Photography is an enormous, multifaceted industry that ranges from portrait and product to macro and landscape. As photographers, we owe it to ourselves to learn as much as we can about each specific genre of our trade. Even if you only shoot weddings or cars, it’s important to learn and practice new techniques, which will allow you to hone your skills and can keep you out of creative ruts. Recently, I have had the opportunity to take on several types of shoots that I either have never done before or have had very limited experience with.
In December, I was approached by a friend at DailyBurn, a leading health and fitness site, who was looking for a food photographer and wanted me to point him in that direction. Even though I had limited experience in shooting food or products, I offered him my own services to shoot their upcoming vitamin and nutrition shake line, and he was willing to give me a chance and let me run with it.
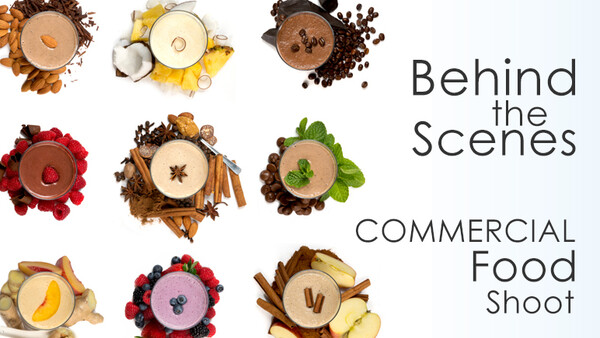
Prior to him contacting me, the only experience I had with food photography was a few years back when I shot for the NY Post. It was some simple dish platings at a few restaurants in Manhattan. Those shots were quick and easy, mostly using window light or a single flash bounced into a couple cards to provide a nice even fill light on the entrees. I knew DailyBurn's shoot would be much more involved and I began planning immediately. I needed to hire a food stylist, reserve a kitchen studio and go shopping for the props, glass and silverware based on the moodboard that DailyBurns's art director, Emily Duong, provided. The shot list Emily provided basically consisted of standard product shots of the vitamin and shake containers, a massive group shot of produce that make up the vitamin ingredients, and front and top views of each of the 14 shake recipes. No big deal, right?

There were many questions I had to answer for myself when I took this shoot on, so let me walk you through most of the process and hopefully this will help you out soon on some of your shoots. Some of these tips apply to photography as a whole, while others specifically apply to food and product photography. Either way there’s some good info in here that I was only able to really learn by doing it. So here goes.
HIRE A FOOD STYLIST
When shooting food, especially when you're just starting out, the photos, at best, can only be as good as your food stylist. In this case I knew I needed a kick-A stylist and I wasn't going to go with a cheap or inexperienced one. A food stylist can make or break your entire shoot. I needed someone that had (a) shot beverages before, (b) worked with large-scale food shots and (c) had the confidence to do a crapload of shots and recipes in a single day. I reached out to one of my food stylist buddies, and she recommended Melanie Dubberley to me. From the get go I was open and honest with her about my being a dance and portrait photographer and how little I knew about shooting these shakes. But she was patient with me, graciously answered my stupid questions and we really got along in our phone conversations. We collaborated and communicated well and that is half the battle with any shoot, you gotta like and trust your crew. If you have that part covered then you're off to a great start (assuming you know the basics of what you're doing of course).

RENT A STUDIO
Next I had to find a kitchen studio. To be honest, I didn’t have much of an idea what would make a good setting and which studios had good reputations among the food photo circuit, so again I reached out to my food stylist friends. It was a unanimous recommendation, Noho Productions. Even though my friends had great things to say about the place, I still went there to check out the facilities and see what they had to offer (i.e. equipment, odds and ends, space, layout, power outlet locations, what software the tech-stations were equipped with, etc). Scouting your location/studio is very important for ANY shoot. You really need to know how things will be laid out and how your shots will line up before you walk in on shoot day. I can't stress this point enough! SCOUT SCOUT SCOUT! Turned out the studio was phenomenal, and though it wasn't cheap, it was within my budget. There were several obscure things that we ended up needing on our shoot day that the studio already had there for us to use and that saved me and my team a lot of time when all was said and done.
PLAN OUT YOUR SHOTS
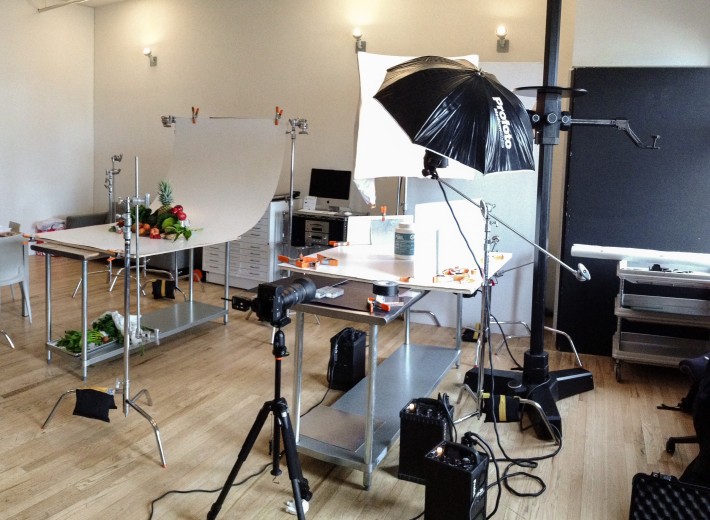
HURRAY! I finally had an awesome stylist and a fantastic studio lined up, now what do I do? Time to work on my shot list and mapping out how the shots will be done. I decided to go with white, matte-finish Formica for the tabletop and the background with a subtle horizon for the main shots. Thankfully, the studio already had those available in 4'x4' and 4'x8' sheets (again, glad I scouted and didn’t have to haul all of that through NYC). I was also set on using a large softbox behind my subjects as the key light for the shakes and packaging shots, but wasn't sure if I would just be able to use boards to bounce the light back onto the front for fill, or if I would need another strobe in the front as well. So I had a bit of uncertainty there, but not much to worry about.
For the large fruit and veggie group shoot I used another 4'x8' white Formica to form sweep (like seamless paper would be used on a portrait shoot) and just lit the group of fruits and veggies with 2 white umbrellas, 1 on the left and 1 on the right to provide even soft lighting across the scene. These are the basics of how the shots were setup. More details covered below, keep reading.
GEAR TALK

CHOOSE A SOLID TRIPOD
I knew this shoot required a 2 camera setup, 1 camera for the front view of the shake and it's recipe’s key ingredients, and another mounted above for a top view. A lot of thought went into which tripod I was going to use for the main front shots because I was going to need the tripod to stay perfectly put the whole day with a DSLR and a heavy 70-200 lens on it. I have several tripods but I ended up going with Vanguard ABEO+ 323CB because it is carbon fiber (tough and lite-weight) and it has very wide rubber feet that are super easy to secure to the ground. Also, it's center column is much more stable than others I own or have used, which would need to remain sturdy for the entire day even if was extended high up from the collar of the tripod. The other "tripod" I used was for the overhead shots, which was a behemoth Foba Asaba camera stand.
SELECT YOUR LENS(ES)
On this shoot I didn’t really need to think too hard about this. I knew I would use my 70-200 the most for all the main front view, packaging and vitamin ingredient shots. Shooting at 200mm would give beautiful compression and help pull off that subtle horizon I was going for with the separation of the tabletop and the background. For the overhead rig I went with my 24-70 zoomed out to 70mm to get a good crop and to fill the frame with the shake and its key elements. I didn't bring a macro lens (which is typically a good thing to have on a food shoot) because the 24-70 has a very close minimum focus distance (less than a foot) and I knew that was going to be enough (when paired with a 36MP Nikon D800) if it came down to doing some close shots. Easy peasy.

KNOW YOUR GEAR
Whatever you shoot with, it's very important that you know your camera inside and out. Making fast setting changes, knowing the strengths and weaknesses of its sensor, sync-speed, how the body interacts with whatever lenses you're using, what focusing mode is best for what you’re shooting ... these lil' bits are VERY important. The studio I shot at had PhaseOnes available for me to use, and I oohhhh so wanted to take advantage of that, but no way could I go into a shoot without ever using the camera system. My confidence would have totally diminished, and it could have been a disaster. Any art director would have shut that shoot down in the first few minutes after watching me chimp around like a moron with a camera that speaks a different language.
It's not just your camera though that you should have a thorough knowledge of, know your lights, know your tripod, know how you're going to tether if you choose that route. Know your triggers, know your editing software. Just please, PLEASE, for the sake of humanity people, KNOW! YOUR! GEAR!
CREATE A FUN, RELAXED ATMOSPHERE
Just to touch on this a bit, earlier I wrote about how a team working together and communicating well is key. Your demeanor/attitude/vibe needs to facilitate that. Have fun, don’t get into petty discussions or tiffs and don’t talk politics and religion. Just have a good time doing what you love to do! If you're producing and shooting keep things light hearted and make sure everyone is happy. Have food and drinks available from the start (hungry, undercaffeinated creatives are grumpy creatives), have chairs or a couch out where you're shooting if possible so people can get off their feet now and again, and don’t sweat the small stuff. However don't mistake that as me saying don't lay down the law. If people aren't doing their job you need to get them into place, but don't embarrass or harass them in front of the rest of the crew, as it could have the opposite effect and make them lazier and/or ass-ier (yes, that is a word).

ARE WE EVER GOING TO TALK ABOUT HOW TO TAKE FOOD PHOTOS?!
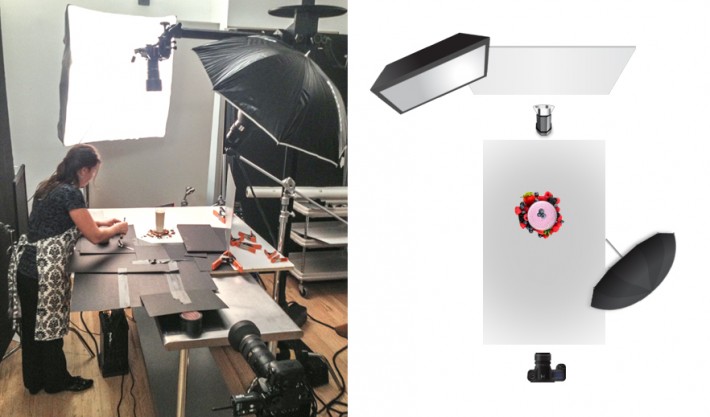
Okay, you've hung in so far and I'm proud of you, let's get down to the lighting and food photo-ing. Typically - not a law - but typically, when shooting food your key light comes from the back and you build a wall of bounce boards (white or silver) around the food to bounce the light back onto the subject to create a nice soft even light that isn't crazy specular (wont cast hard shadows all over the table or on the side dishes, etc). In this case though I did a hybrid setup (see photos below). I built the fill wall around the subject, in this case a shake in a glass and its key flavor elements for it's recipe, but I was getting a ton of white reflections from the table on the shiny glass which washed out the detail of the glass's contents. So my trusted assistant, Sam Prestel, and I essentially covered the entire foreground of the table in blackboard so that the white reflections were now black reflections, which allowed the contents of the glass to really be seen. However, all that black sucked a lot of light away from the fill we were trying to create as could be expected, so we removed the white fill that wasn't making any impact and raised a small white reflective umbrella overhead to make up for the lost fill.
THINGS TO WATCH OUT FOR
As I just addressed, shooting reflective materials can be tricky and present many obstacles as the shoot progresses, even if things stay relatively the same. Many times throughout the shoot, Sam and I had to fix some random silver speck or black line had appeared on the glass due to things moving around in the back or front of the studio. Light stands, people standing behind the camera, a gator clip left near the table while changing out shakes or ingredients … truly nuts how the last thing you’d think would be causing a reflection. Once you find what is causing it you just remove it from the equation or cover it with black tape.
PATIENCE IS A VIRTUE
Even though Melanie our food stylist was killin’ it, cranking out shake after shake, sometimes the ingredients just wouldn’t cooperate. Peaches fall over, water spritz get on the edge of the glass, your assistant eats all the chocolate chips before you can pull focus and fire the shot… you know, unavoidable things. There’s no need to get butt-hurt, just keep your composure, laugh it off and relax. Even if you’re 3 hours over on your studio rental and still have 5 more shakes to shoot, haha. It’s not worth it to get stressed, you’re all in the same boat may as well make it enjoyable, right?

DOUBLE CHECK, QUADRUPLE CHECK
Shot list. A list of shots. That you need to get. Baby that freaking sheet of paper or email or Evernote, wherever you keep it, PAMPER YOUR SHOT LIST! Your client hired you and is spending their hard earned money because they trust you to get everything that they need you to capture. Even though Melanie and I were constantly checking the list, I would have a look at it with Emily just so she was confident that we were getting everything and that she knew we were taking care to get the job done right and get it done 100%. I would imagine that if I were an art director I would want to see everyone sticking to the plan that I and my company laid out for us to do. It should go without saying, but check and check again.
TETHER BALL
So, I rarely tether when I shoot because my main love is location shooting, and it would slow me down mucho. I like moving fast and getting as many angles as I can when I am shooting people (portraits, of course), but studio work like this needs to really be examined on a larger screen and by more people than just the back of your camera’s screen can allow. Also, it’s nice for me to stand at the camera and get a yay or nay before I even see the photo myself. A good art director can a lot of times see the photo better than you can because as photogs we can miss things that someone who didn’t set up the lights and hit the shutter can see. Also, it’s nice to have color correction and exposure adjustments on the spot :)
Color Ain’t Nothin But A Thing
Speaking of color correction on the spot, it’s pretty important to have some sortof 18% target. Personally I use the X-Rite Passport, I love that thing. It not only has a bunch of shades of grey for warm or cool tints it also has a ton of colors that your retoucher or you yourself will love you for using something like this. The color of food is very important, a little much green can make meat look nasty and too much warmth can make your nice green veggies look old, and not as fresh as they were. Color is very important with food, do I need to say this again? Also, please calibrate your screen before you start editing. You don’t have to be crazy about it (a retouching angel just lost it’s wings somewhere in retouch heaven, I know) but assuming that someone at some point will look at your images in print or publish your photos, you want your final shots to look beautiful on more than just your mom’s 1998 Packard-Bell monitor.

I am pretty much out of advice and snarky remarks for now. If you made it through each and every one of these 2,731 words you are an impressive human being and I respect you. Also, thanks for reading. I stopped writing this like 1,500 words ago, and outsourced it to my friend Maruf in Bangladesh. I don’t know how you made it but hopefully you learned something, even if it was “How not to write a blog article”! If you have any other questions about the shoot or just in general, ask me on FB or Twitter or you can shoot me an email through my website www.CoreyMelton.com Cheers and happy shooting!
Images used with permission from DailyBurn
Join the Fstoppers community for free
-
Post comments and join in the discussions
-
Browse the site ad-free
-
Share your work and get featured in the community
-
Compete in the photo contests for fun and prizes
15 Comments
I very much enjoyed this post sir thank you for sharing !!
Thanks for the article. I enjoyed the thought processes that you went through. For some reason Maruf's part was better than yours. ;)
Glad you guys enjoyed it, thanks for reading
I really enjoy articles like these that describe the entire process from planning to shooting (Even though I don't shoot food photography!) Nice work, and do keep Maruf handy ;)
Maruf is the man!
Ți s-a sculat lindicul mare
Pe care-l porți între picioare.
Și te întreb, iubita mea,
Dacă o muie ți-ar plăcea.
i get this all the time :)
Great write up Corey!
thanks Mike :)
Excellent post, thank you
Great post Corey! Like Jeff M said, I love that you were very thorough with your article. Even though you may think that 2,731 words might be excessive, its the amount of detail that I really liked (including the parts that aren't just the actual photography).
Keep up the good work!
thnx much, I truly appreciate the input!
That was awesome.
thnx dude!
I know it is some what off topic, but it would make me really happy if the food industry was held to some standard as far as the photographs of their food. Most of the time the food that you get does not even closely resemble what is advertised. But alas, what an you do. It does make me feel good that they actually take pictures of the food though. I cannot remember where I was, but I saw a chicken sandwich and a hamburger photographs, then I started looking at the bun, then the condiments. The meat was just simply photoshopped in. I tried pointing it out to my wife, it was funny to me.