
From a retouching standpoint, there are few things more unpleasant or challenging than dealing with chunks of hair on the face, missing patches of skin texture and large folds of skin. Generally the existing tools in photoshop such as the healing brush or patch tool fail in these situations and we often end up with unnatural or unpolished results. When all else fails I often turn to a technique called texture grafting to deal with a multitude of issues.
What the Heck is Texture Grafting?
The idea behind texture grafting is to utilize the power of frequency separation and tackle a problem by gradually replacing texture and then blending tones and brightness to recreate a realistic appearance. Now this is a more advanced technique and involves four stages:
- Step 1: Separate the image into high and low frequencies with frequency separation
- Step 2: Replace areas of missing or undesirable texture with areas of good texture
- Step 3: Blend the underlying tones
- Step 4: Add polish with dodging and burning
For the sake of brevity I assume you're already familiar with frequency separation as well as the basics of the dodge and burn technique. If you're not, click on the corresponding links to the topics mentioned above for an in depth explanations on both. I also recommend reading my article on the Keys to a Great Retouch for a lot of the retouching foundation theory you should understand. While all this may seem complicated, by breaking down a problem into stages it actually becomes quite simple and intuitive at each stage. Steps 2-4 deal with issues as follows:
- At step 2, fix texture issues and ignore the underlying color and brightness
- At step 3, blend the colors and get brightness somewhat close
- At step 4, take care of any remaining brightness issues by shaping the area and making everything flow together
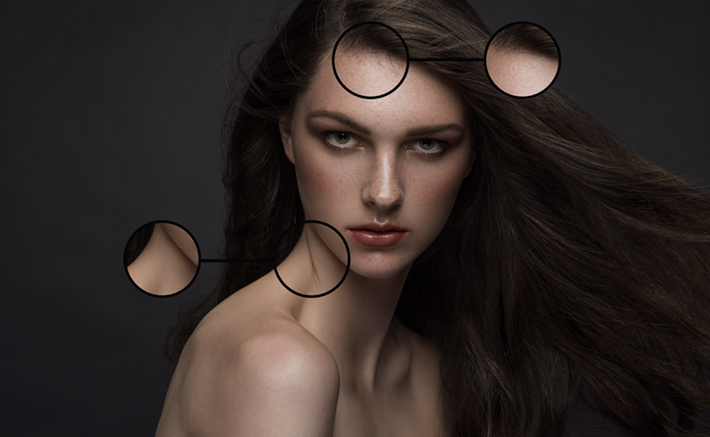
In the corresponding video I demonstrate tackling the two problem areas shown in the image below from start to finish to give you an idea of how the technique can be applied. Once you master the process, you'll see that it can be used for a variety of scenarios which are discussed below. As with anything it does require a bit of practice before you get things looking perfect.
Other Uses
One of the easiest problems to fix using this technique is that of missing or inconsistent texture on the cheekbones, nose or forehead (as shown in the animated gif below). Be creative with your selection of source texture such as grabbing texture from the other side of the face and flipping it, or by doubling up existing texture to multiply its intensity. Be sure to sample areas of similar texture as different areas of the face will have different texture depending on a number of factors. Take a look at my detailed discussion on texture in this article.

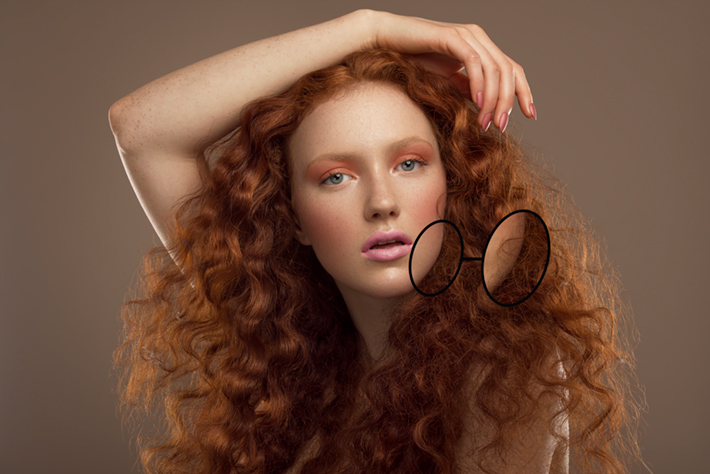
Another approach is to fixing challenging areas by grafting texture from a completely different image. In the below example, I took the texture of the jawline (covered by hair) from another image and applied it to my destination image and blended the tones. The source image was shot at a slightly different angle and the tones didn't quite match up, but the texture was similar. Using the free transform tool to fit the texture into place and a bit of painting, I was able to deal with this tricky area in just a few minutes. If the image was shot relatively straight on, you can also grab the texture from the other side of the face, flip it and then blend the tones accordingly.
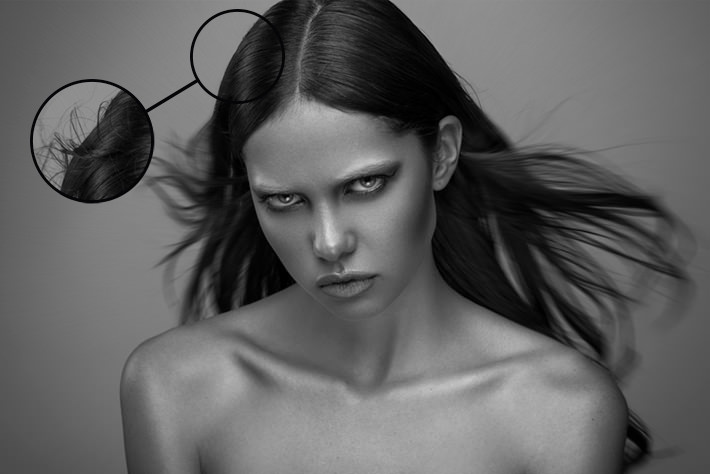
Finally, we can deal with issues within the hair itself as I've done in the image below. Here I took the texture of the straight hair, free transformed it, and covered the crossing hairs and blended the underlying luminosity (since it's B&W we have no color to deal with) using the same process described in the video. Be prepared for multiple iterations for problems like this, and given that it's one of the most difficult cases, I recommend practicing on some of the simpler situations described above before tackling it.
Once you begin to see the image as two separate frequencies you'll be amazed at how much you can do by extending the common frequency separation approach into the workflow described in the video. It's not something you'll have to do in every image but when you've exhausted all your other options, texture grafting can come to the rescue and produce clean and natural results.
Connect with me here: Michael Woloszynowicz | Facebook | YouTube | Instagram

Join the Fstoppers community for free
-
Post comments and join in the discussions
-
Browse the site ad-free
-
Share your work and get featured in the community
-
Compete in the photo contests for fun and prizes
12 Comments
This is awesome Michael, it's really cool to see that I've actually used this technique on my mentorship image :D
How come when I use lasso to make selection from my "H Copy" layer it just copies the texture?
H only has texture. That's the high frequency (texture) layer. A copy would only have the same info.
You have that layer selected when making a selection - lasso> copy ( a portion of the "good skin") to new layer >clip>transform>, then mask in. I must be missing something. But, thank you for taking the time to reply. :)
great stuff
Very useful as always. Thanks Michael
I loved it, thank you Michael!
Awesome as always Michael. It's articles like these that really make fstoppers worth visiting. Keep it up!
This is very cool, first time I've heard of this. Can this technique be used on any photo?
Nice post and pictures. Its really good to see that I actually used this technique on my own skin texture and its really good and my anti ride problem is removed. for more infohttp://www.liftblue.com
Another brilliant article Michael!
This video was so so useful!! I used this thecnique in my latest works (one is my profile pic) and it really saved my day.
I'm basically a self portrait photographer and I do the makeup myself so it's far from perfect. I do a lot of work in post and texture grafting was really game changing for me. Thank you!