For decades, color slide film was the industry standard for commercial and editorial work, and the speed of the film was typically 64 or 100. It was standard practice for a portrait photographer to use a high-powered strobe to illuminate the subject. Today, a digital camera can produce clean images at high ISO settings and allows the photographer to forgo strobes and instead illuminate the subject using lower-power continuous light units.
This article will detail three ways in which continuous lighting is superior to strobes for portrait photography. This is not to suggest that continuous lighting is a better choice than strobe lighting for portrait photography. Both methods offer unique benefits. An article titled, “3 Ways in Which Continuous Lighting Is a Poor Choice for Portraiture” would be just as valid as the article you are about to read, and perhaps you will see that one on this site soon.
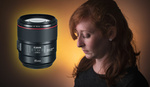
Photography by John Ricard. Sony A1.
Continuous Lighting Gives the Subject Brighter, More Colorful Eyes
In portrait photography, we want to draw attention to the subject’s eyes, and we can use artificial lighting to accomplish this. Often, we use a reflection of the lighting itself in the subject’s eyes to help draw attention to the eyes. Many photographers have a preferred method of arranging their light modifiers to produce the style of catchlight they desire in their images.
Often overlooked by photographers is the relationship between the pupil and iris and how we can use this relationship to draw attention to the subject’s eyes. Everyone we photograph has a black pupil that varies in size depending on the ambient light in which we are shooting. As the pupil enlarges or constricts in reaction to the ambient lighting, the iris conversely constricts or enlarges. If the subject has bright-colored eyes, this effect can be very noticeable. If we want to call attention to the eyes, it would be wise to photograph the subject when the pupil is small and the iris is large. Soft, continuous lighting is ideal for creating these conditions, and the resulting portrait has a look that simply can’t be replicated by shooting in a room lit by standard ceiling lighting.
The Westcott Flex Kit that I use for my headshot photography is substantially brighter than any ambient room lighting. The lights are so powerful that my lights are typically set between 35-40%. If I were to raise the power any higher, the subject would have to squint. At my moderate power setting, the lights are bright enough to shrink the pupil and enlarge the iris, which results in portraits where my subjects have bright, colorful eyes.
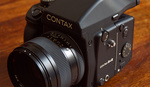
Photograph by John Ricard. Nikon Z7 with 85mm f/1.8S lens.
Continuous Lighting Provides a Valuable Real-time Preview of Your Final Image
When shooting with a modern mirrorless camera and continuous lighting, you are viewing the final image in real-time. You can see where the shadows and highlights appear on the face. If the color temperature of your various lights is not the same, it will be apparent. If your continuous lighting is arranged properly, your subject will look beautiful, no matter how unflattering the ambient lighting may be. By contrast, if you set up strobes in a typical, dimly lit corporate office, the subject may appear to have a green tint or dramatic shadows on their face while you are shooting. You won’t be able to tell from looking at the subject if your lighting is arranged properly. The only way to determine this will be to take a photograph and review it on your camera or laptop. It can be a touch disconcerting that the image you are viewing in real-time doesn’t look at all like the actual photograph on your laptop. This isn’t a major problem, but having used both strobes and continuous lighting for portrait shooting over the years, I can assure you that it is preferable to photograph the subject while they are lit exactly as they will appear in the final photograph.
Continuous lighting also makes it easy to make both minor and major adjustments to the lighting setup. If the subject moves out of the sweet spot you will be aware and it will be a simple matter for you to move the subject back into position or adjust the lighting. Once the subject appears to be lit correctly you can shoot with confidence knowing that the final image will be as beautiful as the scene in front of you.
Strobes are often equipped with modeling lights that are designed to simulate what the subject will look like in the final image. While these lights can be useful when you are arranging your setup, the modeling light is not an accurate representation of how the final image will look. When using strobes, you will need to take a series of test shots to determine if the lighting has been set up correctly. This is time-consuming for you, and you won’t know the effect of each adjustment until you take a photograph and review it.
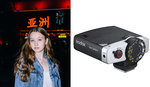
Some continuous lights, such as the Amaran 21c, can illuminate the subject in any color you desire. Rather than buying gels and placing them over the flash tube on a strobe, you can simply dial in the color (and the intensity of that color) of your choice. Some lights can be set to cycle through a series of colors so that each time you take a photograph the subject or background, it has a different color palette. This allows you to create dozens of noticeably different images with ease. This is simply not possible using strobe lighting.
Photograph by John Ricard. Nikon Z7 with 85mm f/1.8S lens.
Continuous Lighting Makes It Easier To Capture Natural Expressions
When a strobe is fired, there is an audible pop from the flash tube going off. Many strobes beep after each shot is taken to indicate that the strobe is ready to fire. When I am working with strobes, these sounds sometimes ease me into a rhythm where I am firing the strobe at a predictable interval of 1.5 seconds or so. As my trigger presses become predictable, so too do the subject’s poses, and it becomes more difficult to capture an authentic moment. When shooting with continuous lighting, the mood is quieter and subtler. While there is a mental adjustment that the subject must make to become comfortable under the relative brightness of my continuous lighting, I find this only takes a minute, and then, they are comfortable for the rest of the shoot. Because there is no flash tube to fire when I press the shutter button, the subject is less aware of when I take a photograph. When I use continuous lighting, I find myself talking to the subject more, and I increase my chances of capturing an authentic expression.
Continuous lighting also allows for shooting multiple images quickly. If the subject is laughing or telling a story, you can fire at will. Using a program like Photo Mechanic, I can cull through thousands of images quickly to locate the single image where the subject’s expression looks correct. This isn’t possible with strobes, since the lights typically require a moment to return to a full charge after each firing. It is also hard for the subject to feel natural when a strobe is firing dozens of times in just a few seconds.
If you are an experienced natural light shooter, you may be familiar with some of the advantages of continuous lighting detailed here. Natural light can certainly be beautiful, but the ever-changing nature of this light means you will always have to make exposure adjustments. It is also difficult to match natural light exposures taken over a period of hours or days. Using continuous lighting, it is possible to develop a consistent look and color in your images no matter what time of day or what location your shoot might take place in.
If you have a preference between strobes and continuous lighting, what are some reasons that you prefer one over the other?
John Ricard is a NYC based portrait photographer. You can find more of Ricard’s work on his Instagram. accounts, www.instagram.com/JohnRicard and www.instagram.com/RicInAction
Reply for george andrews I should have been more precise in my language. I wasn't trying to say Peter Hurley is the first person ever use a triangle setup for lighting. I was trying to say I don't think anyone has ever used the specific triangle lighting setup that Peter uses. This setup is an isosceles triangle and is rather tricky to learn. It works for headshots only because it creates a really small sweet spot of light about 1 foot away from the lights. In Peter's group, this is know as the point of convergence. If the subject is 2 inches too close to the light or 2 inches too far away from the light, then the shot doesn't look right. It's a setup few photographers would chose to use since it really prohibits the subject from having any freedom of movement. And, according to comments in this article, the catchlights are terrible. So I think it is unlikely that Douglas Dubler was using this particular triangle light setup. I did a quick Google search and could only find 2 bts style photographs and neither showed the triangle setup. You Tube was also lacking in bts footage that revealed anything about him using a triangle setup.
Yes Mike you will thoroughly enjoy his work but especially he critically explains the whole setup of all of them. On facebook group art of portrait photography he posts them so search Douglas Dubler, or his main facebook page or his portfolio online. Let me know how you like it.
OK, so I went and joined the group. Then I searched for posts by Douglas Dubler. I saw some truly fantastic images. Images that would be great today, but were even more remarkable because he was often shooting on film and wasn't able to preview exposure as easily as we can today. He's a great photographer and it's really cool that he is sharing information so freely in that group. He'd make a great writer for this site.
That said, I looked at over 35 posts and I didn't see any mention of a triangle, nor did I see any images that even remotely resembled the Peter Hurley triangle setup.