As you may already know, I spend a good deal of time polishing my photos in post production and have taught retouching in Photoshop for some time. A few months ago I made the move from Lightroom to Capture One and haven't looked back. To test out it's power, I decided to see just how close I could get to my portrait retouching style using only Capture One Pro 8 and forgoing Photoshop entirely.
Since I've started using Capture One, it served primarily as a raw preparation tool and still completed all my retouching inside of Photoshop. As I began getting more and more familiar with it, along with the recent release of Version 8, I began to discover just how much can be done within it without having to resort to Photoshop at all. This tutorial is meant to give you a framework for more in-depth portrait retouching and show you just how powerful Capture One's local adjustment tools can be. I'll be spending a good deal of time on Dodging and Burning which utilizes the same theories and concepts I teach in my Fashion/Beauty Photography and Retouching tutorial, but we'll be applying them using the tools that exist in Capture One as opposed to the curves based approach I typically utilize in Photoshop. If you're brand new to Capture One, be sure to check out my Getting Started video to get you up to speed.

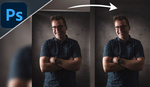
From raw file to finished edit in Capture One Pro 8
To summarize the overall workflow, I recommend the following progression of steps in order to reduce the computing power needed by Capture One:
- Perform basic exposure and high dynamic range adjustments
- Dodging and burning using local adjustments
- Additional local adjustments for detail recovery, eye brightening and sharpening, cloning or healing, color correction/matching, etc.
- Spot healing tool for any leftover blemishes
- White balance adjustments
- Color grading
- Vignetting, grain and other finishing tools
While Photoshop will remain as the tool of choice for high-end, polished results like those demanded in beauty photography, I was genuinely impressed with how far I was able to take a portrait retouch while still reaping the benefits of working entirely out of a raw file in a non-destructive manner. For portrait work such as this, Capture One will definitely form a greater part of my retouching workflow as it presents a number of benefits over Photoshop for certain types of work. The most notable benefits are those of portability, flexibility, and reusability. Unlike working in Photoshop, all the adjustments we make are maintained in a single metadata file that accompanies the original raw file. As a comparison, a similar 16bit Photoshop file will be in the realm of 200mb to 800mb, while the Capture One metadata files total around 12mb for this retouch. Another advantage is that all the color grading can quickly be replicated across a series of photos to achieve a similar result, with only the dodging and burning needing to be redone for each image.

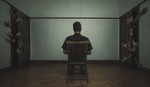
Editing with Capture One Pro 8 only on an IQ140 file, single exposure
In the above image I decided to experiment further with local adjustments and see how much detail I can pull out of the sky. To stylize it somewhat, I created a bit of lens flare with yet another local adjustment and a few simple sliders. Once you begin to look beyond the label of each slider and experiment with the tools, it opens up a startling number of possibilities and the power of the software really starts to shine through.
Although I'm not advocating that you abandon Photoshop entirely, what I do encourage is that you spend some time exploring the capabilities of Capture One - particularly the local adjustment tools - and get as much out of them as you can before diving into an external editor like Photoshop. It just might surprise you as much as it did me.
You can connect with me via the social media links below.


Michael - I'm also really excited with the new heal and clone layer features, instead of C1 7's workflow of convincing me that the subject didn't REALLY need retouching ;)
Thank you SOOOO much for this! I had been on LR for years, but just won a copy of C1 and have been trying to transition. This is exactly what I was looking for.
hi Michael,
i saw in you video: nikon raw v2 and 50iso
if i'm right, your using your d800 at lo1 (50iso)
Do you use Lo1 a lot ?? and its ''virtual'' 50 iso do you lose any quality??
Mike this was awesome, I never would of thought you could D & B with C1. I'm a LR user but thinking about C1 a little harder after this new revaluation. Thanks Michael
I also was surprised when I made the move to Capture One. Although it took some time to adjust, I'm quickly learning the power behind it. Nice article/video Michael! Also, awesome job on Cydney's photos. Nice to see some local Saskatchewan represent.
how comes that you are talking about retouching when it s about color grading ?
Very interesting - thanks
Hey Michael I have a question for you concerning C1:
I wanted to switch to C1. I am using it for tethered shooting quite a while. That works (mostly well) if it does not lose the camera signal once in a while. Still v8.1 is a little buggy in the respect.
BUT in postproduction I love the skin tone rendering. ACR seems mostly crappy for this kind of work. To orangy and flat.
But in order to incorporate C1 into my workflow I had to change it drastically.
Normally I do as much retouching (dust, pimples and so on) as I can in the raw processing stage. I then convert it in ACR to a smart object so that I can go back in the raw file inside Photoshop and redo e.g. my color temperature and I am not losing all of my basic retouching which would have a different color or texture if I changed the smart object beneath. Although the files get really big that proves to be the best workflow for me.
Now I tried this in C1 to a degree. And - aside from the fact the each export to Photoshop generates a new PSD file (which I put in the trash immediately after I dragged it into the main retouching file) - that works quite well. Although I find the usage a little cumbersome (you only have circles compared to ACR) and to change size with right mouseclick the window directly appears over the section you are just editing with the tool. Why is there a window anyway. In ACR you just drag your mouse and the brush gets bigger/smaller. Whatever. ;)
In C1 I LOVE that you retain the texture of the skin when you remove the spot. That is way better than ACR.
->> BUT I saw that C1 v8.1 still has a limit of 100 dust removal spots!!!!
Which I find rather stupid. If you have a dirty sensor and a model with bad skin 100 removal spots is a joke. I mean, it is only metadata. So memory should not be a problem.
My only workaround right now is that I make spot/dust removal (e.g. in the face) then I make a "clone variant" remove all the 100 removed spots and work on a new area (e.g. background) until I reach another 100. Then I have to process/export 2 PSD files to Photoshop. But this is quite a stupid process if you decide to change something in general on the image.
Do you know another way to avoid the 100 limit ? Or do I just have to wait for several updates in the future ? Maybe you know a trick or even heard something from PhaseOne...
That is my biggest throwback with C1. Apart from its idiosyncratic UI.
best regards
It's a great software, but I prefer PaintShop Pro. I first started with retouching following this tutorial http://www.paintshoppro.com/en/pages/retouch-photos/ and now I got used to using PaintShop Pro for my edits. :)
There I was, blissfully removing spots in a Capture One Pro 10 demo version from an archival photo, when suddenly the tool stopped working.
"What the hell...?"
Then I discovered -- there's a 100-spot LIMIT on dust/spot removals.
Why the 100-spot limit? Why not 147, or 214? Is the limit to save wear-and-tear on the Spot Removal tool? Help users meet deadlines by moving them on to the next operation?
Rationing spot-removals seems awfully short sighted. Guess I should be prepared for limitations in other Capture One tools too.
I too have a limit...for poorly implemented tool design.