I am continuing my series of articles about creating stunning Beauty portraits and I would like to talk about on location lighting today. Please note that not only are we talking about advertising Beauty photography, examples of which you may see in the cosmetics section of a department store, or in fashion magazine ads, but we are also talking about simple female Beauty portraits that many of you are probably often hired to photograph for your female clients locally.
I personally love Beauty images photographed with natural light as well as with studio lighting, and normally my choice of lighting will depend on the following circumstances.
Location: Outdoors
If it's a private client photo shoot, and we're shooting at my client's home or at an outdoor location, I will normally bring my lights and a portable power source (just in case), but will shoot with existing light and my favorite light modifier - silver reflector - whenever possible.
Shooting with natural light allows me to open up the aperture and create that wonderful softness in the frame that makes Beauty images so gentle, delicate and feminine.
I always try to have at least two light sources for any beauty portrait - it helps me to create more depth and volume in a 2-dimensional image.
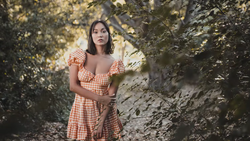
When shooting outdoors, I use my 40" (101.6 cm) reflector as key light by placing my model so that the sun is behind her (no direct sun light reaches her face) and bouncing the sun light onto her face and body off the silver side of my reflector, like in the two following images.
Note: in this article I will not draw arrows on my photos to show you the direction of light, because if you studied my articles on how to "read light" in photography, and have been practicing since, you will have no problem understanding where the light is coming from and how soft or hard it is. If you haven't read the mentioned above articles, I strongly recommend that you do that before you go on:
How To “Read” Light In Photography – Part 1
How To “Read” Light In Photography – Part 2
Photographed on a sunny day:

Photographed on a hazy day (no direct sun light):

Location: Indoors
When shooting indoor on location, I always search for a spot where I can place my client or model between a couple of existing light sources. I arrange it in the way that one of the light sources (usually the larger one) will be the key light, and the other one will either add rim light and separate my subject from the background, or simply add interesting detail in the background.
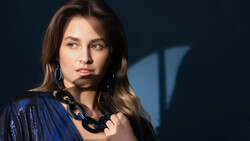
The following portrait was photographed in a coffee shop in Moscow, 2010. My friend, internationally published professional model Elena Fomina, was sitting at our table facing a large window, which was behind me, slightly on my right.

The lights in the background are simple wall lights inside the coffee shop. Not only did they add interest in the otherwise completely dark background, they also threw some warm rim light onto my model's hair.
In the next picture, the adult movie star Dani Daniels and I were shooting at my home. I placed her right by a large window (on my right) while the light from the windows in the kitchen were filling in the shadows (on my left).
Wide open aperture (f/1.4) allowed me to use the ambient light and not have to add flashes, which always take away the softness that you can only create with natural or continuous lights:

The following portrait was photographed at my client's home. I placed her in front of a large glass wall (behind me, slightly on my left), but to add dimensions, volume and interest to this photo, I fired a flash into a nearby wall behind the subject on my right:

In the following portrait, my beautiful friend, Australian singer and songwriter Tyla Bertolli and I were shooting in my home in Melbourne, Australia. I sat Tyla right under a small window in a bright room and fired my flash into a wall behind me, slightly on my left.
So, the key light in this photo is the diffused light bouncing off of a large bright wall. The highlights, which you can see on her cheek and her beautiful hair, is the light spilling down from the window behind her.

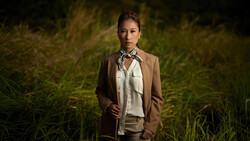
Similar lighting setup where I added an artificial light source as key light and used the ambient light coming from the window as rim light is in the following image, which you've already seen in my previous article about Framing & Composition.
In this particular setup I was able to add interest to the photo by using a continuous light source (warm key light) instead of a flash, which allowed me to open up the aperture wider to achieve shallower depth of field, and create the softness throughout the frame just like I love. Plus, the day light pouring into the room through the window was of a higher color temperature than my continuous light source, which helped me to get this beautiful combination of cool and warm colors.

So, as you can see, there are plenty of variations as to how you can set up your lighting for indoor and outdoor Beauty photography using artificial and natural light. It is even possible to create beautiful lighting with just one reflector!
Key Takeaways
The main few elements that are consistent throughout all of these lighting situations and examples are:
1. You can always see the catchlights in the models' eyes. If both eyes are visible to the viewer, the catchlights should be in both eyes in most situations. Catchlights is what makes human eyes alive, attractive and interesting in photographs. When you are placing your model and the key light, keep this in mind and it will help you make correct decision as to how to adjust the model's and the key light's positions in relation to one another.
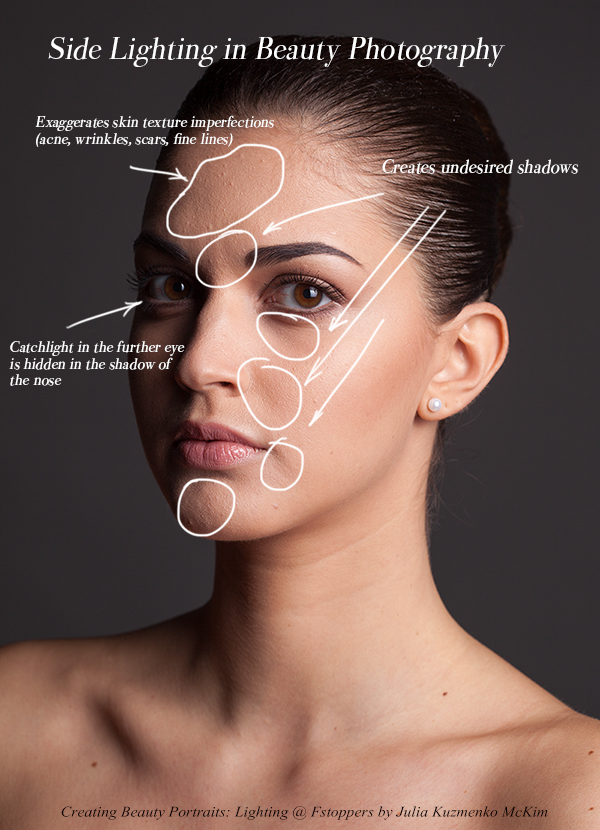
2. I never use side light when creating female portraits. Unless you are dealing with a model with flawless skin, amazing bone structure and ideal weight, side lighting will be unflattering for most women. The older, more overweight your client or model is, and the less perfect her skin texture is, the worse the effects of the side lighting will be.
Place the key light not too far from yourself to your left or right and tell your model to make sure that she sees it with her both eyes at all times. That way as soon as she turns away from the main light far enough for her nose to cast a shadow over her further eye, she'll know she needs to turn back towards the main light.
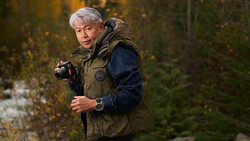
Check out this picture from my recent Beauty Photography workshop in Umbria, Italy (organized by Marianna Santoni), it will help you to understand what I mean when I say that side lighting isn't flattering for female portraits:
3. Prime lenses, wide apertures. Whenever I shoot on location I almost always choose prime lenses, open up the aperture as wide as I can and shoot with ambient light adding artificial light sources only when I need to add rim light or fill the shadows. Note: I normally don't go below f/1.6 if I want model's both eyes to be in focus.
4. Shallow depth of field and soft light help make retouching easier. Shooting with softer (diffused) natural light and wide apertures is also very helpful when you are shooting a client with aged or problematic skin (acne, scarring, etc.). Shallow depth of field will help you "hide" the flaws on the skin by making them less contrasty and sharp, and diffused light will make it much easier to even out the skin texture in post-production.
The same goes for when you don't have a makeup artist on set - soft light and shallow depth of field will trick the viewer out of noticing makeup imperfections and make it easier for you to fix them in post-production. However, it of course will depend on the situation.
5. Focus plane. When shooting with wide apertures move your model and your camera so that you strategically place the focus plane on the areas which you would like to attract the viewers' attention to, meaning, the areas you would like to "hide" should end up in the blurred parts of the frame.
6. Slimming with smart framing. Crop smart leaving the outlines of the body parts such as shoulders and arms outside of the frame, when you need to visually slim down your client.
Hope you enjoyed this article and have learned something new. In my next article I will talk about lighting for Beauty images photographed in studio.
Meanwhile, make sure to check out my Studio Beauty Lighting & Retouching – Where Does Great Photography Start? article on my blog. It will help you get even more great tips out of this series of articles.
Happy shooting!

Join the Fstoppers community for free
-
Post comments and join in the discussions
-
Browse the site ad-free
-
Share your work and get featured in the community
-
Compete in the photo contests for fun and prizes
47 Comments
Another amazing article by Julia... Someone needs a raise. =P
Haha, thanks Bert! Taking a screenshot of this! :D
Julia is the only reason I still follow this site.
Hold my beer while I go Google on Dani Daniels' eyes...
Eyes? You're not fooling anyone, Tam..
She has BIG eyes, I swear.
I stumbled across a vine. Nice eyes she has.
Dani ain't no shy gal :O
great shots!
lmao at the the people who recognized a certain actress.
(myself included, had to do a double take and the comments confirmed my suspicions)
Lol, it is funny that she is recognized by some here ;)
I hope to achieve a better beauty portfolio and thank you julia for this article and series.
Fantastic! I assume they all had professional hair/make-up before the shoot?
Only one of them, Chet: http://fstoppers.com/wp-content/uploads/2013/12/creating-beauty-portrai…
These are amazing! What soft and beautiful photos. Do you use the 50mm lens exclusively? I love the 50mm length for this type of image. I would love to see a 'before' of the coffee shop photo. :)
I love 50mm and use mainly for shoots like this, but I also use my 24-70 2.8 for on location portraits. For studio mainly 100mm, which I'll talk about next time.
ND filters are more like a treat every now and then, but not often :)
thank you for your reply, it's refreshing to see a contributor as involved and helpful as you.
Of course, it's my pleasure!
great article, as usual!
I'm rolling with team #Julia
I'm rolling with team #Julia!! She has definitely helped me create some beautiful work!!
http://lorenzopphotography.com/
Awesomeeeeeeeeeeeee bro!
Thanks for the love Ken!!
Every damn time I read Julia's posts (or ebook) I just wanna go out and shoot someone (with my camera, not a gun).
Good good! You get inspired, that alone is worth the time I put into my writing :)
I need a prime lens and a big window. Stat.
Julia never disappoints!!!
Ahhh.. please lower your expectations, I lose my sleep before my articles get published now :P
Thank you for awesome content yet again, Julia!
i would like to see your retouch and color grading techniques videos. love the colors.
Another very well written article. This is the kind of content that stop FStoppers from being just a news source for regurgitated articles. Very nice work!!!
This Is so Good!! =)
What skin processing technique did you use?
I describe and demonstrate what I do with faces, skin and hair in my ebook with videos: http://www.retouchingebooks.com/shop/mad-artist-ebook/
Some amazing stuff here. Never seen Julia's work before but it's certainly made me a fan. Some great tips in there.
Thanks Rick!
A-m-a-z-i-n-g-s tips. Thank you for sharing your experiences!
I swear your articles are tailored directly to me.... EXCELLENT article
Keep them coming, love to learn from you.
Julia rocks! Thanks :-)
Inspiring!
I've said this before but you continue to be, BY FAR, the best contributor here at fstoppers. I've been here quite some time (really since nearly the beginning) and your work is complete, easy to understand, and provides a fantastic baseline for anybody wanting to take their work to the next level. Always thankful and appreciative of your contributions here Julia! Thank you!!
Thank you Jon! Seriously, comments like yours really make me feel that this is worth the time and effort I invest into writing my articles. Thank you for this!
Great article, I enjoyed it. Can I ask which continuous light you used for that list photo? Thanks!
Amazing! Definitely inspiring.
One of few very informative and to the point articles. Thanks a lot, Julia.
Julia, I just found your Beaty articles and I am totally delighted. I am desperate to go out and take some beauty portraits ASAP!!!
As photographers, we often get lost in our equipment and our technique and don't think about WHO we are shooting. You never, NEVER shoot women the way you shoot men. THANK YOU JULIA for pointing out that your never shoot women sidelit. It is AWESOME on men because all the shape, wrinkles, jaw line are amazing heavily side lit with a little fill but a woman lit light that might strangle you with her own hands. Men and women are different. Physically and emotionally. Women DESERVE softer frontal light. It brings out and accentuates their feminine features. Strong side lighting accentuates character and wrinkles and lines. It makes a man look strong and rugged. Not aware of too many men that are looking for beauty lighting. VERY NICE ARTICLE.