
Coloring outside the lines is a good metaphor for when a photographer decides to take a leap outside the norm in a photographic genre.
It is possible you might face rebuttal from some members of the purist photography community when applying new ideas to your work in the genre, but there is too much creative potential left on the table to limit yourself to only playing by the rules, so I, for one, am a big fan of coloring outside the lines. One example of this is with street photography — a genre I adore. If you really start a debate about rules in the street photography community, you will see “guidelines” brought up in the discussion. Street photography is often done with the understanding that it is meant to be journalistic in nature, and revealing a glimpse at the moment in time in society-at-large with major post-processing is often discouraged (and don’t even think about staging anything!). As a journalist myself, I can really sympathize with this expectation, and generations of epic street photographers have been doing just that and producing images I only dream of taking, but too much thought is placed into the idea of “should I do this?” or “should I do that?” when the correct answer is almost always: do both.
Do both? It seems like such a simple answer because it is. Unless you truly desire the street cred (pun intended a little) that comes with adhering to total photo purism and you’re willing to pass up all the creative opportunities that come with thinking open-mindedly and artistically, the answer has always been to not box yourself in. It was a wonderful realization that my street sessions could and should be a mix of journalistic methods and artistic intent, switching between the two fluidly, and, like fluid, mixing at times in various ratios. If I spend a night in the city, I find myself coming away with more keepers, and now, it's a mix of street photos and what might be categorized as fine art (which had strong undertones of street and cityscape photography).
The mere act of keeping my eyes open for possibilities of both acts is almost like expanding your creative bandwidth, because instead of being open to only one sort of photo opportunity, allowing yourself to think more fluidly when you work will help you see how many opportunities are really at your fingertips. Feeling stymied because your street shots are in a slump? Think about your other options. Nobody ever said you’re only allowed to do one thing.
One of my favorite methods to transform my street and cityscape work is applying intentional blur through various methods. Purists would suggest playing with slow shutter speeds first. After that, they might suggest “intentional camera movement” or ICM as a good option to play with creative methods in urban work, and that is true, but as someone who really enjoys finding how well I can shape a photograph to my artistic vision through post-processing, those are simply two of the tools in my bag. Other excellent methods to apply blur with artistic intent are through multiple exposure (either in camera or via post), and, my favorite, a combination of some or all of them. The nature of tools like Photoshop for artists can be likened to superpowers, especially when applied responsibly.
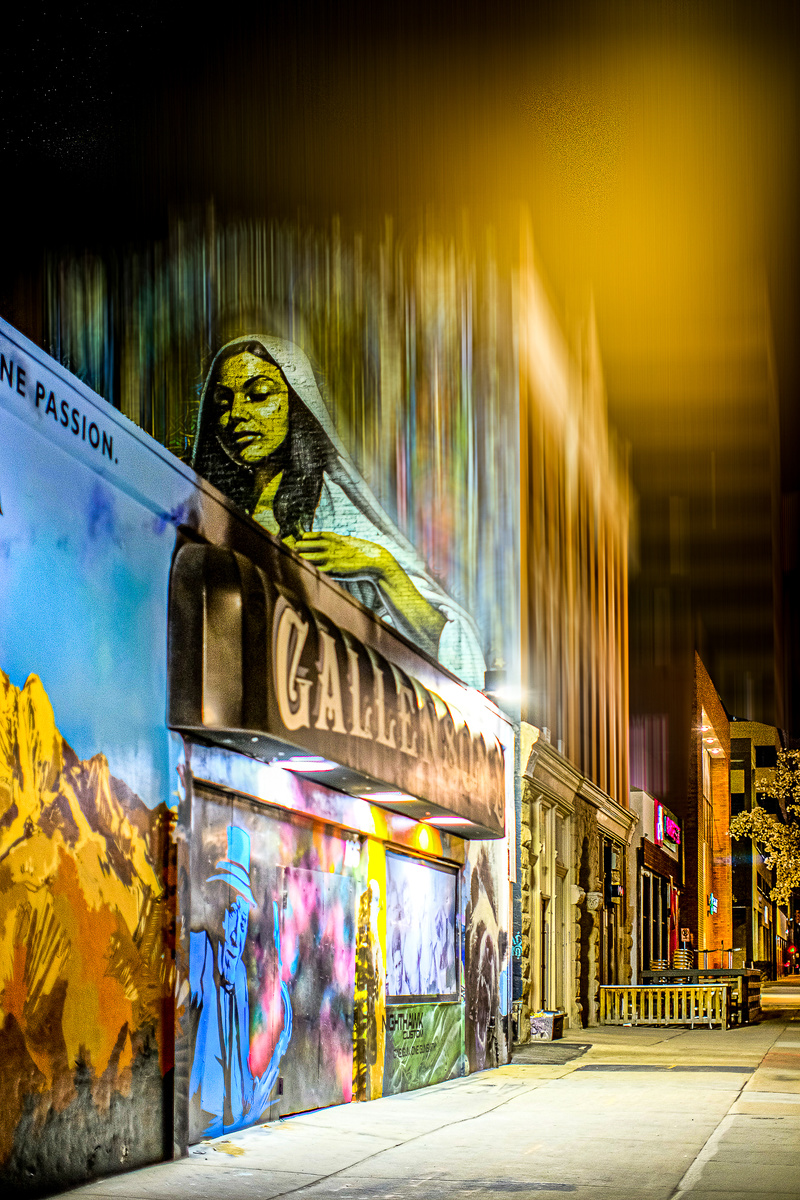
By using intentional blur, you can transform street and city scenes into new possibilities. This street art jumps off the wall after the technique was applied.
The Path Blur Tool in Photoshop is a fountain of overflowing creative possibilities when done well, and the strong lines found in urban structures lend very well towards blur being applied with artistic intent. On my last trip to the city I shoot in often, I decided to use it to transform the towering buildings around me into more futuristic, sometimes abstract scenes. Blade Runner even comes to mind when viewing a few of the more dramatic and moody images, and the process of creating them was more straightforward than the average non-Photoshop initiate might assume.
First, I kept my eyes open for scenes that I thought would lend themselves well to the ultimate vision I had for them, and after coming to the city for a few hours, I always come back with a few good options. Once I settle into editing mode, I start by choosing a suitable image for the process and making some basic adjustments in Adobe Lightroom to tweak contrast, curves, and saturation, and then, I export it into Photoshop. Immediately, I duplicate the background layer so I am just working on top of the duplicate and the original is preserved.
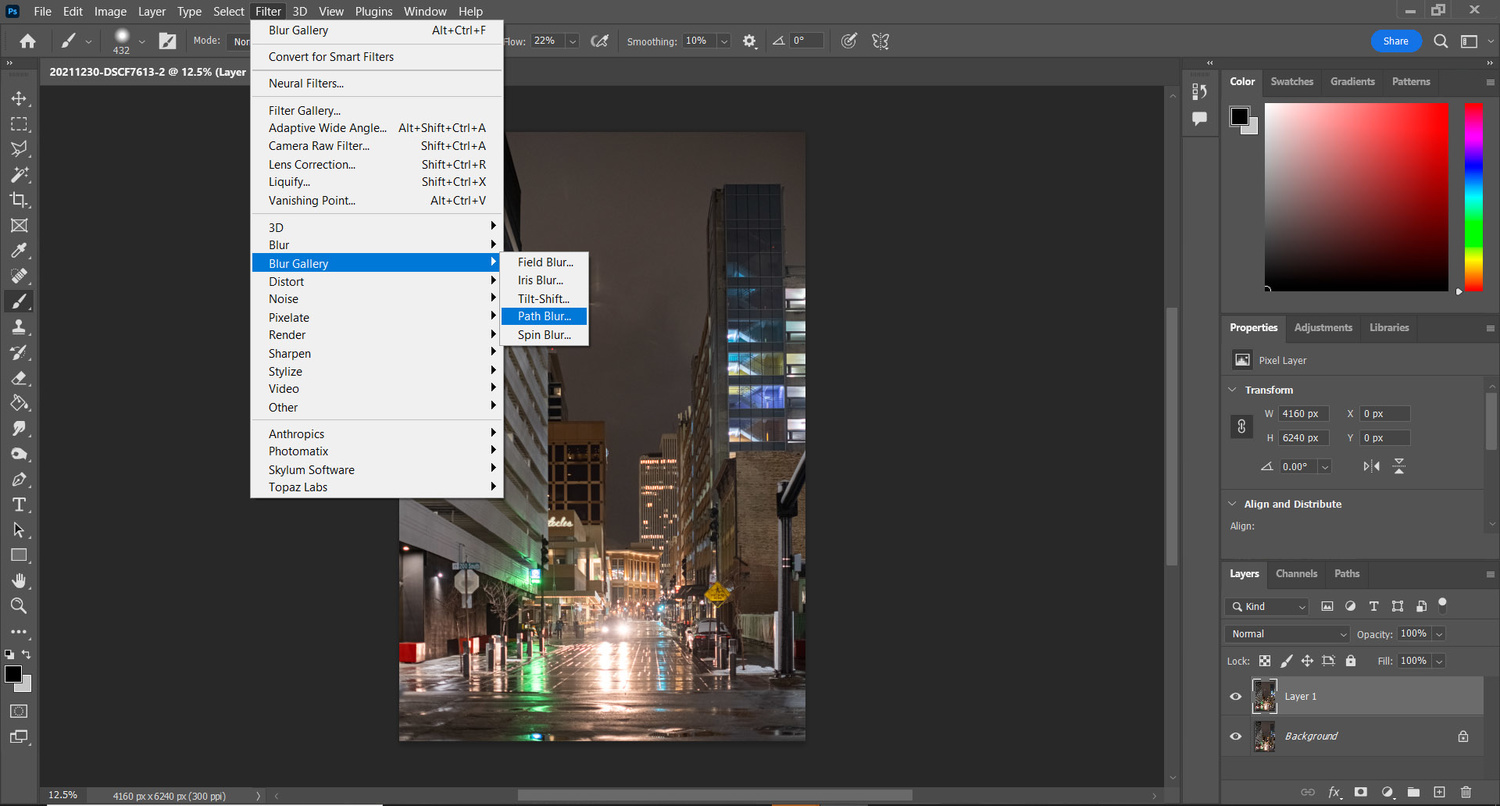
After opening your image in Photoshop and creating a duplicate of the background layer, select Path Blur from the Blur Gallery in the filters dropdown box.
Under the filters tab, a subcategory called Blur Galleries contains the Path Blur Tool, and clicking it will take you to a new screen. Here, you will first adjust the direction of the blur with the blue line, which you can delete and replace or simply adjust to your taste. I went with vertical orientation to match with the building lines. The sliders on the right change the intensity and appearance of the blur, and you can simply adjust them to taste once your blue direction line is set correctly. Once the blur is to your liking, clicking ok will return you to the main screen and the blur will be applied. Next, we will ensure only the desired areas of the image received the path blur.

The Path Blur tool screen allows you to choose the direction and intensity of the blur, and in the next step, we will make sure it only gets applied to the desired areas of the image.
This is done with a layer mask, which you want to invert after applying, so instead of painting away the blur, we will paint it where we want it by applying white to the layer mask. After you create the layer mask on your top layer and invert it, the blur will all go away, effectively hidden by the mask. Then, I take a paintbrush, and leaving opacity and flow at 100%, I began painting the blur onto the tops of the tallest building in the scene. After I have added some blur at the top, I reduce the brush flow by 50% and start painting the blur even lower. I repeat this process another time or as many as it takes in an effort to create the effect of a gradual phase between the blurred and unblurred areas of the image.

After applying an inverted layer mask to the image, you can start painting in the areas you want blurred with a white paintbrush, starting at the top. As you go down the building with the paintbrush, reducing the flow allows you to more easily make the blur phase into unblurred if you choose.
After all is said and done, the creative effect of intentional blur for scenes like these is clear, but take some care to not go too far overboard with the effect, lest you fall into the trap of just using techniques as a trend rather than the proper tool it can be.
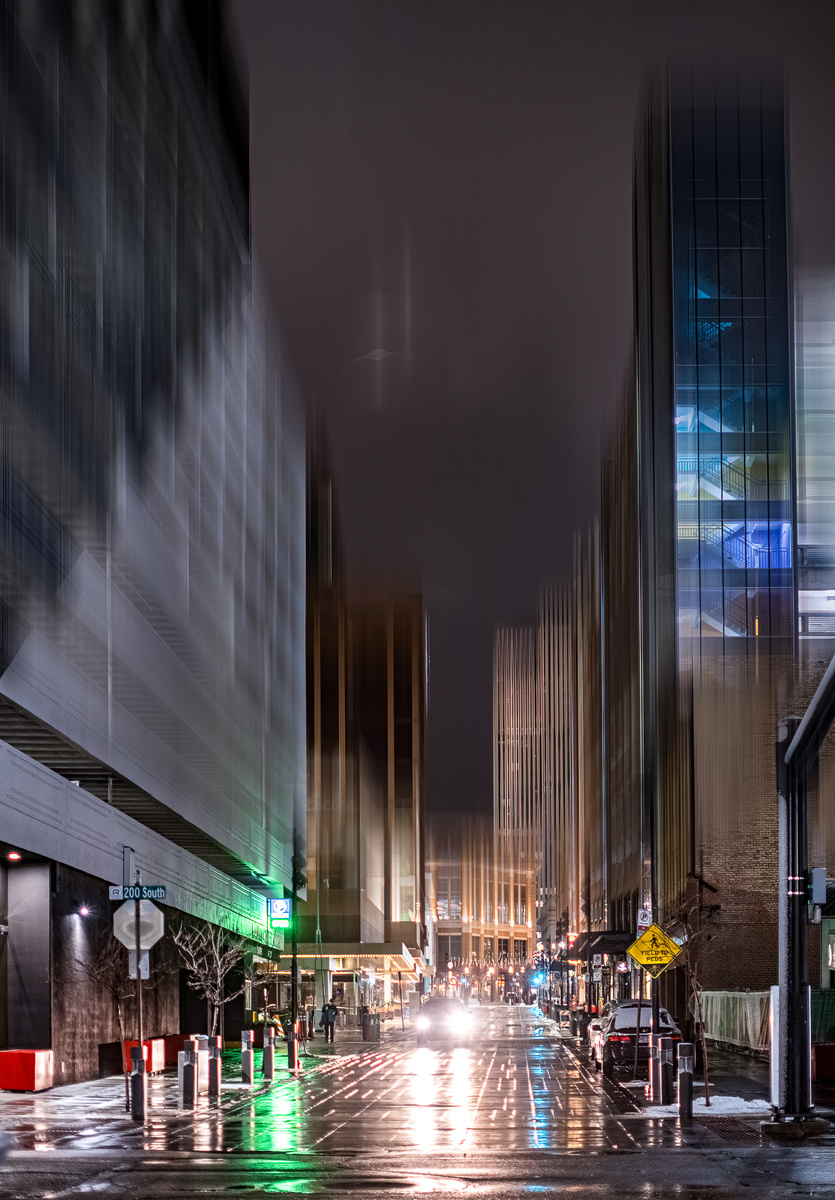
The finished version has a strong Blade Runner flavor to it and gives you a basic idea of the creative potential a tool like Path Blur has on urban images.


The images give me the weird sensation of falling from the top of a twenty story building and snapping a photo just before I splat on the pavement!
These are really great images, and I love the dynamic feel of them. Very creative.
Thank you very much!
Thanks for the information, I've been doing this manually in camera and yes get some great results, however, you cannot control what is blurred as the entire scene is blurred... again thanks for this information.
My pleasure!