
I’m occasionally asked to recommend a camera to get into astrophotography. Of course, my first answer is to use the camera and lenses you already have. Beyond that, it’s difficult to recommend a specific brand and model because I don’t have every camera at my disposal, and we are blessed (cursed?) with a continuous stream of new and improved cameras. Here are some thoughts.
Multiple Paths
First off, let me say that I’ve been taking astrophotos since the dinosaur age (back in the days of film). Second, while I have used a variety of brands of cameras (Sony, Panasonic, Canon, Pentax, Fuji) for travel and other purposes, my go-to cameras have been Nikons for “serious” shooting. I also have a few dedicated astrophotography cameras in use.
But a couple of years ago, I decided to get a “consumer” camera modified for astrophotography. When a camera is described as modified for astrophotography, it means that the response of the camera sensor has been extended further into the red end of the spectrum to pick up the astronomically important hydrogen-alpha (H-alpha) emission line. This is done by removing/replacing the IR blocking filter, which cuts a bit into the deep red end of the visual spectrum. While normal daylight photos taken with such a camera can be re-balanced to appear “normal,” if exact standard color reproduction is necessary, a modified camera should not be used.
Although special factory production versions of commercial cameras exist (e.g. Nikon D800a and Canon 60DA), They are built in limited production runs and are probably sold out as you read this. They are also “behind” the current models and more expensive than the standard models. These do, however, have the advantage of including built-in daylight color balance and additional astrophoto firmware features, such as longer exposure capability.
The other option is to have a third-party camera or astronomy equipment dealer modify a camera to remove the standard IR filter and replace it with one that passes more of the H-alpha line. In fact, having a third-party modify a camera gives you more options such as to completely remove the IR filter to allow the possibility of shooting IR photos (blocking visible wavelengths) or even UV photos.
In addition, third-party mods allow the selection of a filter which allows more H-alpha light to pass through to the sensor than the factory-designed astro models, which use more aggressive IR cutoffs to keep daylight performance closer to the standard models. But note that whatever replacement filter option is selected, the filter must match the factory filter so that the focal point is not changed, or standard lenses for that camera may not come to focus.
My Path: The Canon RP
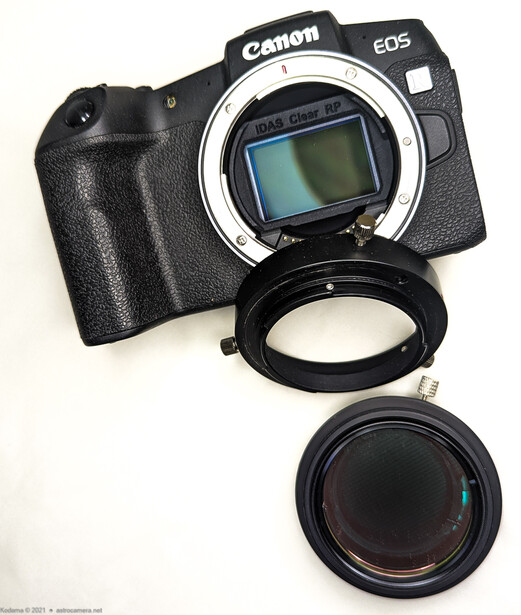
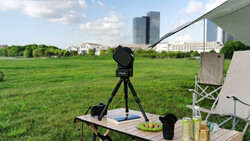
As a long-time Nikon shooter and having built a collection of F mount lenses, it would have been logical to select a modified Nikon body. However, I took this opportunity to also experiment with the mirrorless camera body experience. In fact, I did a complete 180-degree flip and went with a Canon RP body (26 megapixels, full frame, mirrorless). Why? One answer is that this camera wasn’t intended to replace any of my “normal” use cameras.
I wanted to have a camera modified for red-sensitive astrophotography, and by virtue of selecting a mirrorless camera body, I could get an Nikon F mount lens adapter, making it fully compatible with my existing camera lenses and telescopes. In addition, the thickness of the lens adapter allowed me to get (imported from Japan), an adapter that allows for the insertion of filters (58mm, threaded) as well as a 3-point tapered ring which allows the camera to be freely rotated and locked into any framing orientation. Other brands of adapters have subsequently become available, which allow filters to be mounted in filter drawers and conveniently and quickly swapped out. For my use, I’ve found the need to swap filters quickly is not important.
Of course, an important concern was the cost of the camera body. Having anyone modify a camera body will certainly void the warranty and possibly make it unrepairable in the eyes of an authorized factory repair facility. The Canon RP currently sells for about $1000, which is a good value for a full frame mirrorless camera (in my opinion), and cheap enough for an “experiment.”
Astronomical Filters
Why are the swappable filters an important point? For most astrophotographers, light pollution is an issue, so better results can be obtained by using special astronomical filters in the optical path. These are not low-cost, but for most astrophotographers, should be considered “must-have” items. For my situation, my default astrophotography shooting setup includes a light pollution filter, which is designed to selectively block out bands where light pollution sources contribute a lot of interference. These are the prominent emission bands found in fluorescent lights, mercury vapor lights, and sodium lights commonly used in outdoor settings. Also filtered out by the IDAS filter I use is the natural "light pollution" source from high-altitude oxygen. Despite the complicated bandpass of this specialized filter, it manages to maintain a color balance that does not require a lot of post-processing adjustments.

Dual Narrowband Filter
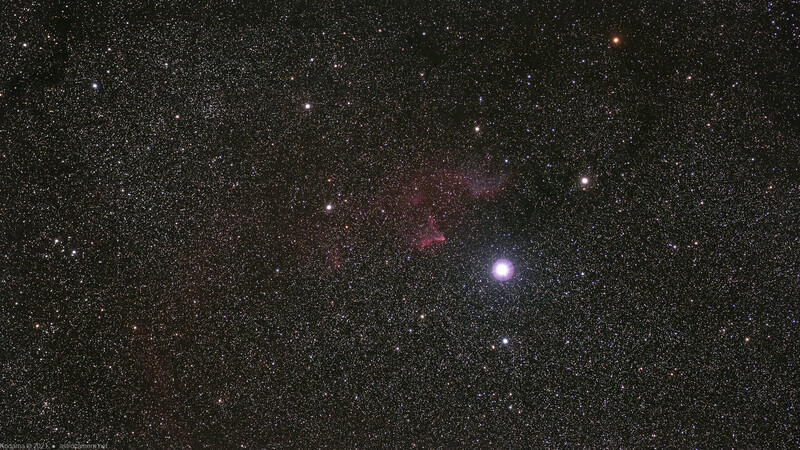
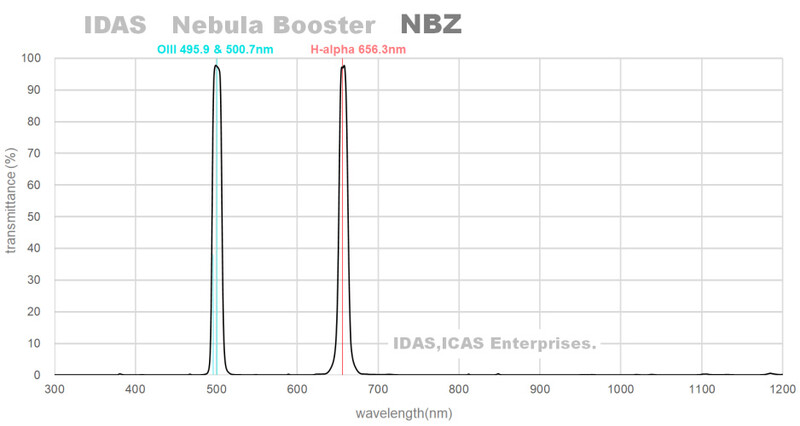
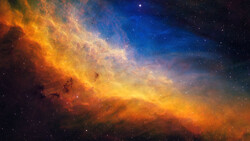
Sadly (for astronomers), the easily blocked lights are being replaced by LED lights, which are broader band and harder to selectively block. In this case, for many astronomical objects, the problem can be attacked from a different direction: use filters which block everything except the light from astronomical targets. This works for many deep-sky nebulosity objects, targets which glow by the light of ionized hydrogen (H-alpha) and Oxygen (OIII). These are often called dual narrowband filters, as they have narrow bandpasses at H-alpha (deep red) and OIII (blue-green) and work well with mirrorless and DSLR cameras with color sensors to give a relatively natural color balance (important for stars) while improving the contrast of the target nebulosity.
Single Narrowband (H-alpha) Filter
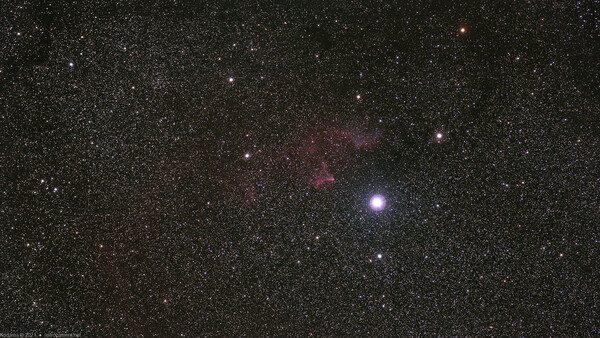
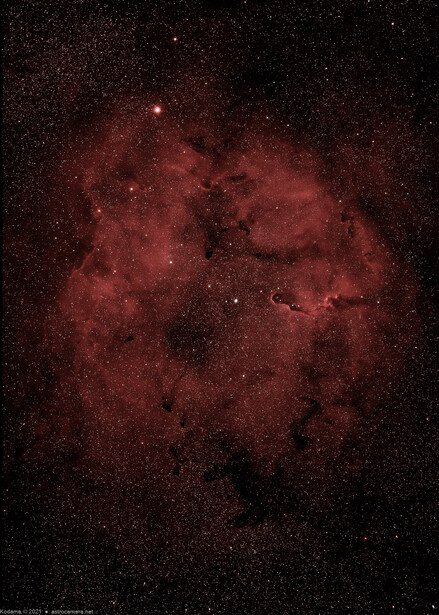
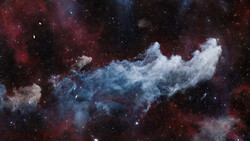
Though it can be argued that a narrowband H-alpha filter is wasted on a color-matrix camera since only the red pixels in the sensor are used, I have also experimented with a (very) narrowband H-alpha filter. This isolates the H-alpha light of emission nebulosity, which is in the red end of the visible spectrum. This light is scattered less in our atmosphere than light from the blue end of the spectrum and is thus least affected by manmade light pollution and even moonlight. The net result is that even under the moonlight, even extremely dim targets can be imaged successfully.
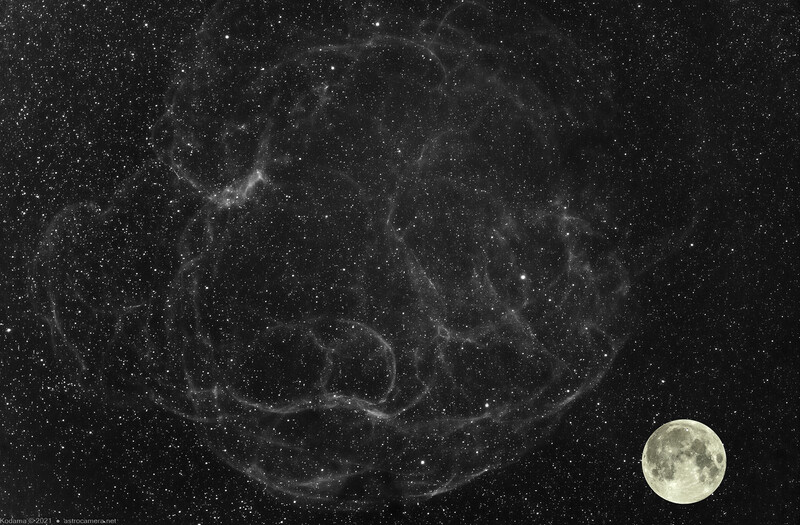
In the image above (full moon superimposed for scale), the remnants of a supernova explosion that occurred 40,000 years ago can be seen despite being imaged while a half-illuminated Moon was 83 degrees away in the sky. The actual appearance of the nebulosity in the image is pure red (as are the filtered stars) as one would expect for H-alpha, but has been converted to a monochrome image for presentation so that it is more easily seen on a screen.
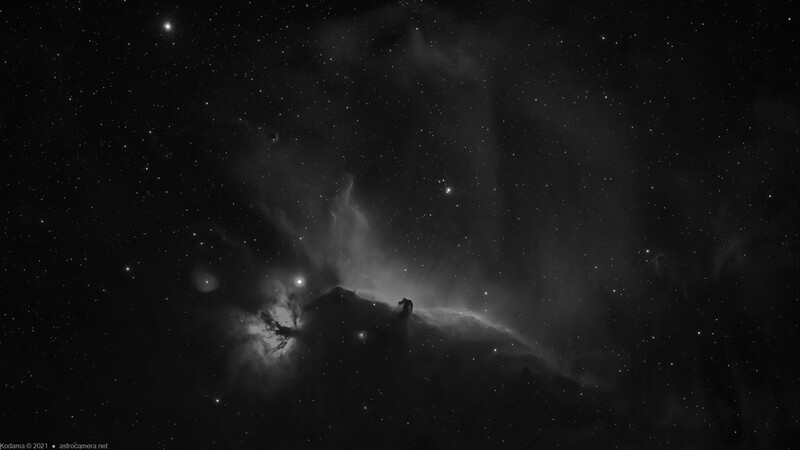
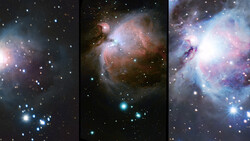
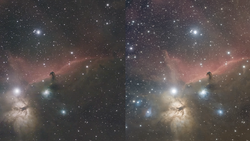
The image above shows the region around the Orion belt star Alnitak, including the Horse Head and Flame nebulae. This image was taken with the Moon up in the sky, 73 degrees away, five days before the full Moon phase.
Why Not Choose a 'Real' Astronomical Camera?
Experienced astrophotographers may ask why I didn’t simply go with a “real” astronomical camera. After all, they have the advantage of active cooling, which significantly reduces noise. In addition, true monochrome cameras are available, which have better resolution since pixels are not split between R,G, and B filters.
My reason is that astronomical cameras invariably need an external computer to operate them. Typically, this is a traditional laptop computer (usually Windows) and all the complications associated with a computer setup. While this may not be so important in an observatory setting, needing to bring along a computer adds a lot of additional weight, complication, and reduces reliability in portable setups. It’s true that very small computers (e.g. Raspberry Pi) are available, one still needs at least another tablet or phone to control the computer along with network wiring or a properly configured WiFi network. And while additional cooling and noise reduction would be nice, modern cameras have quite good performance as long as you don’t have to image in extremely warm locations.
A monochrome astronomy camera would indeed provide better resolution and sensitivity for the same size of sensor, but for color shots, additional filters (and exposures) are required along with the complication of a filter wheel for at least R, G, and B filters and additional software to control the filter sequencing. Add the frustrating possibility of getting only 2 of the 3 colors needed before being interrupted by clouds, and my enjoyment of astrophotography starts to wear thin.
Another factor that can’t be ignored is the fact that a full frame camera like the Canon RP is much less expensive (even after modification) than a full frame astronomy camera, especially if an additional computer and/or tablet isn’t already at hand to support the camera.
The Canon RP Experience
So, how has the Canon RP worked out for me? The short answer is that I’m very happy with it, especially as I just use it for astrophotography. As expected, the camera’s user interface took a little adjustment, but it was nothing I wasn’t expecting. I was able to rapidly get to the point of using it in the dark with the limited functionality I needed for just astrophotography.
I was easily able to find an AC adapter to replace the rather small battery, enabling me to run all night without worrying about losing frames due to a dead battery or worry about the camera overheating because the battery had warmed up with heavy use.
With the addition of an external programmable intervalometer, I’m able to set and forget for as long as my telescope mount will allow shooting. In addition, in Bulb mode, the camera’s display shows the elapsed exposure time on the rear display. Even without the intervalometer, the Canon RP can shoot continuous frames (up to 30 seconds long), making it suitable for night-time time-lapse movies (e.g. meteor sequences) too.
While I prefer the “real” optical viewfinder of a DSLR, the viewfinder of the camera is not as important for my use in astrophotography as long as the camera has a decent rear LCD live view. The view on the Canon RP's rear LCD is adequate for focusing, though I would like it even better if the magnified view provided at least twice as much magnification to ensure perfect focus.
I had heard some Canon camera users complain about fixed banding patterns in long exposures, but in my use (up to 10 minutes), I have not had any problems with banding or excessive random noise. The high-ISO range (up to 40,000) is great for taking quick framing shots. I typically back off to ISO 1,600 for actual image frames.
Conclusion
Using the Canon RP mirrorless camera has been a successful astrophotography “experiment” for me. It has been a flexible, low-cost, reliable, and (most important) low-frustration way to do deep-sky astrophotography. It would probably be the same experience with any modern mirrorless camera and should provide a great way to start if you don’t already have an astrophoto-optimized camera.
Join the Fstoppers community for free
-
Post comments and join in the discussions
-
Browse the site ad-free
-
Share your work and get featured in the community
-
Compete in the photo contests for fun and prizes
27 Comments
"Low-cost" haha ... A $1,000 camera body, plus the average of $300 to modify it, unless you're brave enough to attempt it yourself, is anything but low cost. It looks like the price of filters was also not included here, those also add up quickly.
Something like an already modified T3i (used, about $300-$400), although for low cost a stock DSLR works on many targets, yes, even those with Ha, plus a simple tracker (another $300-$500) along with an Astrotech AT80 ($399) is low cost.
A $1,300 modified camera body.... And nothing else, is far from low cost.
For many, $1,300 in gear is very low cost. You just need to realize that these things are relative.
When the people whose work I admire are using $15,000 to $100,000+ in telescopes, cameras, mounts, software, and custom built observatories, then trying to get similar photos with a used $1,300 camera is certainly "low cost".
Indeed, the price of the system is relative! A camera with a smaller sensor is cheaper, but having a full frame was important to me. High-end DSLR's or mirrorless full frame cameras are in the $4000+ range and full frame cooled astro cameras are similarly expensive. The RP was my choice for trying a modified mirrorless camera for the reasons given in the article. Being a mirrorless camera with an adapter to my existing lenses made it possible to insert the (optional) filters I wanted in there. It's possible to get specially mounted filters to sit inside the camera body between lens and sensor, but these are usable with only that camera body. And to be clear, if you never care to use filters in the light path with camera lenses, then having a mirrorless camera with a shorter distance between lens and camera isn't important.
Given an unlimited budget for experimenting, If I had access to other types of cameras I would have tried those too.
In the end, you are "designing" a system for yourself with a lot of engineering tradeoffs. Probably no two people with come up with exactly the same solution. Rejoice that we have so many options!
Can get a pentax k1 cheaper than this
I do want to say these are nice pieces of work and it is a pleasure to see astrophotography that is astrophotography instead of night landscapes. (Which are lovely too but just a different animal).Any variety of Pentax cameras with an Astrotracer accessory or with the built in Astrotracer could be less expensive than the RP with a separate tracking mount. And very compact also.
But again, wonderful images.
The Pentax cameras would indeed be interesting to try out, though finding a place to modify them might be more difficult. Some cameras are harder to modify (I hear Sony is harder than Canon), so that is a factor too.
I really, REALLY want to take photos of the sun that look like this ...
https://www.astrobin.com/apdeob/
But, sadly, I was told that there is no way I can take those kinds of solar (astrophotography) photos without some very specialized, expensive gear. Yet you recommend that I use the camera gear that I already have. That is a Canon 5D Mark 4 and a Sigma 300-800mm f5.6 lens.
Can you please tell me how to take these kinds of solar (astrophotography) photos with the gear I already have?
I really want to take images like that, but cannot afford a telescope or expensive specialized stacking software.
For that kind of solar astrophotography, there is no getting around the need for a very special (and expensive) solar hydrogen-alpha filter that has a much, much narrower bandpass than the H-alpha filter used for night sky astrophotography. Although a specialized (but low cost) astro camera would be best, a DSLR could be used in movie mode. For solar astrophotography, you want to capture a very large number of images (hundreds) quickly, reject blurry ones, and combine the rest. I'll cover this in a future article. :)
Combine a large number of images .... yikes. I was afraid it would be much more complicated than just taking a still photo.
Kinda bummed, because I am extremely challenged when it comes to technical ability and using software. Still haven't figured out how to make layers in Photoshop, despite trying to learn for 3 years now. Even paid good money for a Brooke Shaden tutorial on compositing for beginners, but even that is way over my head.
Someday I will figure these computer-based things out, but it takes me years and years to learn things that most people learn in a couple of hours.
Maybe a future article would really help those like myself, who are extremely challenged when it comes to using photo editing software to combine or stack images, stitch images, do edits, etc.
Unfortunately there is no magic "Easy button" for astrophotography or even photography in general. Auto exposure doesn't always work, and for post processing images (in Photoshop or any program) there's no automatic way to get a good image. Each one has to be tweaked by hand manually. Maybe in the far distant future we'll have advanced Artificial Intelligence which could do it, but I think we'll be long gone by then...
Hey Tom...I'm a reformed astrophotographer. I had a roll off roof observatory in my backyard when I lived just outside of New Orleans. It is much more complicated than terrestrial photography, especially if you really get into monochrome, purpose built astro cameras. Then you're talking about shooting not only the base image, you shoot either color filters (RGB) or through specialized filters as mentioned in the article. Then there's the 'Hubble Pallet' of Hydrogen Alpha, Silicon II, and Oxygen III filters.
There are one shot color astro cameras as well and they do a great job helped along by the fact that they are cooled to reduce noise from the sensor heating up during long exposures. It can be very rewarding....and very frustrating at the same time. It's a real 'treat' to set up for a long night of exposures, get the guide camera going, test shots look good, then go inside. And then you come out an hour or so later to find that a rogue cloud bank rolled through and your guide camera lost its star. Oy!!!!
"reformed astrophotographer" ..... LOL
This article is supposed to show is that getting into astrophotography can be easy and inexpensive, but the more you and others share about it, the more I realize that it truly is complicated and costly ..... at least if one wants better images than the typical beginner stuff.
As interesting as astrophotography could be, I'm starting to think that I may be better off just sticking to wildlife photography for the time being.
Tom,
Astrophotography encompasses a huge range of images and equally huge range of the equipment that can be used. If you know wildlife photography already, then you know that you don't necessarily need a $15,000 800mm lens to start. You can shoot some wildlife with just a consumer camera and kit lens. Similarly, you can start with a standard camera and lens kit. What I described here in this article is for a second step for someone or a first step (not necessarily modified) if someone doesn't have any suitable camera..
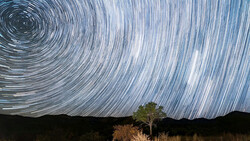
Here's an example of what you can do with just a digital camera, wide angle lens, and standard tripod with no stacking or any special processing, but just normal image adjustment, cropping, and assembling into a video - https://youtu.be/nDBSgEDjSX8
Dave
My decision to try astrophotography started before I built the observatory. I had a Celestron CGE mount and a 10" Meade Schmidt-Cassegrain scope. I was an observation only backyarder, but decided to give it a shot.
So I bought a small doublet refractor to use as a guide scope, hooked up a Canon 300D to the 10" Meade, hooked up my laptop for the guidescope/camera, and got a so so shot of M51. It was enough to make me get out hammer and nail and build the observatory so that I wouldn't have to assemble and disassemble my gear every time I went out.
One of the fun things I did was join a group of backyarders that were updating tracks of known asteroids. We were given a list of asteroids and took a bunch of shots of them. The data was sent to a group of people that were compiling the information. I got out of it and never did follow up, but it was quite neat to know that I played a very small part in a research project.
Having said all this, there are ways to do this minimally. But if you want high end results, it does get complicated, fairly expensive, and time consuming.
David,
You said,
"Having said all this, there are ways to do this minimally. But if you want high end results, it does get complicated, fairly expensive, and time consuming."
Kinda sounds like wildlife photography. Especially the "time consuming" part.
Yes, sir! The most expensive part of my imaging stuff was the mount. I had a Mountain Instruments MI250 (now out of business). It could hold 85 pounds of scope and accessories and barely breath hard. The tracking was terrific. The mount is crucial for long exposure work. The new mounts today are substantially better than the mount I had. But, mounts are the perfect example of 'you get what you pay for'.
If you ever decide to look into this further, I'd suggest you look up the webpage, Cloudy Nights. It's the largest astro webpage on the 'net. I'm a former admin there. There's some of the finest observational and imaging backyarders on the planet there. If you can't find the information you need there, then it doesn't exist. :-)
I'm not particularly interested in photographing comets and (most) stars and planets. The kind of astrophotography I am interested in is doing extreme close-ups of the sun itself, like the pics in that link I provided yesterday. One doesn't need a mount or any kind of tracking device for that type of astrophotography, do they?
Tom,
Sorry, but especially if you want "extreme close-ups" of the sun, you need at least a tracking mount. The is an active guider specifically designed for tracking the sun (Hutech's Hinode solar guider). If you are just doing single snapshots of the sun, you don't need such a guider. But if you want to shoot the sun over an extended period (e.g. time-lapse movie), a guider will help a lot. Especially if you have a portable setup, it's hard to get close polar alignment so that you don't get drifting of the sun over the course of a half hour.
Planetary and solar imaging are quite different from deep sky stuff. Typically, planetary imaging is done with a video camera of sorts. I'm not the guy to give all the details, but what the imagers do is take hundreds of frames of, say, Saturn, and then wash it through a program that will pick out the best two or three hundred frames. Then those frames are stacked in another program to be processed.
Solar stuff like the image you linked to requires a special telescope that is purpose built for solar viewing or imaging. Different filters give different results. I'm always amazed by guys like me that had backyard setups that can get those sort of solar shots, although I never did solar work. Until you see one like you linked to, you have no idea that the Sun's surface is so complex. Further, we amateurs can catch huge solar flares which is way cool! I liken it to catching that bull elk with the sunlight glinting off those majestic antlers. The timing thing.
For solar work, you don't need a mount like I had since the exposures are very short. A safety tip; if you ever decide to do solar work, DO NOT buy a solar scope that has been modified. At least, it could ruin your camera, at worst, it can damage your eye if you decide to look instead of image.
astrophotography is a hobby where the result of your images heavily depends on the money you put in the equipment. Solar is "cheaper", but you will require a specific type of telescope for it. And please don't start pointing your lens at the sun! that's not going to end well.
But, consider having a look at the "Lunt 40mm", it's a hydrogen scope that allows you to look at the sun. it's the "cheaper" option, while still being a great little scope.
If you want to image with it. You don't need an expensive camera.
You could do it with your current camera in video mode. Or solar imaging can be done with cheap dedicated cameras. Have a look at the "ZWO ASI 290MM" or "ZWO ASI 120MM" for example. But this requires more effort, you would need to control the camera through a laptop.
And the combining of the video for solar imaging isn't difficult at all.
You can use a free programs called "pipp", 'Autostakkert" and registax, Those will do most of the work for you..You just upload the video in it, run it through the programs., and it will do the stacking. There are helpful videos on YouTube about it.
Any editing after can be done in photoshop, or gimp
I made the image below was made using a 140 dollar camera and an 800 dollar solar scope.
Thanks for all of that information, Steven! Much appreciated.
I bought my first real camera (I didn't know nothing about photography) to do astrophotography, but the camera body is a little part of the equation of astrophotography, the telescope (or good lenses), the tracking mount and possibly the second scope for correcting the tracking are far more important... and also cost more than the camera body.
But for around 1000€ you can build a small setup (a little tracking mount, a good tripod, an old apsc body and a good lens) to try astrophotography, then little by little, you can upgrade each component of your set up. That's what I'm doing and it's easier this way, at least, it worked well or me.
Also, the thing that is the most important is time. Time to learn, to experiment, to process the files... do not buy one thing until you mastered what you already have bought...
Very well written and informative article! I’m still using a 6Da (and several dedicated astro cameras). When my R6 starts to age, I think it will make a superb astro camera after removing the LPF2 filter.
I just got the 6Da with low clicks for $500. That’s pretty budget… also scored a FD Flourite 300 2.8 for a similar amount. Would be superb with an RPa. Maybe similar to the Borg?
My issue is managing burn out with AP after several years of extreme dedication. Now just using a 6Da and a good prime lens on a SGPro is easy. In the end, I enjoy the experience under dark clear skies more than the final photo. I also do visual astronomy.
Looking forward to Bortle 1 at 7 degrees N latitude in 8 weeks!
I think one-shot color (OSC) astronomy cameras and wireless controllers like the ZWO ASIair have made astrophotography so much easier and accessible to a lot more people. A part of my first dedicated astrophotography rig consisted of a ZWO ASI183MC-Pro (which is a OSC camera), an ASIair Pro, and a Sky-Watcher EQM-35 Pro equatorial mount. I was able to control it all from my phone or table connected to the ASIair.
OSC cameras are major time-savers, but perhaps their biggest disadvantage is that bayer filer in front of the sensor hindering sensitivity, unless you're using a very fast telescope like a Celestron RASA 8 or you're adapting a fast lens like a Samyang/Rokinon 135 f/2, which is practically legendary in astrophotography circles.
I do agree, however, that a modified DSLR/mirrorless camera paired with a telephoto lens and good tracker like the Sky-Watcher Star Adventurer 2i or the iOptron Sky-Guider Pro is the way to go if you're looking for serious portability. Watch Trevor Jones' videos on YouTube (AstroBackyard)--he's taken fantastic images with these highly portable setups.
I have both a SkyGuider Pro and a CEM25p that only weights 10lb which I consider portable (sans hiking). The CEM25 costs double the skyguider but is easily 10x more capable, and I’ve even used it remotely for several months in a friends observatory. It handles up to 18lb well for imaging.
Well, having this rather nice article I must conclude that this isn't a "low cost" solution...🙄