
CGI is usually associated with movies, but it has its place in photography too. In fact, you create elaborate and creative backgrounds for your shoots using CGI software.
Create Anything For Free (Well Almost)
Looking for a creative tool to add to your photography without spending a fortune? CGI could well be for you. During the Covid lockdowns, I began to explore the weird and wonderful world of CGI (Computer Generated Images). This was not because I thought that the rise of technology was about to kill off the photography industry. Rather, I wanted something that I could add to my toolbox for creating images. After discovering that the software Blender was available for free, I thought it was worth investing some spare time to see what it could do for me. Yes, there are other packages out there, but you have to be willing to shell out for a subscription for those and there was no way I wanted to part with serious cash before I knew if it would actually benefit my business.

Photo of Rimmel lipstick combined with a CGI render for the background
I won’t lie, it wasn’t as easy as I might have hoped, but with a bit of work and some tutorials, I started to get the hang of it. There are 3 main steps that you need to learn for CGI – modelling, texturing, and lighting for rendering. At the modelling stage, you build the various items you need in the 3D world. You then add materials to the objects (texturing) with controls over things like how glossy or matt the surface is, what colour, transparency, etc. Then you build a lighting setup a bit like you do in a studio. You add a camera with a focal length and depth of field for the render viewpoint. For those of you who work with CGI, you’ll know this is a bit of a simplification and that the steps aren’t always isolated from one another. However, hopefully, this gives you a rough idea of what you’d need to tackle if you wanted to make a start with CGI.
Why CGI?
There weren’t any tutorials I could find at the time that were specifically about set building. You need to learn the tools for creating objects and then figure out what objects you want to make. But it is well worth it as with a lot of practice you can indeed make almost anything. Or, if you are a bit lazier, you can buy ready-made models to populate your scene with. From furniture to fruit to people and properties, there are banks of 3D models out there to save you time if you need it. But why bother with all this in the first place? Well, for me there were a few key reasons:
- If you can’t go anywhere (e.g. a lockdown!) you can still create sets for photos
- You don’t create any waste by having to build sets and throw things away
- If you want to re-shoot then the set can be saved and you can go back any time
- You can make stuff that would be a pain in real life or just too expensive
- No gravity! Lights and objects can float in space with no cables or wires
CGI Backgrounds
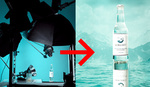
So, having reached a point where I could build a set in 3D and render out high-resolution scenes, I could finally use it for what I wanted in the first place. Although I have done some pre-build visualisations for businesses which were purely CGI, I mainly tend to use it for compositing for product photography. For example, in the image below you’ve got a scene that was built in Blender with a dummy placeholder object where the product would go. This enabled me to see how the scene would fit together and also give some reflections in the bubbles of the product to make it look more realistic. Yes, I’m aware it isn’t 100% bang on, but you do at least have to look closely to see the errors!

The bottle of shower gel was shot in the studio. I made a note of the lighting so that I could match it in the 3D scene (as near as possible anyway). Matching the light is a key aspect of any composite image if it is going to look realistic, so don’t skip this step and do any old thing in your 3D scene. I cut out the bottle and overlayed it on top of the rendered background in Photoshop. With a little bit of extra tweaking, it was done.

The Final Image
Could I have used real bubbles? Yes, of course, but they don’t always behave how you want them to. In the 3D scene, I could place them where I wanted and they stayed there. Also, it was a quick and easy scene to make. The bubbles are just slightly manipulated basic spheres, so there wasn’t any detailed modelling to do. For commercial projects, it is about balancing up the time and cost of doing something in 3D or not. It won’t always make sense to do so. But, for a personal project, it is fun and nice to have the odd challenge every now and then.
Cosmetics With CGI Backgrounds
I also used Blender to create the background for the images of the nail varnish and the lipstick. In these instances, there wasn’t going to be any interaction with the scene from the subject, so I was free to create the scene without a dummy object in place. Obviously, you still have to plan ahead.

Photo of Technic nail polish bottle composited with a CGI background

Here are some behind the scenes images showing the 3D environments that I built for these shots.

Here you can see the 3D scene that I built in Blender CGI software for the Rimmel lipstick shot. The render camera is highlighted in yellow/orange bottom left, angled from below similar to the studio shot of the lipstick

This shows the cylinders behind the nail polish image along with the lighting used and the the camera for the render
Renders With Shallow Depth of Field
In this next image, I used the depth of field controls on the CGI camera to add blur to the more distant spheres. Although sometimes it can be a benefit to have an infinite depth of field in CGI, you’ll probably still want to have some control to give more of a photographic feel to the images. Plus, having everything super sharp can of course make it harder to make the subject stand out.

This shows that you can alter the depth of field for CGI renders to create out of focus backgrounds for more depth
Your photography knowledge gives you a good foundation for CGI. But, there is still a lot to learn to be able to make the most of what it offers. For product photographers, there is the potential to create 3D product animations and pre-production renders of products as well as using renders for composites with studio photos. Portrait photographers might find it useful to be able to make scenes for them to composite people into, especially for sci-fi and alien worlds. CGI is a handy addition to the creative toolkit and it really can be a photographer’s friend.


I really want to start learning CGI and mixing it in with my photography. We are at an interesting crossroads where I can see Ai starting to fill that gap between the photographer and the computer graphics artist. Right now Ai can't build anything you imagine perfectly and with the ability to be tweaked so I think CGI is still the way to go.
How long did you have to work in Blender before you started feeling confident in the results you were getting? It probably wasn't hours but more like days or months right?
CGI gives you more control and sidesteps potential copyright issues which AI might have in future as it "borrows" from existing images. But, you're right, it is a fairly steep learning curve. That is especially the case if you are after photorealistic renders. You can follow a tutorial and produce something reasonable in a couple of days, but you won't be at the stage where you can model what you like - that takes a lot of practise. It is a bit like learning Photoshop - you can do something chunky pretty quick, but if you want nuanced then you're going to have to invest time to get the experience
Hi Patrick, I also use Blender to mixing it with photography. It took me 2 weeks to learn the basics of the program and about 6 months to learn how to model my own objects with photorealistic results. I currently have several commercial clients for whom I do photomontage jobs using CGI. By the way, I also think that CGI is better and more versatile than AI. I only use AI to create some textures for some CGI projects.
well, you can not learn the basics of a 3D Software in 2 weeks, it´s not Photoshop or Lightroom ;)
2 weeks is like reading 2 pages of the bible :P
Also, no way to achieve photorealistic results within 6 weeks, only if you do nothing else and if its for some very restricted objects or scenes.