
Although I've professed my love for film many times in many articles, I've always been missing a key ingredient to the analog experience. Namely, I've never learned to print my own film in the darkroom. Sad, I know. Well, no more! My journey to teaching myself to use a darkroom starts now and, whether you like it or not, I'm taking you with me. First things first: Where the hell am I going to put a darkroom?While reading up on the subject of building your own darkroom, a common theme emerged for the budget user: convert an unused or rarely used room that has no windows and adequate ventilation. Ok, let's see. All of my bathrooms are heavily used and have exterior windows. No-go there. My walk in closet is in my bathroom with no door. And it's small. And my wife would murder me if her clothes ended up smelling like chemistry. The kid's bathroom is upstairs and having sensitive equipment in reach of a boisterous toddler in the throes of the terrible twos seems like a bad idea. Looks like the basement is my only option.
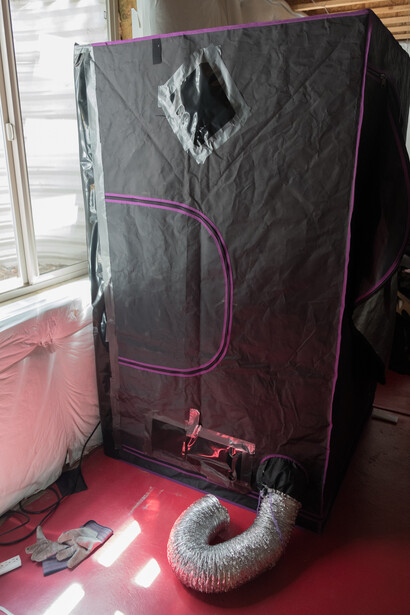
The basement has plenty of room. The problem is that there are also four window wells that let plenty of light in and the floorplan is wide open. There's no way to get secluded behind a wall. I needed a self contained shelter of sorts that wouldn't take up much room, yet was light-tight or could be made to be with little effort. One day, as I was perusing the interwebs, I saw it. Being in Colorado I'm not sure why the idea didn't hit me sooner, but I finally had it: a grow tent.
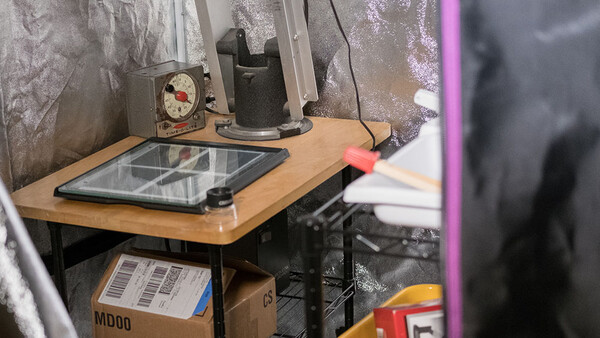
In order to grow plants using hydroponics, as many in this great state of mine are wont to do, a very well controlled environment is needed. You need a mostly light-tight enclosure that can still support access for electrical cords, ventilation, and be roomy enough to have shelving. Sounds like a darkroom to me! Being space limited, I ordered an Apollo Horticulture 48”x48”x80” Mylar Hydroponic Grow Tent. After wrestling with this massive box for what seemed like hours, I had a semi-roomy enclosure that would be perfect for my needs as a budding printer. If you've never built a grow tent before, I would definitely suggest getting a second set of hands to help you put it together. The material is heavy-ish and bulky enough to be awkward. Not to mention that you'll need to put the material on over a snug fitting metal frame. You'll also need a fair amount of space to lay out the material before putting it on the frame. With a little creative placement of shelving and enlarger, I got things to fit where I need them. I think. Now, to check for light leaks.
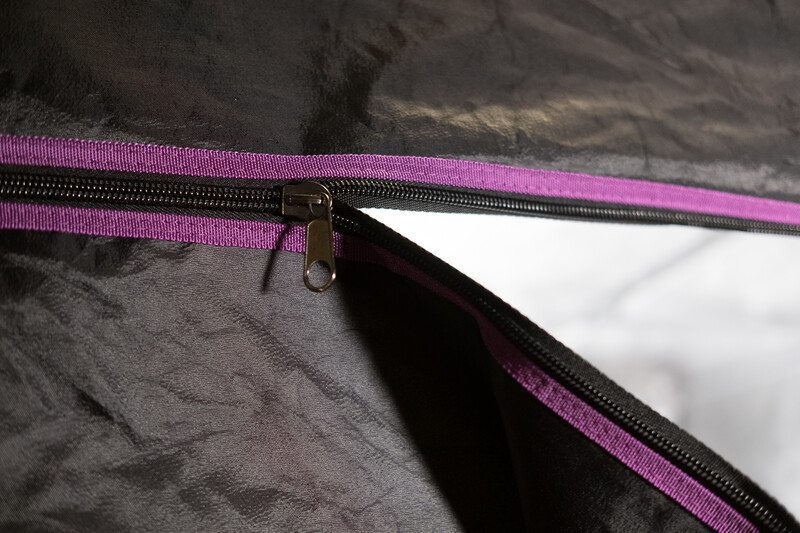
For the uninitiated, the darkroom needs to be light tight because any stray light will fog the paper and ruin your print. When printing in black and white, an amber or red light can be used, depending on your paper and process. If you're printing color, absolutely no light is acceptable as the paper needs to be able to read every visible wavelength of light to make the print. The first problem that became clear to me is the zipper placement. The zippers are not double sided, so you can't close the zipper completely from the inside. Hmm, I'll leave that problem for later. The best way to check for light-leaks is to sit in darkness until your eyes get acclimated. After sitting in the dark for about five minutes, all the light leaks reared their ugly heads. One of the features of these tents is plenty of holes with sleeves for ventilation. Although the sleeves are double layered, light still seeps into them. Also, the back left seam had pinhole leaks all the way from the floor to ceiling. My solution? Panda Film. Panda Film is a light-proof material that's cheap, easily cut, and tailor-made for light-proofing a grow tent. A few strips of the film, secured with duct tape, and all the light leaks have been sealed. Well, all except one.
The zipper issue is still there. To cover the leak produced by the hole left because there are no internal zippers, I bought a small sheet of felt and secured it with velcro to the inside of the tent. One I've sealed myself in, I velcroed the flap of felt over the remaining gap. Presto, I'm light-tight.
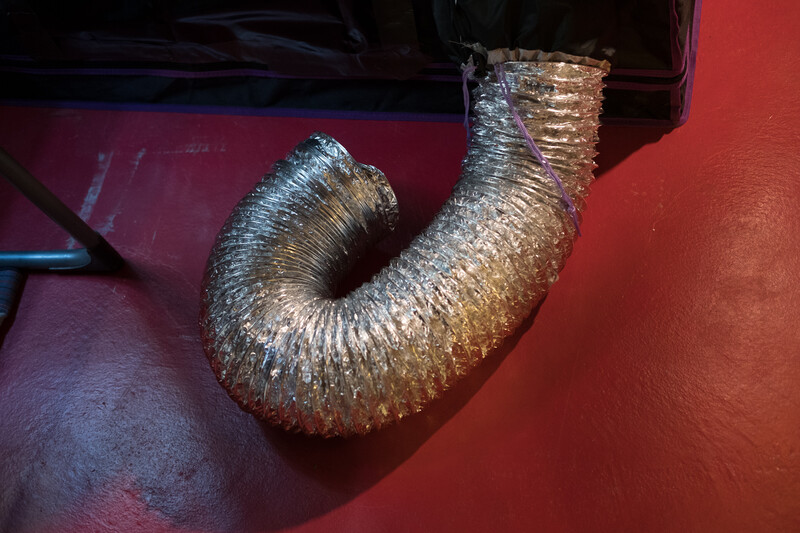
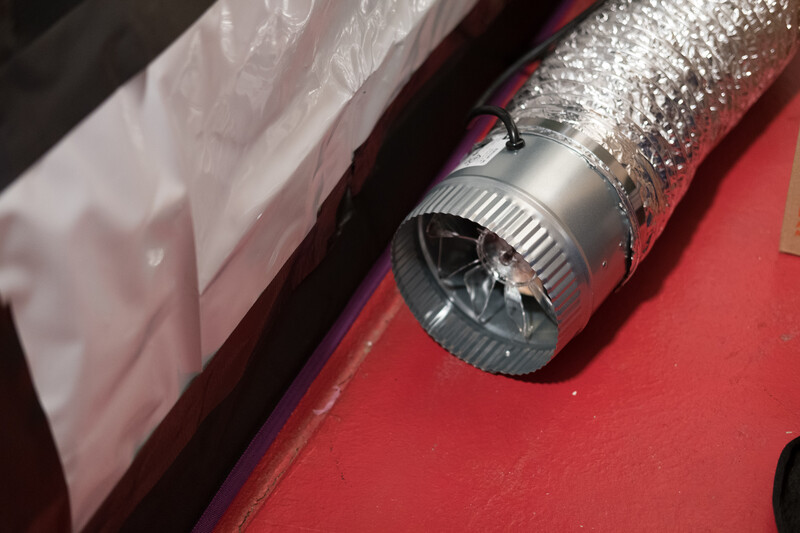
Now for one of the most important aspects of a darkroom: ventilation. Air flow is crucial when dealing with any chemicals in small, enclosed spaces, and the last thing I want to do is get sick or pass out from exposure. I went to the hardware store and purchased a 25-foot length of flexible aluminum venting, cut it in half, and placed a passive vent low on the tent on the side opposite the chemicals and another above where the chemical trays will be. The vent above the chemicals, however, needs air flow to direct the chemical vapors out of the tent. You can't rely on the fumes to disperse themselves effectively on their own. To accomplish this, I purchased a small duct fan, placed it at the end of the second vent, and plugged it into the same power strip as the enlarger. That way, whenever the enlarger is on, I know the vent is pulling the fumes out.
With that, my simple darkroom was built and ready to support a basic setup! My one concern going in is that the interior of the grow tent is highly reflective, so I'm worried about stray light fogging the paper. But, we shall see how that goes. Hopefully it will not be an issue. If it is, I'll end up painting the interior flat black. Let's hope not because I hate painting.
Join me next week when I go through the equipment in the tent and attempt my first ever darkroom assignment: a contact print.


Join the Fstoppers community for free
-
Post comments and join in the discussions
-
Browse the site ad-free
-
Share your work and get featured in the community
-
Compete in the photo contests for fun and prizes
9 Comments
This is fantastic! And just the solution I have been looking for! Thanks
Very Interesting. I'm looking forward to following this series. Your past articles have partly been my inspiration to switch to film and I'm now shooting with an 8x10 and developing and printing my images. Luckily, I have a storage closet at work and a very understanding boss that lets me use part of it as a darkroom.
My dream is to eventually shoot landscapes using a wet plate process and one of the many, many, MANY obstacles is the need to develop the plates within minutes. I thought about using a similar grow tent to setup at various locations, but it sounds like transporting it and setting it up would be a major headache.
Depending on how much time you have, yeah it could be a pain. Especially since you'd be outdoors with landscapes. I can imagine the wind kicking up and sending it down a mountain!
I worked in home darkrooms for about 5 before spending 12 years in prolabs and here are a few tips from long experience:
Do not paint black, stop the light leaks and paint a flat white. Only, if necessary, paint black behind your enlarger as light reflecting off paper can cause problems if you have prints developing and you are exposing at the same time. It may sound silly but a darkroom should not be dark, it makes for makes it an unpleasant place to work. As long as there is no white light there is no danger of fogging.
Get a Kodak beehive safelight with an orange filter. These are the best by far. Place according to instructions and you should have both decent light to see by and no fogging.
Learn how to count accurately, one Mississippi, 2 Mississippi ad infinitum works surprisingly well. This is so much easier that watching a clock when you start into dodging and burning.
Most importantly, get a Negative Ion generator, they go by various names but they all knock dust out off the air. The most frustrating part off a makeshift darkroom is dust and all the retouching that it produces. After 20 years experiences I was still only a so so retoucher.
Buy a quality spring loaded easel and papersafe. Don't cheap out on the easel, sorry I can't remember brand names but they should be heavy. I always preferred 2 blade types.
Good luck.
That's really great info. thanks. My solution instead of counting is to use a metronome when I print. Then I can listen to beeps and its more reliable than counting. When I start dodging and burning my counting slows down :)
Nice! Thanks for the info. I got a Bogen 2 blade easel on ebay that is in good condition, so hopefully it'll get the job done. I'll try out the "Mississippi" idea once I start dodging and burning, although I have a feeling I might need help as my counting is all over the place when I'm distracted. From the few sheets I've printed so far it doesn't look like light leaks will be an issue (knock wood)!
I'll look into the Negative Ion Generator as well. Thanks again for your many contributions.
How do the ice fishing tents compare to the grow tents? Iv'e seen a lot of people use the Eskimo QuickFish and wonder how the light leaks compare.
As a side note for the fStoppers film community, I made up a simple bellows factor calculator app for iPhone. It's available for free in the Apple App store. Search for "bellows factor" or "large format calculator" by Matt Barr.
I've seen the ice fishing tents and a friend of mine used to use one for wet plate as the tolerances are much less stringent. They're also really expensive. I definitely would have picked one up if they were less pricey.