
As creative professionals, hobbyists, and tech nerds (myself included), we often find ourselves wearing many different hats in our day-to-day activities. The crafts of photography and cinematography, among others, remain heavily dependent on technology that needs to be reliable and largely up to date. Often, that means the technician hat comes out to perform RAM upgrades on computers, to replace internal batteries and hard drives, and, admittedly, to repair screens on mobile devices. Here are some tools and tips to make that process a bit easier for you.
Computer Repairs, Static, and You
The ability to wrench on the types of technology we have available to us today is relatively new compared to other tangible skills passed on over time. I would also wager that many more photographers today can swap out a hard drive than can load a reel and developing tank in a darkroom. It goes without saying, but it needs to be said: it's always a good idea to back up your data, especially before making a hardware repair. As far as data is concerned (as with most things in professional photography), two is one, and one is none.
With that said, there are many good practices and tricks for hardware servicing and repair that don’t always get the due they deserve. Electrostatic discharge (ESD) safety is one of them. As I anticipate the sheer number of emails and tweets telling me this concept is a farce, huge tech companies invest incredible sums of money training their technicians to work in ESD-compliant environments to prevent even the most remote chance of damage. If you’re doing any hardware repairs or upgrades to your computer or even camera gear, static electricity can build up and damage your components beyond even component-level repair. The amount of voltage in a static shock required to damage an integrated circuit board isn't even detectable all the time, and the visual damage can also be indistinguishable.
Create an ESD Workstation
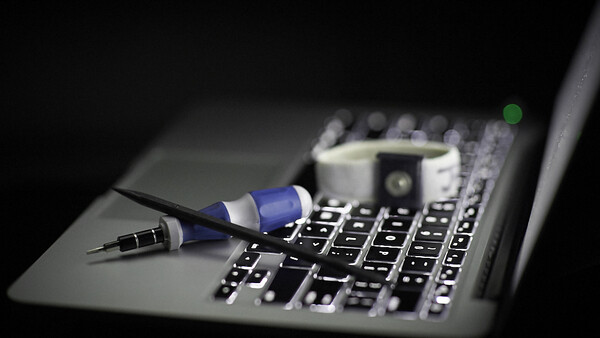
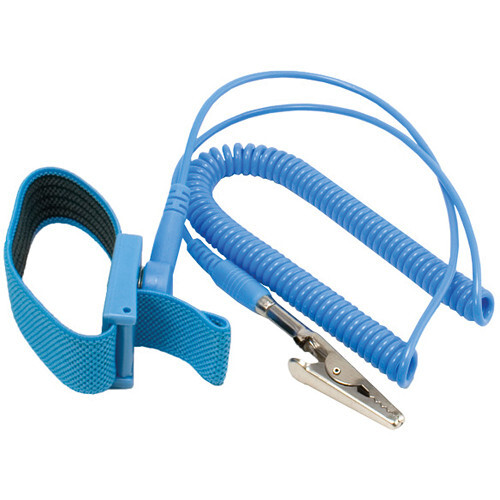
Two of the easiest and least expensive tools to implement in ESD safety is a grounding mat and wrist strap. An ESD-safe grounding mat and wrist strap can help safeguard your tech devices as you work on improving them. If you are getting into wiring, component-level repair, and plan on soldering, look for a grounding mat that is also heat-resistant.
Those silver bags that internal hard drives and RAM come in are static shielded bags. It is also a good idea to keep parts in (not on) shielded bags placed on the ESD mat before working. Anti-static bags are reusable and perfect to keep on hand for storing spare parts. Plano boxes are great for organizing screws as you work. I often use small magnetic bowls for small screws, but be sure to keep these from hard disk drives, as magnets can wipe the memory if they're strong enough.
Best Practices & Useful Tricks
- Work with ESD-compliant mat, wrist strap, and tools
- Components should always be handled by the edges, not touching the connectors or circuitry
- Be sure no one bumps into you while you’re grounded, including the cat
-
Take Reference Photographs. If you are disassembling a piece of hardware, snap photographs on your phone as you progress for reference. This will help when you start to reassemble hardware, seeing how ribbon cables were routed, and will minimize that a terrible feeling of having left over screws at the end of a repair.
-
Look For Take Apart Guides. Sometimes there will be a specialized tool or technique required to complete a given repair or upgrade that are dedicated for that task. Rather than risk breaking brackets or stripping screws needlessly in disassembly, see if there are any free take apart guides online or how to videos from a reputable source. These are a superb reference to have on hand assuming the information in them is correct.
Helpful Tools To Improve Your Repair Work
- ESD Wrist Strap - Ground yourself to protect electronics from static charge.
- ESD Mat - Ground your workstation. Look for an ESD & heat resistant solution if you plan on soldering.
- Magnetizer/Demagnetizer - Another massively helpful tool for repairs, adding or removing a charge to a driver for easier wrenching.
- Small Parts Organizer - Great for sequentially organizing screws as you are working on a device
- Magnetic Parts Tray - Again, avoid having this come into contact with hard drives or components. I love using these because even if the tray gets knocked over, any metal screws inside will be held in place.
- (Nylon) Precision Driver Set - Torx, Pentalobe (mobile devices especially), Phillips screwdrivers in size 0, 00, and 000, are some of the most popular sizes to have on hand. The last thing anyone wants is to not have the right tool in the middle of a repair when you need to get a device working.
- Nylon Spudger/Black Stick - Helpful for lifting ribbon cables, connectors, prying, and positioning components. The utility these provide in a repair is absolutely superb and can help you to avoid a lot of stress in repairs, especially disconnecting cables.
- Helping Hands - Aids in keeping your hands free from holding wires while working on electronics. These often include a magnifying glass to assist with precision tasks.
 Things to Avoid
- Avoid working in low humidity environments to minimize static charge buildup
- Carpeted areas, fuzzy socks, fleeces, anything that can build up static including polyester
- Jewelry, including rings and watches
- Vinyl, polyester, and (non-ESD) plastics
- Contact with others while being grounded
- Working on metal surfaces
- Handling components by any means except on the edges or with ESD pliers
- Food and drink shouldn't be anywhere near your repair workstation
Disclaimer: I discourage anyone from performing repairs that are beyond his or her qualifications. Electrical shock can be lethal, and all that aside, my intent is to help people from damaging sensitive electronic components. I’m not going to get into CRT (cathode ray tube) safety and discharging those, as that can be a highly dangerous task and is much more component-specific. Mishandling technology can permanently damage you or the device, so make sure you are well educated on the task at hand. My intent is to help you be more intentional in your work, not to guide any repair step-by-step.


6 Comments
"Humidity – low-humidity environments to minimize static charge buildups"
You've got this backwards.
I'm saying that low humidity environments are to be avoided, as higher levels of relative humidity helps to reduce the buildup of a charge.
I suggest to edit it ;)
Gotcha. I see. My initial reading was: "Things to avoid: Humidity," followed by an instruction: "low-humidit environments to minimize static charge buildups."
The edit clears up the confusion! Thanks!
I am amazed that you are not providing a link to possibly the largest resource for repair guides and tools and parts to usually a lot better prices then B&H and that is www.ifixit.com
While ifixit is one of the best, sometimes their information is incomplete or inaccurate. I recommend looking at more than one repair guide to get a better idea of what to do. The best one for Macs are at MacSales.com, otherwise known as OWC.
The information provided in this article is excellent advice but I would also add to simply take your time. Learn everything that is involved in the task before getting started and then treat it like what it usually is, a surgical operation. If you are dealing with something that could benefit from someone assisting you, then get someone to assist, even if just to hold a part in place while you connect a harness, for example.
If after doing all that you still have reservations about completing the task, then don't try to. Take it to someone you know that can.