
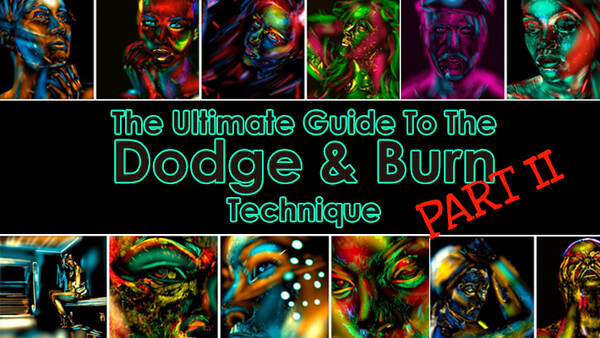
This is the second part of The Ultimate Guide to the Dodge & Burn Technique. Check out Part 1, where I covered the fundamentals of light and shadow rendering in painting.
So, now that we understand that the shadows and highlights are what makes our 2-dimensional pictures appear to have more volume and dimensions, let's move on to the technical side of the Dodge & Burn implementation in retouching.
Part 1 of this article: The Ultimate Guide to the Dodge & Burn Technique – Part 1: The Fundamentals
Part 3 of this article: The Ultimate Guide to the Dodge & Burn Technique – Part 3: Curves Setup & More
In this article my friend and fellow artist Alexey Dovgulya will help me cover the correct tablet and brush settings for effective and accurate Dodging and Burning.
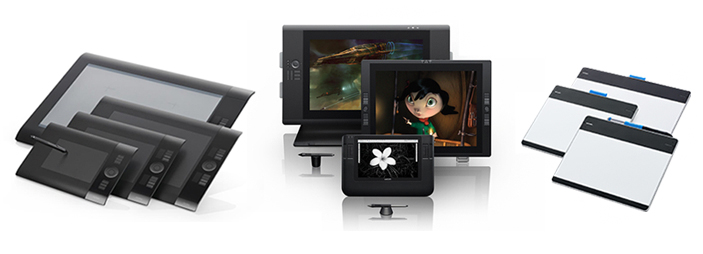
Retouching with a Mouse Vs. Tablet
First of all, I'd like to make a point that it is possible to retouch with a mouse, but to achieve outstanding results and soon - highly unlikely. If you want to speed up your retouching progress and work with comfort get yourself a graphics tablet. Wacom tablets now are at least 5-7 times less expensive as they were when I was starting out, so the cost shouldn't be stopping you if you're serious about your retouching.
Retouching with a stylus may seem very inconvenient at first, but you get used to it in a matter of days. And once you do you'll never want to look back. It will always feel more comfortable and natural in your hand than a mouse. You can control the thickness of your brush strokes, transparency and color with its pressure-sensitivity. The higher the pressure-sensitivity, the more responsive and natural your tablet will feel and the more control over your retouching you will have.
Choosing the Right Tablet Size
Alexey suggests that for retouchers graphics tablets should be small, because unlike digital painters when working retouchers move their hand rather than their arm. With a larger tablet you will have to move your hand around a larger working area of the tablet, often lifting up your arm, which will add tension to your shoulder and back in the long run.
I personally prefer small tablets too, even though I work on a 27-inch screen. My very first purchase was Intuos 3 medium size - I mistakenly assumed that I needed a large tablet, but I could only afford a mid sized one at the time (it was $499 + tax then). Then I got an Intuos 4 small size as a present in 2011, and won Intuos 5 Touch medium size in 2012 in a Wacom & AfterCapture Digital Imaging contest. Of course I started using my prize tablet, but soon went back to the small one and am working on it until this day.
Before you get down to working with your new tablet, make sure to download and install the latest driver from the Wacom website and get into the tablet settings. Make sure your mapping is set to Pen mode and the tablet's working area is matching your screen in full.

Once that's confirmed customize your pen's tip feel. I personally always set it to the softest, so that my brush strokes are soft and match the size of the brush tip. If you set it to Firm, your brush strokes will be much smaller than the selected brush size.
Brush Settings in Photoshop
To open your Brush settings panel in Photoshop you can either press F5, select Brush in the Window menu or click on the little brushes icon in the Options Bar, like in the illustration below:
Let's take a look at some important settings in the Brush panel and set up your brush for the most efficient and accurate Dodge & Burn work.
There are only a few tabs where the settings do matter for our 'D&B brush': Brush Tip Shape, Shape Dynamics and Transfer. I will quickly show you the importance of some of these settings, including Spacing, and instead of walking you through the rest of the brush settings, I'll offer you to download a set of brushes (large and small) that I created for this article.
So, Spacing is the setting that adjusts the distance between each stamp of the brush tip in a stroke, and with that it influences the density of the brush stroke. Keep the Spacing in the Brush Tip Shape tab at 25%: anything higher will break up your brush stroke into a series of dots, and anything under it will make your brush 'bleed', and the brush strokes will be more RAM-demanding and larger than the actual size of the tip of your brush.
In the Shape Dynamics tab: Size Jitter - 0%, Control set to Pen Pressure - if there's an exclamation point by this or any other setting in your Brush Panel it means you need to update your tablet's driver.
Minimum Diameter - 50%, however this setting will depend on your personal preferences. With a smaller number you will be able to create thinner brush strokes by changing your pen pressure as you paint. And a higher number is good for soft large brush strokes. Thus, 50% would be ideal in most cases.
Remember to keep your Airbrush setting in the Options Panel off. When it's on, you may accidentally affect a larger area than you intend if you keep your brush in one spot for a little longer.
Please feel free to download this brush set that I've created for you - these brushes are perfect for both local and global Dodging & Burning, which we will discuss later: D&B Brush Set download.
Brush Opacity & Flow For D&B Work
Normally when Dodging & Burning we want very low intensity for our brush, so we can slowly and accurately build up the effect we're trying to achieve with multiple brush strokes. For that we can lower either the Opacity or the Flow of the brush and it often seems confusing for beginners which one to adjust for a better result.
If you're still unsure what the difference between these two settings is, check out this video tutorial on Retouching Academy by my friend, fellow-artist and Fstoppers colleague Michael Woloszynowicz: The difference between Opacity & Fill and Opacity & Flow.
In short, it depends on your style of handling your pen when painting. I, for example, lower the Opacity and leave the Flow at 100% most of the time, because when I paint, I lift my brush up at the end of each brush stroke. It is just my individual habit. Michael Woloszynowisz, for example, lowers the Flow and leaves the Opacity at 100%, because he builds up the intensity of the brush strokes without lifting up the stylus. So does my friend - whom you all know and love - Pratik Naik.
Dodge & Burn Tools in Photoshop
Even though I often hear from my colleagues that they don't use the native Dodge & Burn Photoshop tools in their workflow, and I myself use other setups and tools too, they are still there and it's possible to retouch with them as well. But there are a few nuances we believe you need to be aware of.
Long story short, the Dodge tool brightens pixels when applied, and the Burn tool darkens them. The fastest and the simplest way to organize your Dodge & Burn workflow is to work on a duplicate layer using the both of these tools. You can even switch between them by holding the Alt key as you go.
But there are some disadvantages to working with these Photoshop tools. These instruments are pretty aggressive and are challenging to control. Their functioning is based on the Color Burn and Color Dodge algorithms, which tend to drastically change the original colors and values of the pixels even with very light application. As a result, you often get 'burned-out' highly saturated areas instead of only slightly brightened as you might have intended.
However, there are a few ways to contain these tools' extreme temper.
First, of course the Exposure of the tool - lower it to 1-10% for lighter application. You can uncheck the Protect Tones to prevent over-saturation of the brightened areas, but Alexey admits he keeps it on to prevent changing of the color, instead he corrects the over-saturation in the following step of his retouch.
We can also select the Range of the application to Shadows, Midtones and Highlights and the tools will treat the colors they are applied to accordingly.
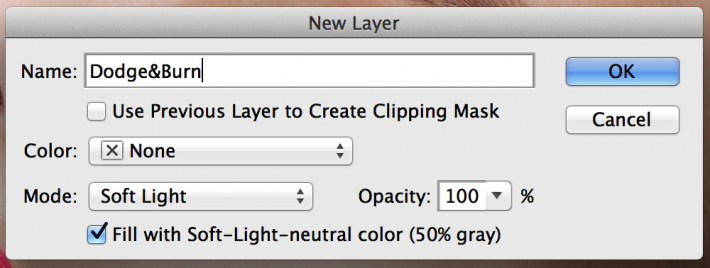
And as an additional counter-action we can work on new layers filled with 50% mid gray set to Soft Light Blending mode - this will significantly decrease the possibility of creating color artifacts and it will also soften the impact of these tools altogether.
To quickly create such new layers press Shift + Command (CTRL) + N, select Mode: Soft Light and check Fill with Soft-Light-neutral color (50% gray).
But even this won't completely prevent you from creating new problems with over-saturation and you will still need to correct them as an additional step in your workflow. Use a new layer set to Hue or Color Blending mode to cover up such areas with correct colors and tones after you've finished dodging and burning.
This is all for today and in our next part we will finally get to all the most used setups and methods for Dodging & Burning in Photoshop.
Stay tuned, prepare your tablet and brushes and flex your retouching muscles until then!
Special thanks to my talented friend and fellow-retoucher from Peru Jesús Vilca for allowing me to use his colorful Dodge & Burn masks in the featured image for this article. You can see his full collection in a Facebook album on his page: D&B Mask - Color.


Join the Fstoppers community for free
-
Post comments and join in the discussions
-
Browse the site ad-free
-
Share your work and get featured in the community
-
Compete in the photo contests for fun and prizes
31 Comments
Whoaaa.... Dammit now we have to wait again?!!!
*rolls Game of Thrones end credits*
Except no one's killed in this tutorial, lol
Tam, I swear I thought the second one was gonna be final :)
Hi Julia, where can i download your brush sets? thanks
Im very excited for the next part, thanks for a great article.
Great tutorial. Thank you for sharing your knowledge. :)
I have a Intous Pen & Touch (CTH480) with the latest drivers installed and the warning is there for pressure sensitivity, anyone else with this issue? Or maybe this tablet isn't compatible with PS?
Sorry, I don't know the answer to this, but if I were you, I'd shoot an email to Wacom customer service. Or search through forums - someone else must have had this before, I'm sure.
tablet and muscle prepared.....and flexing the retouching muscles in the meantime!
tablet and muscle prepared.....and flexing the retouching muscles in the meantime! ...waiting for the next part
interesting article. im not sure if i can ask here, but i have 3 wacom pens, and the airbrush. i wanted photoshop to "remember" the settings for each one. but it doesnt: every time i want to switch pen i had to set the values over and over again... does anyone made it?
Well, I understand that there are many instances where this is required and I respect the technique and the teacher, but dear Santa, I wanted to take pictures and share the real world with the world. The more time I spend in isolation making something perfect, the more perfect moments I will miss. But as always, amazing tips, and thank you.
Oh please, go do your thing, who's stopping you?
Don't waste your time on reading this and leaving comments.
No tablet for me. I'll just deal with having a claw-hand.
tablet is make d and b much funnier i think +)
I'm sure you meant to say 'much more fun', Igor :)
exactly
Thanks Julia, and greets from RA Group @FB
Great Tutorial Julia, Now I have changed my pen tool, it is much easer to D&B ! That's awesome!
D&B Brush Set link is no longer working :(
Any chance to repost the brushes? The Dropbox link is no longer working.
good article :) but i can download D&B Brush Set :( where can i get?
Hi Julia,
thanks for sharing this great tutorial. how to get the d&B brush set you mention in part II. it seems the link is broken.
thanks detlef
Hi Julia,
Thanks for a great article! Do you mind reposting the link to the D&B brush set again? It seems like the file has moved and the link isn't working.
Thanks for amazing article.
Thanks for the series. A few questions here.
1. You talked about using pen pressure to change the size of the brush (shape dynamics setting), so does it mean that you dont have to change the brush size in traditional way?
I find out that when i do local dodge and burn (fixing detail, i dont need to change brush size much as most of the small areas require same brush size)
2. You didnt mention "Transfer setting", do u use pressure to affect your own opacity and flow?
WHat i learn from Krunoslav Stifter's technique is that, i keep my flow really small (1-5%), and leave all Shape Dynamics and Transfer off. So, here comes a confusion: Using a tablet but PRESSURE wont be used.
I hope you got my points,
Thanks
Some of the image links are broken. Can you please restore the images?
I just started to read through this guide which is really helpful. On my screen there are some images regarding brush settings missing. It would be great to see them. Thank you.
thank you for your perfect article
how could i download dodge and burn brush beacuse when i press the link
it said the dropbox is empty
Most of the links are broken