
Most of the time, we try to avoid blur in a photo. But sometimes, it can be nice to add some kind of blur to make it special. I have listed seven ways to add blur to a photo or the illusion of blur. It may help you find inspiration for your photography.
A lot of photography requires a sharp photo and the focus at the right spot. We use sophisticated autofocus systems to help focusing, like the new AF-AI system of the latest Sony a7R V mirrorless camera (read my review of this camera), and fast-responding autofocus tracking like the Canon EOS R6 Mark II has (read my review of this camera also). Together with amazing stabilization systems that work up to eight stops, it seems almost impossible to take a photo that is either out of focus or subject to blur.
These systems will help shoot tack-sharp images no matter what ISO, aperture, or shutter speed is used within limits, of course. It also depends on the subject movement itself because stabilization is only meant to reduce camera shake. If an image is not sharp enough, we often throw it away. It’s considered a failed photo.

Intentional Camera Movement (ICM). It was fun to try at that moment, but it turned out to have something special, I think.
There are times when an image doesn’t have to be perfectly sharp at all, especially when it is a memory, like a photo from a holiday or another memorable moment. Some photographers make deliberate use of some kind of blur. Intentional camera movement is a good example, which seems to have become even more popular over time. Some years ago, it was just a niche, but now, more and more people experiment with blur of some sort.

Intentional movement of branches with autumn leaves. It's a way to add blur to the photo.
I have listed a couple of creative ways to use blur, lack of sharpness, or the illusion of blur. It may help you find inspiration.
1. Shallow Depth of Field
A shallow depth of field is probably the first thing that comes to mind when blur in a photo is mentioned. It is also the easiest way to reduce the amount of sharpness in a photo. Only a small part in the frame will be sharp. The amount is defined by the combination of aperture, distance to the subject, and the focal length.

Using a shallow depth of field for portraiture is fairly common.
The quality of the out-of-focus area is called bokeh. This can be used to your advantage. Brights sports in the out-of-focus area work well, but also photographing through small lights can produce great results.

A shallow depth of field is easily achieved with macro photography. The bokeh of these small droplets is important for this photo.
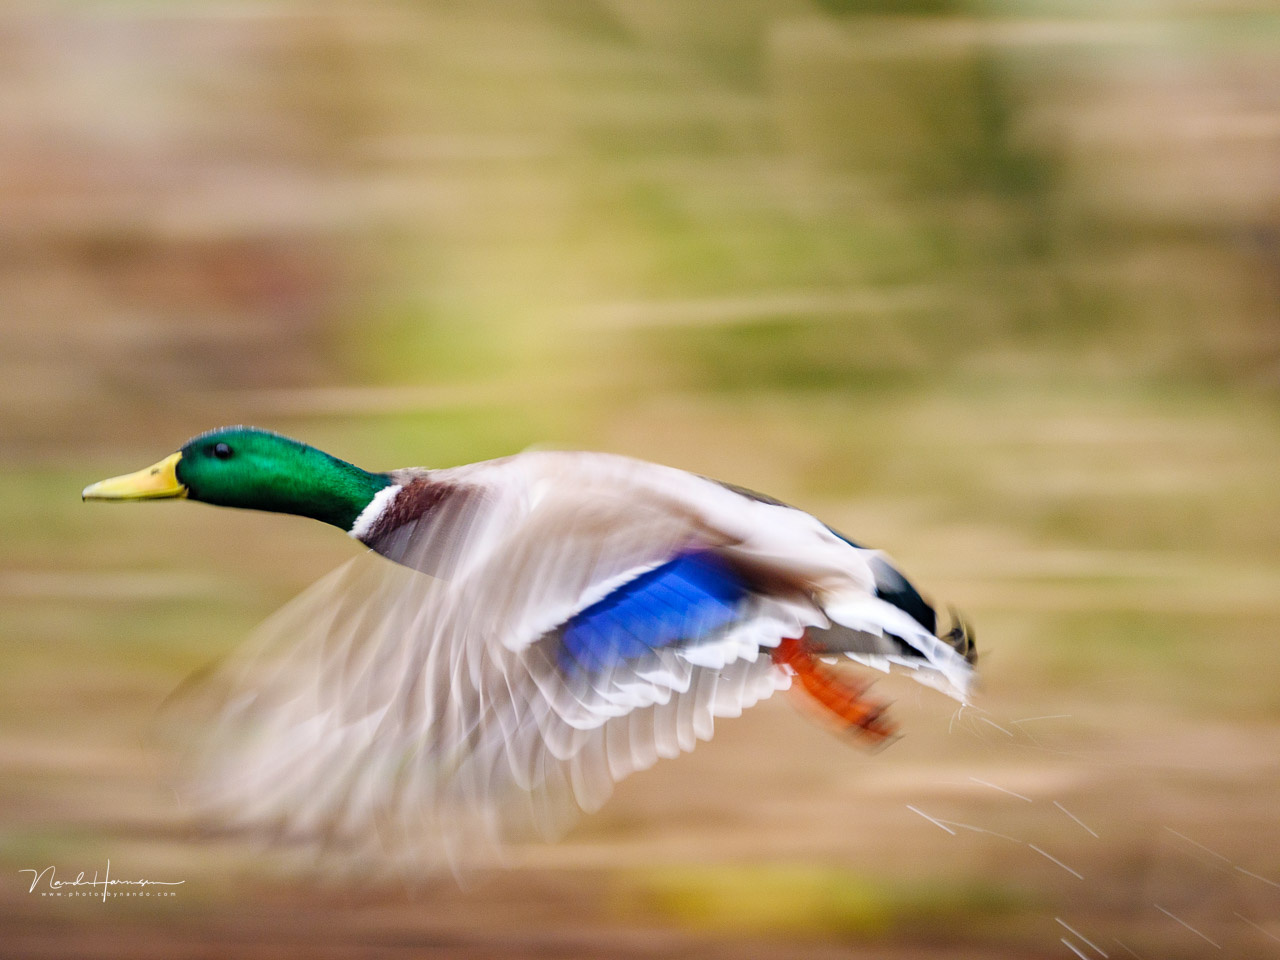
2. Panning
If you follow a moving subject with your camera while photographing with a relative slow shutter speed, motion blur becomes visible while the subject is relatively sharp. This is called panning, which is often used for motor sports or with running or flying animals.
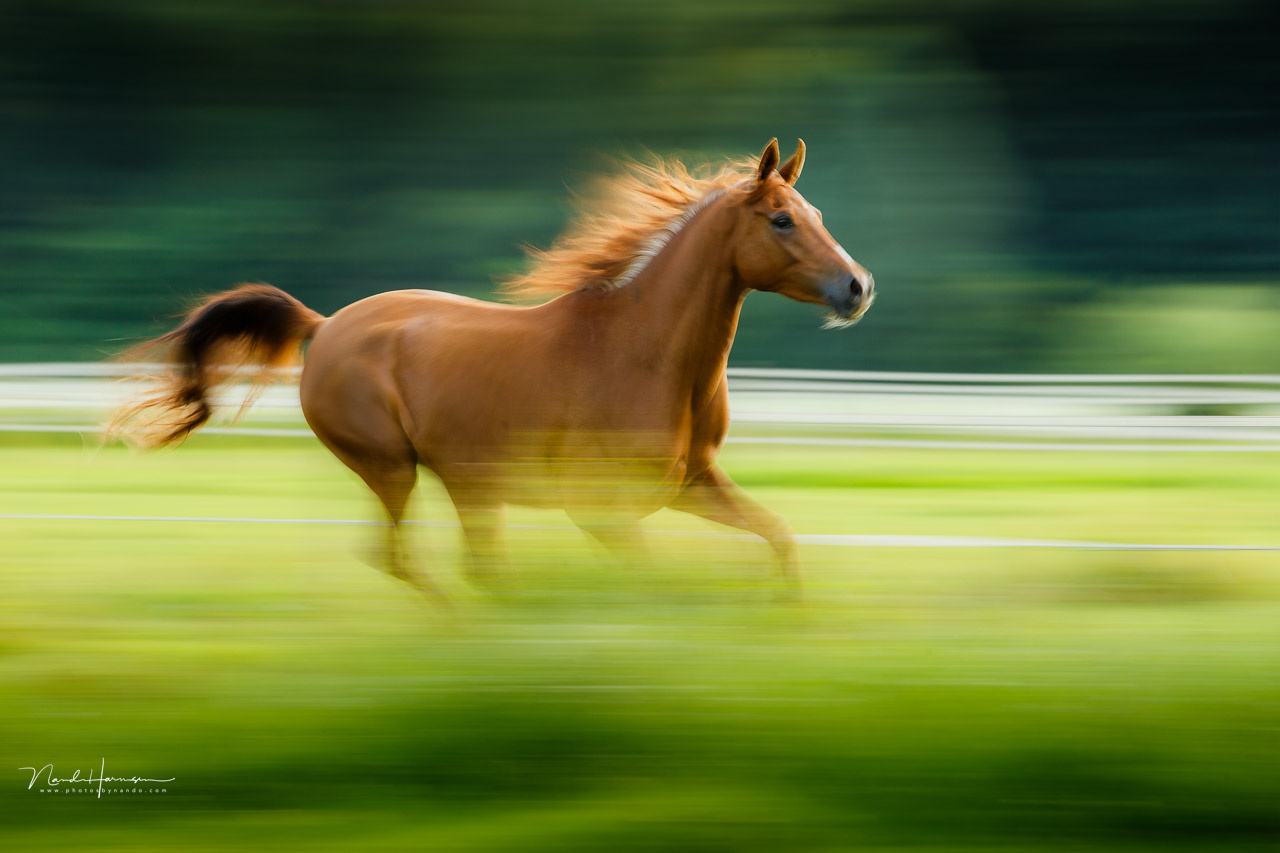
Using a slow shutter speed in combination with panning can produce great results. It's difficult and requires a lot of practice.
When performed correctly, it brings a strong feeling of movement. Sometimes, the subject has also some kind of motion blur, but that doesn’t have to be a problem. It can be quite a difficult photo technique, and it takes a lot of practice to find out which focal length and shutter speed works best in a situation.
3. Long Exposure
Although a long shutter speed is used in a lot of different ways of adding blur in an image, long exposure has to be added to this list as a separate way of capturing motion blur. Often, neutral density filters are used to acquire the right amount of motion blur in water or clouds.

Long exposure photography is well known. Finding the right exposure length is important for the best result.
A long exposure doesn’t have to be extremely long. When capturing the movement of vehicles or people, you have to find the right exposure time. As a matter of fact, this also applies for clouds and water in landscape photography.

Long exposures don't have to be extremely long. Finding the right shutter speed depends on the movement of the elements in the frame.
4. Intentional Camera Movement
With long exposure and a fixed camera, it is possible to capture the motion of the subject. With intentional camera movement, better known as ICM photography, you will move the camera with a longer shutter speed while the subject is fixed.

Instead of relying on the subject motion, you can also move the camera intentionally. This is ICM photography, Intentional Camera Movement.
In this specific situation, you can bring motion blur to objects that are otherwise motionless. A vertical movement is often used with trees. But, you can also combine a moving camera with a moving subject. It’s like panning, but instead of trying to keep the subject sharp, the intentional camera movement will add a deliberate motion blur to the subject also.

ICM Photography is quite challenging. I've been experimenting with this technique lately.
5. Double Exposures
With double exposures, a lot of the previously mentioned techniques can be combined. It’s possible to capture a stationary subject more than once in one frame. Or you can use motion blur in combination with a normal capture. It’s also possible to combine an out-of-focus image with an in-focus image. The possibilities are endless, and your own imagination is the only limit.

Double exposures can add a sense of movement to the image also. If fact, combine ICM photography with a sharp image, or an out-of-focus image with an in-focus image.
Although double exposures are possible in the cameras itself, not every camera has this function built in. It is possible to use this technique in a program like Photoshop or Affinity Photo as well. I do prefer to do this in the field with my camera. It feels more like photo manipulation if done in post.
6. Shooting Through Objects
Blur can also be obtained by shooting through objects. I’ve used Perspex tubes and prisms for my wedding photography. It is also possible to use other objects in your vicinity. Shooting through glass, leaves and flowers, or even through a group of people. As long as you find a way to keep the objects in front out of focus, you can keep the attention on the subject itself.
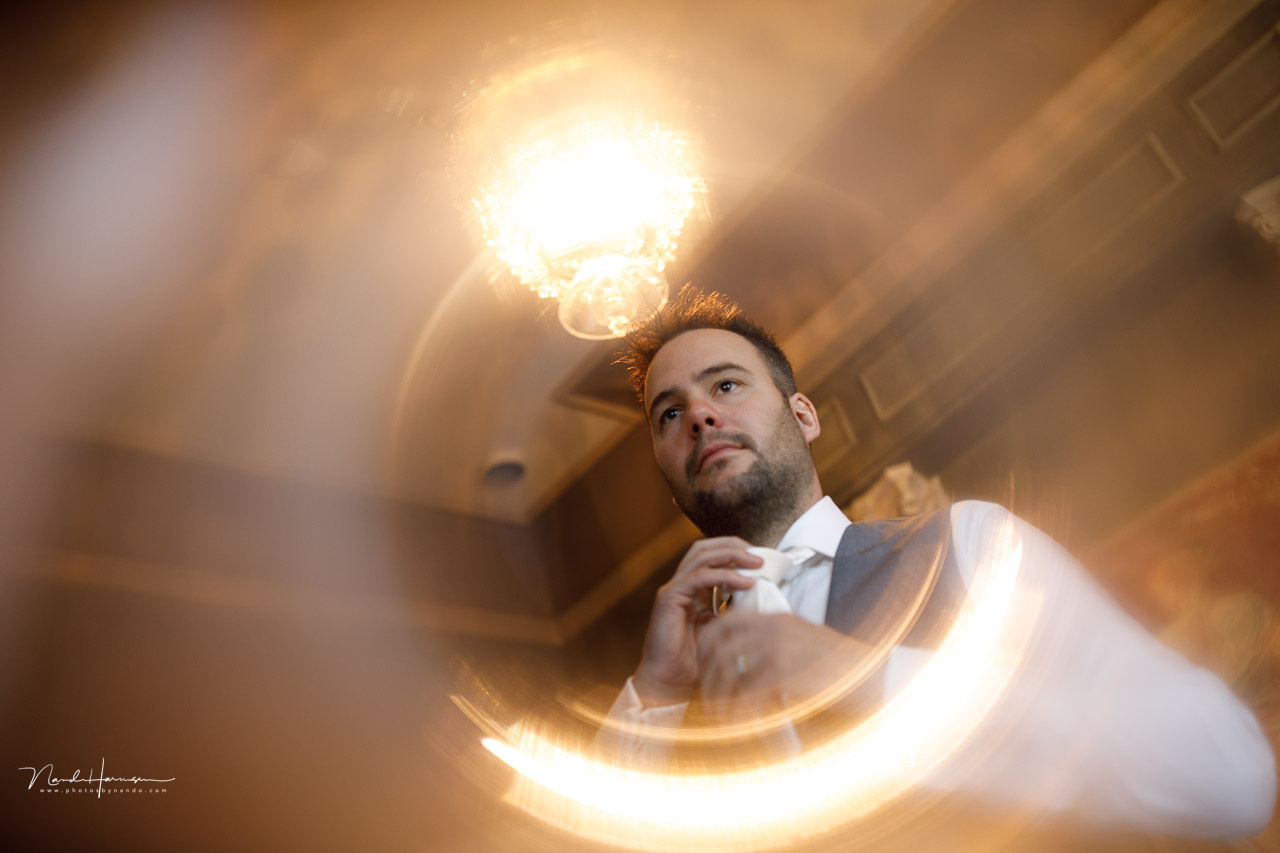
I used a Perspex tube in front of the lens to add some special effect to the image of the groom. This kind of effect has to be used sparingly to keep it special.
I’ve seen all sorts of tutorials on the internet that give nice ideas for shooting through objects. A rubber band allows you to keep all kinds of things fixed around the lens, producing a nice vignetting. Try shooting through a transparent plastic bag, which will give a great texture at the borders of the frame.
7. Reflections
Using reflections in a photo is always a nice way of making the photo more interesting. I wrote an article about seven ways of adding reflections to the photo on Fstoppers as well. Unless you have a pristine reflective surface, some kind of blur will be visible in the reflection.

The muddy water allowed a nice blurred reflection.
The texture of the surface in which a reflection occurs will often add some kind of blur. Also, movement of a water surface can change the way a reflection will be visible. With water, it is possible to manipulate the blur by disturbing the water surface yourself, adding some sort of movement to it.
Perhaps There Are Other Ways As Well
These are the seven ways I use for my photography to add some kind of blur to an image. I’ve been experimenting with in-camera movement a lot lately, and I find it hard to get great results, but I find it an interesting way of showing a scenery in a very special way.
Perhaps you can come up with another way that will produce some kind of blur in an image. If you do, please let me know in the comments below. I hope this article and your comments will give some inspiration.


Cool article. For shooting through objects I'd add shooting through leaves/foliage, grass, whatever is at hand (a scarf with fringes, glass objects like lenses, prisms).
When learning to use "Bokeh" creatively i started with the misconception that it's the lens that produces blur. Well, for the background blur that might go, but foreground blur? No way the lens does this well. When analyzing many images from Japanese flower photographers I came to the conclusion that there's mostly something in the way, being out of focus due to close distance. One can achieve this even with cheap lenses, but well, I learning this after buying a whole lot of pricey ones.
It became an addiction. One of my favourites is this: https://flic.kr/p/2kWenoa
As a street photographer, I often zone focus on a 40mm or 50mm lens. You just need to make sure to include elements in front of the zone of focus to create intentional foreground blur. Works really well.
That was a cool quick article. I would have appreciated if the specs for each photo was shown. I myself have always wanted to do those cool nighttime laser highway photos, but just it never really ends up on my shot list.
I've done plenty of waterfront long exposures but trying to get the water to have a very smooth, sexy look even with a ND filter can still be challenging. Sometimes it just looks like a weird texture running across the water. That's what practice is for I guess lol.
I have a goal for this type of image when I head back to Japan. I'm trying to wrap my head around this r62 autofocus coming from a 5d3, so maybe the double exposure functionality is available and I can try more of these kinds of effects.
That said, can the post be updated with the data for the photos? Thanks 🙏
Okay, Exif data for you (except the opening wedding photo with kids)
- 24mm, ISO50, f/16, 1/20s, handheld and panning op and down
- 17mm, ISO50, f/11, 1,3s, tripod and moving branches with leaves in the front of the camera
- 85mm, ISO100, f/2, 1/640s, focus on the eyes of the girl
- 100mm macro, ISO200, f/4, 1/2500s
- 200mm, ISO100, f/8, 1/20, handheld panning with the horse
- 318mm (M43), ISO640, f/5.8, 1/60s, handheld panning with the duck
- 19mm, ISO400, f/11, 0,3s, tripod with 0.9ND filter
- 35mm, ISO50, f/5.6, 1/10s, handheld with remote flashlight in an umbrella
- 15mm, ISO50, f/16, 1/13s, handheld, panning with the waves
- 500mm, ISO50, f/9, 1/5s, handheld, panning with the gulls
- 200mm, ISO100, f/5, 1/5s, handheld double exposure, with one of them panning in vertical direction
- 35mm, ISO500, f/2, 1/40s, handheld, shooting through a hollow Perspex tube
- can't find the exif of the last one, but it's quite straight forward.
Another fun one if you're using a zoom lens is to try a zoom blur. It's a similar technique to panning or ICM, where you slow down your shutter speed and push or pull your focal range after you fire the shutter. Nice article!