
"How did you retouch that?" This is the common question I see most when I post my images online. Unfortunately, answering that question directly won't get photographers any closer to being able to replicate that style on their own. In order to broaden the dialog here are five things you must understand if you want to get skin looking beautiful in your portraits.
Before I begin, I'll be using the terms "model" and "subject" interchangeably. I say these words to mean a human person that you are photographing. I am also assuming that you are always shooting in raw, as it gives you the most flexibility to work with an image in post.
The Importance of Makeup
Makeup that has been improperly applied is terribly difficult to fix in postproduction, and is one of the top ways people ruin their photographs. Consideration must be given to the model's skin condition (whether dry or oily), and the proper type of makeup has to be applied given those needs. There have been times in the past where a powder foundation was applied to a model's face and it only amplified the imperfections on their face (pimples, scars, etc.). Properly applied makeup should help to conceal those things so that when you get into postproduction you'll only have basic cleanup to take care of. If you're wanting to get great skin in your photographs, find a makeup artist that is willing to collaborate with you and you'll quickly learn they are worth their weight in gold.
Lighting Can Make or Break Your Image
When I first started photographing beauty portraits I went out and purchased a beauty dish. After all, the word "beauty" is right there in the name of the modifier, so clearly that's the right type of light shaper, right? If you go down that road like I did you'll quickly learn that on some people it does an awesome job, and on others it makes your work in post grueling. The general rule of thumb that I go by when selecting which type of light shaper to use boils down to how well the makeup was applied, as well as the subject's skin health. If a person has really oily skin, or has acne, then I tend to select larger, soft light modifiers like an octa or softbox. If they have great skin, I can enhance the look and texture by using a hard light shaper like a beauty dish or silver interior umbrella. If you photograph someone with poor lighting, it will enhance all of the imperfections of their skin. At this point, no matter what retouching method you choose to employ (cloning, frequency separation, etc.) it will typically lead to a final image with skin that doesn't look natural. This is why my default my go-to lighting modifier is a 5-foot octa. It provides a soft, beautiful light that can be made into a high contrast (harder) light source by taking off the outer diffusion. As you try photographing people with different light shapers, you'll quickly learn what you'll need for any given situation. Experience is key.

The Lens You Choose Matters
Early on in my photography career, I would read about how photographers always rated sharpness in a lens above all. If a lens wasn't sharp, it was deemed to be unsuitable for portrait work. Since macro lenses are generally some of the sharpest lenses around, I picked one up and began using it for all of my portrait and beauty shoots. As I found when using a beauty dish exclusively for my work, it wasn't the best option in every scenario. If you choose a lens like a macro to photograph someone who doesn't have great skin, all you'll end up with is a sharp image of imperfect skin. If you compound this issue with the wrong choice of light and makeup that hasn't been applied properly, it's easy to see why there are so many poorly retouched photos out there in the world. Just as a handyman would bring a variety of tools to a job, we as photographers have to employ a variety of different lenses to use given the situation. I have a set of three lenses that are my go-to lenses. The first is what I call "forgivably sharp," which is an 85mm f/1.4 (or f/1.8) prime lens. It is a great, all-purpose lens for getting great skin texture but not so sharp to the point that it can't be used widely. The second lens I use is a mid-range sharpness lens, which in my case is the Sony FE 100mm f/2.8 STF GM lens. It's visibly sharper than the 85mm lens, but not as sharp as my sharpest lens which happens to be a 90mm macro. Depending on what brand you shoot, that macro may be a 90mm, 100mm, 105mm, or 150mm. In any case, these are the sharpest lenses out there that you should generally reach for in those scenarios where your model has great skin and all of the other factors we're discussing here are on point.
Wider Apertures Blur Skin, Narrow Apertures Enhance Skin
Another big factor in getting skin to look good is the camera settings that you choose; specifically, the aperture you select. Many photographers are in love with the idea of getting "creamy bokeh," but the reality is that shooting at wider apertures will cause a natural blur to the skin thereby minimizing texture and detail. This would be fine if you have a subject that doesn't have healthy skin, but it gives you blurry skin that could look better if their skin was lit right with the right lens and proper makeup (see how this situation is more involved than just a simple retouching technique?). Whether I'm shooting in studio or in natural light, I tend to aim for higher apertures (f/8 and up) when I'm able to control the other factors discussed in this article. This will often lead to portraits that have more of a "high definition" look to it. Try varying your aperture during your next portrait session and you'll see how much better skin can look using different apertures.
Choosing the Right Photo
In my lectures and workshops I am constantly telling people "you can't polish a turd." I say this to mean that if you select a photo that didn't have the elements discussed above there will be no amount of retouching, techniques, or methods that will yield a great final image. This is one of the top things I run into with new photographers, as it takes time and experience to discipline your eyes to tell the differences between a good and bad photo. As your eyes get better and more discerning, you'll find you will be more critical when selecting an image to work on and show the world. If you take 100 photos during a session and believe 95 of them are keepers, then you've likely got some more to learn. Take the time to learn the differences between a good and bad image, and then when you get to Photoshop you'll really be able to enhance a good photo and make it even better (dare I say, perfect!).
Final Thoughts
We live in an age where everyone wants a shortcut, a hack, a secret technique to getting great results. The fact of the matter in regards to photographing skin is that you have to start off with a great raw image in camera. Do this, and you'll see that even the simplest retouching techniques will yield massive results.
If you're wanting to learn more about photographing skin, be sure to subscribe to my YouTube channel. I am planning on doing some more videos discussing this topic and attempting to answer any questions that are left in the comments for the video.


Join the Fstoppers community for free
-
Post comments and join in the discussions
-
Browse the site ad-free
-
Share your work and get featured in the community
-
Compete in the photo contests for fun and prizes
37 Comments
I agree with all of this AND it would have been highly relevant to post the details about each of the photos in order to highlight the points that were made. Which photos were taken with the 90mm Macro? Which were shot at f/8 vs. 1.8? Which were shot with soft vs. hard light? If you can already identify those characteristics by looking at these pictures then you didn't need this article, so if this article is relevant so are the details about each photo.
The man photo has no exif.
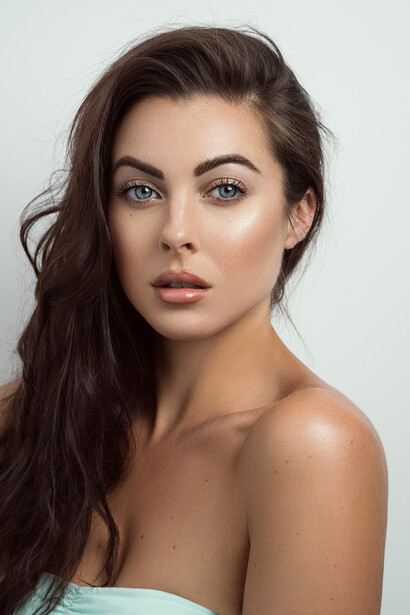
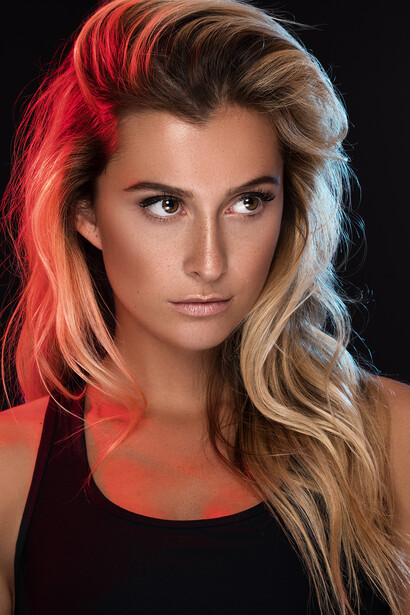
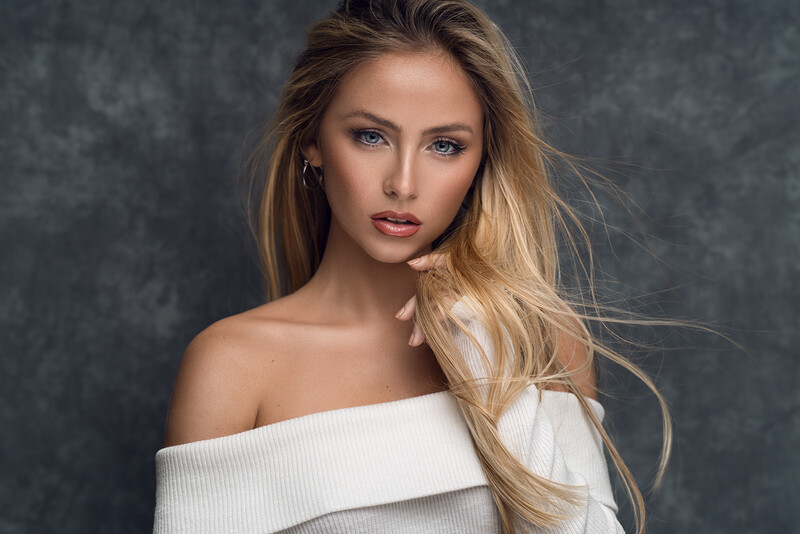
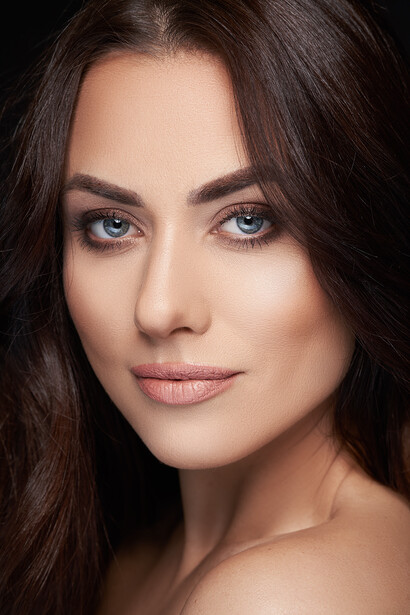
All woman photos were shoot wiht 100mm, execpt the blond with red light, it was an 85mm.
"You can't polish a turd", but you can sure frequency separate the hell out of it to make it look like one of these peoples' faces.
Troll on troll baby, troll on ;)
The only hack is hiring a gorgeous model with perfect skin. Always ask for polas before shooting.
It definitely helps, but if you only wait to shoot someone with perfect skin imagine how bare the portfolio would be 😀✌️
Is it just me, or is there something about most beauty and tight photos from the Sony A7R/S series that just looks unrealistic?
I will say, the photo of the lady with the white top does look amazing.
It's the editing technique called 'frequency separation'. When overused, it removes all blemishes and skin takes on this plastic look.
In fact, when I was learning retouching, Frequency Separation was to me like a super fun technique to use, especially loved painting in the low-freq layer because I was a tattoo artist before and loved to paint.
But the retouchers I learned from, Natalia Taffarel, Pratik Naik, Michael Woloszynowicz, Julia Kuzmenko McKim... all they said they use it little or even never. They were doing everything with D&B. I thought "oh, I always going to use FS, is so fun..." Guess what, one year later more or less, I was doing everything with D&B, and today I have FS completely removed from my workflow.
Is not like is a bad technique. When you use it properly, you have good results, but if you work in your lighting and you look for a good natural looking photography, D&B is the way.
This, Frequency Separation is pretty rare to see in retouching studios.
Typically when people incorrectly use FS it obliterates texture and pores in the skin. I'm not about that with my portraits. If you want to see what one of these files looks like on your own monitor, download this TIFF file of one of the shots here and see for yourself> https://drive.google.com/open?id=1eveOuhaDI1tQVAWJhUd1cp_Nm8j6Itq-
Feel free to reply back and let me know if you think it looks CGI.
Plastic has texture. Porcelain less so, sure, but plastic still has texture and still looks plastic. No, that particular image does not look CGI, but the ones of the women do. You picked the one image where you left in large pores and wrinkles and didn't overly smooth out the face.
First thing's first: its a nicely written article. You touch on some things that are genuinely important to consider when it comes to skin. Since that was the point, I was going to let the the next point slide, but since this is the direction the discussion has gone...
2) Your photos of the women look very CGI and you should know it. The fact that the article opens with "'How did you retouch that?' This is the common question I see most when I post my images online." should make it VERY obvious that your photos look fake and people know it. For reference, people honestly believe Ansel Adams work was straight out of camera, completely untouched. Fact is it was processed to the extreme. The difference between that kind of processing and yours is that his was believable, and yours isn't. There's nothing wrong with going for a look - your photos all convey a similar visual style that is very popular right now, ESPECIALLY here on FStoppers and 500px. But you HAVE to know that people's skin doesn't look like that. Even absolutely perfect skin doesn't look like that. And despite what some people here are saying, frequency separation isn't the culprit - D&B can look equally fake, if not worse in some cases when people overdo it. Again, if that is the look you're going for, by all means, have at it. But if you want natural looking skin, the photos you posted of the women aren't it.
Again, it is a very good article.
I agree that you can overdo D&B too. But People here have a point with FS because is a lot easier to overdo, and it happens a lot. Is too much power. With D&B you have to really work for that fake effect, with FS you can blur the low-freq layer in just a second and you have it.
Is not for nothing that the retouchers I mentioned before talks about the dangers of misusing FS but every one of them are in favor of a good D&B technique.
Once I read a funny comment in a Natalia Taffarel video, it was something like "Is weird to watch Natalia in a video in which she doesn't curse FS" :D (Well, is funny if you are familiar with Natalia's personality. Is very passionate and very opinionated)
It is definitely easier and faster to overcook an image with frequency separation, I completely agree. Its also usually the first or second skin cleaning technique people try (I'd guess after the old "blur it to oblivion" technique). However, while I haven't seen every video/article on the subject, I have yet to see a tutorial or article on D&B that depicts realistic looking skin. In fact, from what I've seen, often times D&B is even more prone to overcooking the overall image than FS, as FS is just cleaning skin, while the D&B crowd feel the need to create specular highlights all over the face.
All that said, I do find myself preferring D&B for cleaning skin when time allows. Its a great tool.
Uhh, looks like wax cabinet...
My 9yr old says there are 3 wax people and 3 real people in the above photos.
I asked my newborn what he thought about your comment and he said your 9 year old was half right. Oh, and he pooped his diaper 🤣✌️
Great work Miguel, thanks for sharing this wonderful article. Can I just ask you and any other professional portrait photographer reading this, what are your thoughts on blood vessels in eyes. Do you use post production to edit them out on your work to make the whites of the eyes look clean and clear?
Thank you! As far as the eyes go, it all depends on the image and the use. I typically get rid of the blood vessels while they are on their own later and then reduce the opacity to bring it back a bit.
Great advice! Thanks again and best of luck with all of your work, it's wonderful buddy!
These are all fantastic tips so I commend the author for those. However I believe that the examples above are still a little over-retouched. The model in the white outfit appears the most over retouched to my eye followed by the last example which is too sharp.
Thanks for the feedback. Keep in mind, this article isn't about retouching. Its about the prerequisites to retouching. Theoretically, if you use the tips in the article to get your own shots you can retouch them to your own tastes. :)
Agree!
These are all fantastic tips so I commend the author for those. However I believe that the examples above are still a little over-retouched. The model in the white outfit appears the most over retouched to my eye followed by the last example which is too sharp.
The skin on those female models looks like cheap vegan leather. I cant really take the article seriously when the photos are waaay below the acceptable line. A for effort though.
A for effort, I'll take that :)
Also love how the author just accepts the fact that he published a sad excuse for an article and a subpar photo and just goes ahead to reply to every comment, just shut your trap dude, you aint helping yourself.
That's a bit harsh. The tips provided are actually really good advice regardless of whether you like the example images or not. Remember end results are subjective and for newish retouchers these tips are very useful.
I see, so according to you Misael, you can say whatever you like and I should sit quietly? What fun is that ;)
Miguel, thank you for passing along your observations. I, for one, found them informative and appreciated your post. That goes for any follow up posts with other CONSTRUCTIVE criticism. As for the crap and negativity of others, well, try to let it roll off, dude. I look forward to reading more about your work.
Thank you! Glad you found the information useful. I'm not really too worried about the haters and trolls. They are entertainment and fuel for me to keep on pushing forward. :)
Good stuff, Miguel
Thanks! 😀✌️
Miguel,
I am a 3D artist who is interested in taking highly detailed photographs of skin (face, neck and shoulders) to use for realistic skin texturing. In my case, skin detail (pores, varied coloration, etc.) is the goal. The photographs would be front, 3/4 and side close-up headshots (shoulders and up). It seems that I should use your recommended 90mm lens at f/8 for this purpose. Is that correct? What would your lighting recommendation be in this situation? I would like to reduce specular highlights as much as possible (maybe using a polarization filter, or something).
It's interesting how we have these two particular areas of massive hypocrisy among photographers: Retouching and watermarking. ANYTHING else in photography gets doffed away as, "It's his art, man! There are no rules in art! Who are you to judge!" But get into those two subjects and all the hypocritical judging crawls out of the woodwork...as if either were a moral decision.
In the video it was mentioned that from f8 and above you will get good skin textures. Just a comment for anyone that has no money like me. I own APSC to save on expenses. I have found I can work from f4 and above. I also have found I get too much diffraction the at higher f-stops. I prefere not to go above f8, and shoot with a 50mm, to 80mm. The smaller sensors just can't handle the higher f numbers.
Photography is described as the art and science of creating with light. We are each capable of using science in photography to create our art as we see it. Miguel, thank you for this video and article, it was good for you to share insights into your unique photography style.
I now have to say something about the rude comments that many people think is ok to share while hiding behind their avatar and fake name. First of all, if you wont share your opinions without showing who you really are, you probably are aware that your behavior is not ok, or perhaps you would show who is commenting. My image by the way is me, not hiding anything here.
People, it is not ok to attack an artist's work. If you don't like the work, don't comment. I don't understand why some of you spend so much time putting the work of others down? Miguel has shared what is important to him giving good information about his vision. I have picked up useful information from artists who's work I like and artist's who's work I don't like. The point in art isn't about if you do or do not like someone's work it's about understanding what it is they are trying to communicate, that's it.
I get we have a freedom to say whatever we want, but that doesn't meen we always should. Attacking artist's work online is very wrong, please stop!