
Are you committing these editing mistakes, and potentially ruining your portraits?
A beauty portrait is just what it sounds like: a photograph meant to show the beauty of the subject. There are several sub-genres within the umbrella of beauty photography, including portrait, editorial, commercial, and creative. Each one will have slightly different requirements depending the intended purpose, for example: commercial beauty is generally hyper-perfect, where "imperfections" in the skin, including permanent features such as freckles and moles, are removed, in order to show something like an "ideal of beauty" while selling a product, like skincare or makeup. Beauty portraiture will aim to retain those identifying marks and only remove temporary blemishes and deemphasize things like wrinkles or under-eye bags, and are often for a personal client.
The first thing you need to know, before beginning a beauty retouch, is what kind of image you're working on, so you can meet those standards. The mistakes in this article, however, are mistakes all across the board. Avoid these if you want your beauty portrait to be lovely and believable.
For these examples, I'm sharing a set of beauty portraits that should be cleaned of distractions, but not hyper-perfect. They should maintain a sense of realism.
Hyper-soft Skin


This mistake is easy to make, and one most often committed by beginners. It's often a result of using filter actions on the skin (either through techniques like Frequency Separation or purchased actions that automate the softening,) but can also happen when someone gets over-enthusiastic about dodge and burn. Skin should look like it belongs on a real human, meaning that the texture can be cleaned up, but it shouldn't be erased; human skin should still look like human skin.

Close up of skin and the regular skin editing layers and tools.
If you want to avoid this, remember to K.I.S.S. Keep It Simple, Stupid. Don't try to use multiple actions and programs that will only exacerbate the problem by piling effect on top of effect; all you really need to clean the skin is Healing/Cloning and Dodge and Burn. Clean the skin texture with healing or cloning tool on an empty layer set to "Current and Below," and then use Dodge and Burn (I prefer to do this with a masked curves adjustment layers) to even out the way light transitions across the skin. Make sure to begin your dodging and burning zoomed out, so that you can see how the effect is affecting the skin, then zoom in to tackle more local skin issues. Make sure to zoom out often to stop yourself from overdoing it. Don't forget that there is also skin on the neck, torso, arms and hands. Having the skin of a twelve year-old on your subjects face, but a neck that looks like a plucked chicken in cold weather, isn't a good look.
Signs You May Have Gone Too Far
- The texture of the skin is completely gone and the face looks like belongs in a department store window
- The texture looks like it's "floating" above the color, or otherwise unattached to the color
- The skin color is gray around the edges in areas like in the hairline on the sides of the face or arms.
No Lower Eyelids


I cannot tell you how many times I have seen this. I have to assume this is people mistaking lower eyelids for under-eye bags, but whatever the reason, this is a huge retouching mistake. Humans need lower eyelids, and beautiful women need them just as much as anyone else. Removing the lower eyelid pushes the photo into something called the "Uncanny Valley" where there is something off about the subject but the viewer doesn't immediately catch what is wrong. It's used often in reference to non-human objects, like robots, that have human characteristics but don't quite make the grade.
Avoid removing the lower eyelid. Feel free to clean up distracting wrinkles, stray hairs, blemishes, etc. but for heaven's sake, please leave the eyelid intact.
Signs You May Have Gone Too Far
- The subject looks like they're squinting when they're not
- The cheek extends up into the lower eye with no visible definition between eye and cheek, like a cartoon character
- The skin texture of the lower eyelid disappears, looks soft, or like the texture from the cheek instead of texture from the eye-area. These two textures are not the same, by the way, because the skin in each area is different. Unless your an android.
Nuclear Eyes

Eyes are subject to the same rules of light that everything else is subject to. They should never look like someone just injected your subject with radioactive serum and they're in the middle of a superhero transformation. Eyes are rarely ever pure white, either. They'll often be tinted slightly by the blood vessels and reflections of the environment, from clothing to light bounce. Clean up the sclera (the whites of the eyes) but be very, very careful about brightening and whitening them. They aren't teeth. There is supposed to be a bit of native color in there.
Eyes will also have shadows in them because of the shape of the eyeball and the bones and skin surrounding it. Don't remove those shadows, they are supposed to be there. Also beware of giving your subjects super contrasty, super sharp, otherwise inhuman looking irises. Eyes are incredibly important and, like skin, should look like they belong to real people. You can remove any veins that are distracting, lashes the cross the iris, fill in eyelashes, and brighten up the iris a bit if you must, but let the eyes remain human eyes.
Signs You May Have Gone Too Far
- The sclera looks like a boiled egg, perfectly white
- The eyes are the brightest part of the face, and blaze out at the viewer like the subject has been possessed by Cyclops...yes, that's an XMen reference
- The Iris is a color that isn't humanly possible
Too Much Dodge and Burn


I've heard people call this "sculpting" and while it's helpful sometimes to enhance the light, your subject isn't a piece of clay. The best way to sculpt their features is with careful lighting. A great makeup artist is also be indispensable in this regard. Feel free to add contrast and smooth transitions, but only as needed increase depth. When the dodging and burning has altered the subjects features, changed their bone structure, or made them look more like an illustration rather than a photograph of a person, it's probably time to put the stylus down.
Get the lighting right first, so that you don't have go in and treat your subject's face like a lump of clay. Make sure your enhancing the current lighting scenario, not creating a new one, and be absolutely certain you aren't changing the subjects bone structure or altering their features.
Sings You May Have Gone Too Far
- The subject looks like they're coming at you in HDR 3D
- You've changed the subject's bone structure
- Shadows and highlights have significantly changed color, are distracting, or inhuman
Yes, people who retouch any kind of photograph in any genre can fall into these mistakes, it's simply that they're more noticeable in beauty photography because, well, beauty is the entire point of the image. The photographs are taken zoomed in tight, with the models face and upper body often filling the frame. A viewer might not notice overly soft skin on an environmental portrait, but you cannot miss it in a beauty photograph.
To be fair, it takes a long time to learn how to properly retouch beauty photography in any incarnation, and if you're making these common mistakes, don't get down on yourself! Everyone starts somewhere, and I can guarantee you I made (and still make) plenty of mistakes. The trick is learning to recognize them, and be careful about how each technique is applied. If you have any questions about what a wonderfully retouched beauty photo should look like, study the people who are doing what you want to be doing, whether it's beauty portraits, editorial beauty, or commercial beauty, and make comparisons. Look at the skin, the hair, the lips, the eyes, the color, the texture, and light. Find out how your edits differ, and try to make adjustments. Get feedback from people who are better, more experienced retouchers than you are. Most of all, give yourself time. You'll get there.
For some great examples of photographers and retouchers who are doing it right, check out Jenn Collins, Tina Eisen, Pratik Nyak, or Carrie Beene.
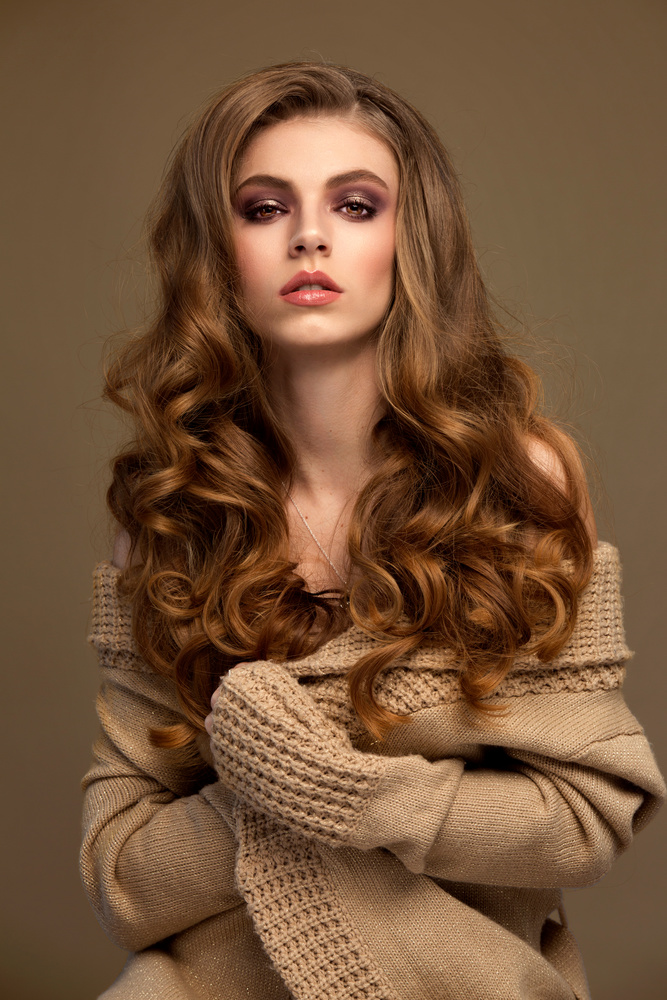
Lead image by Daria Shevtsova via Pexels


I feel like people need a visual. And for others there is no hope.
this.
also, some visual examples of each point would help to illustrate for those who cannot see their own mistakes, even if only for the amusement of those who've already learned the lesson.
maybe the mannequin look is that photographer's "visual style?"
Great article, Nicole! Thank you!
Not so long ago I was doing these exact four things. Great article, thanks !
"The sclera looks like a boiled egg.." lol
Unfortunately, with all the mistakes you mentioned, made a perfect "liked" photo on Instagram or FB.
yes. Yes. YES! It's called skin not plastic!
And as to the demonic, possessed, insectoid eyes.... ENOUGH!
Thank you Nicole for sharing this.
Yeah, I used to be pretty aggressive with frequency separation. Now, I don't use it all. I switched over to dodge and burn. Even if you get a little carried away, it's nowhere as destructive as FS.
Ever since I saw this Vogue cover of Jennifer Lawrence, this has been my reel-back to reality. I just love how it's retouched but looks so organic. They left alone some skin and color "imperfections."
https://assets.vogue.com/photos/5877049471b368a625a08fff/master/pass/jen...
This is rightly a recurring theme. Any technique can be used well or used badly. Too much of a good thing as they say.
I mentioned to a friend that I'd learned (from FS) how to soften the skin of my model and quick as a flash they said, I was perpetuating the false ideal of the perfect woman, making ordinary people feel inadequate.
So much YES!
How about this for a standard... If the result doesn't look 99% like the subject does in real life, you've gone too far.
I've seen all of these, and the one I hate the most is the lower eyelid. I personally do brighten/soften it, but leave it intact. I do like to brighten the eyes, but I try to make it look as natural as possible.
My personal rules of retouching - heal acne blemishes, minor touch-up of lip hair, or egregious bags under the eyes where warranted. Otherwise, I keep tones and textures representative of their reality. Eyeballs, I do add some white and slightly bring up the iris. Nothing drastic. It's all a personal style, but when you see something overcooked, it's off-putting.
Thanks, great post for me, i tend to overdo skin tones. Good reminder
Glow in the dark teeth. I just saw a photo of a politician whose teeth were impossibly whitened.
"Sings You May Have Gone Too Far"?!?!
As usual, great info Nicole.