
Ever look at images on your phone or tablet and think the colors don't look quite right? Quickly and easily calibrate your screen with this lesser-known IOS feature.
After replacing a smashed screen on my antique iPhone 5s, I noticed the colors didn't look quite right. A quick search in the settings didn't offer many options for adjustment, which didn't really surprise me as Apple is well known for keeping tight control of their devices. For this reason, I resorted to the fact that I would probably have to see the digital world through a slight "mustard-tinted" lens. It probably comes as no surprise to read that someone who has such an old iPhone isn't much of a heavy smartphone user. Emails, messages, and light social media is mostly what I do on my phone. Even so, the color shift I saw on the screen started to bug me pretty quickly.
A Google search for a fix brought up some issues regarding the phone's Night Shift feature and that this could be the reason for my warm-colored screen. Unfortunately for me, this wasn't the case. A little despondent but unwilling to give up, I was reminded of some of the useful features that Apple has in their "Accessibility" section of the settings. I'm no stranger to this particular area of the iPhone and have previously talked about the benefits of switching to grayscale and how it can help photographers to see the world through different eyes. Inside the Accessibility section, I was greeted with a feature that I have never paid any attention to before called "Display Accommodation". Within a few clicks, my phone's screen was looking close to color accurate and I was pleased as punch. Not only would I not have to endure those unwanted warm tones on my screen, but the process was quick and easy to do and wasn't just a temporary fix.
For those wanting to adjust their own Apple devices this is how you do it:
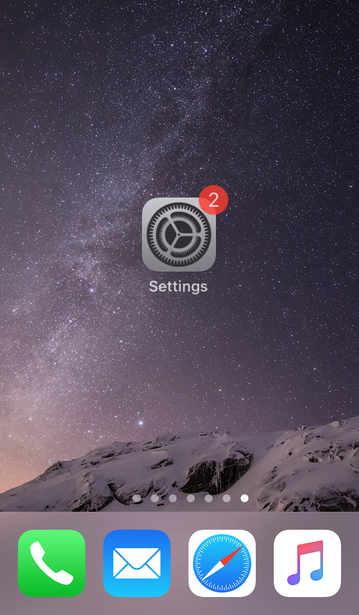
1. Open up your iPhone or iPad and click on the Settings app.
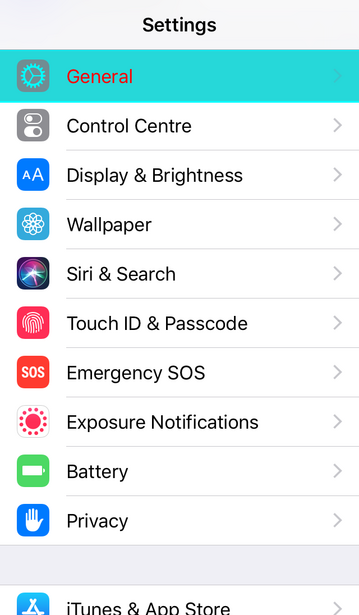
2. Once in Settings scroll down and select "General".
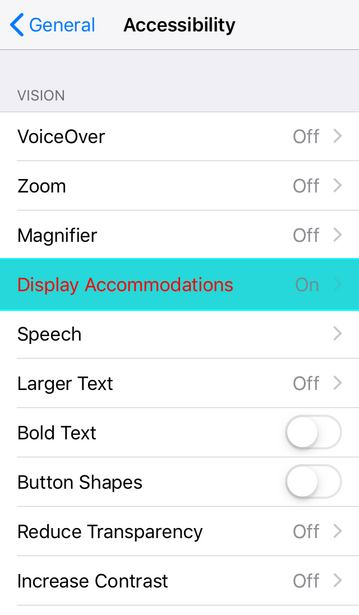
3. Next, go to "Accessibility".
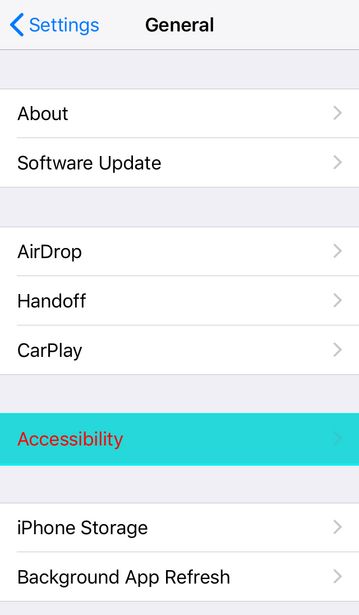
4. Here you will see an option called "Display Accommodations". On some older versions of IOS this may be called "Color Accommodations" but the only difference between the two as far as I can see is the name.
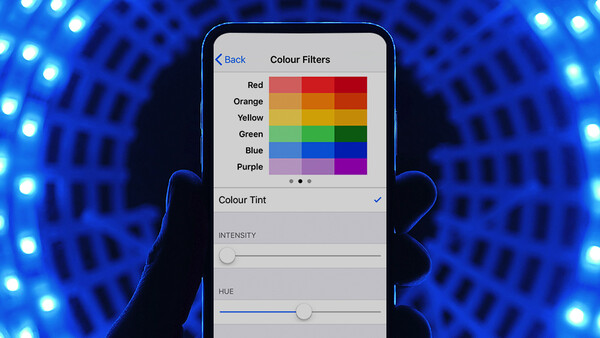
5. Here you will be greeted with several interesting features that can change the appearance of the screen. If this is your first time in this section the "Color Filters" will be set to "Off". By clicking on this line you will switch this feature on and will be taken to the "Color Filters" section.
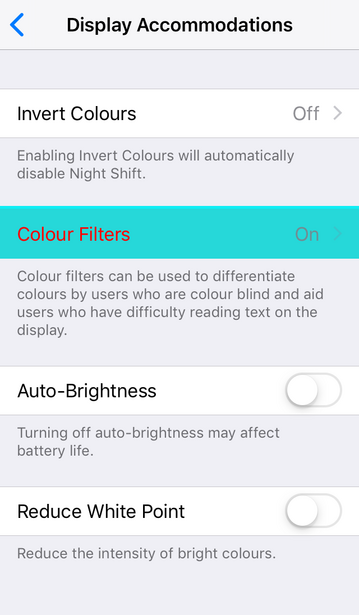
6. Once you switch "Color Filters" on, your screen will probably change tone and several options for changing the phone's colors will become visible.
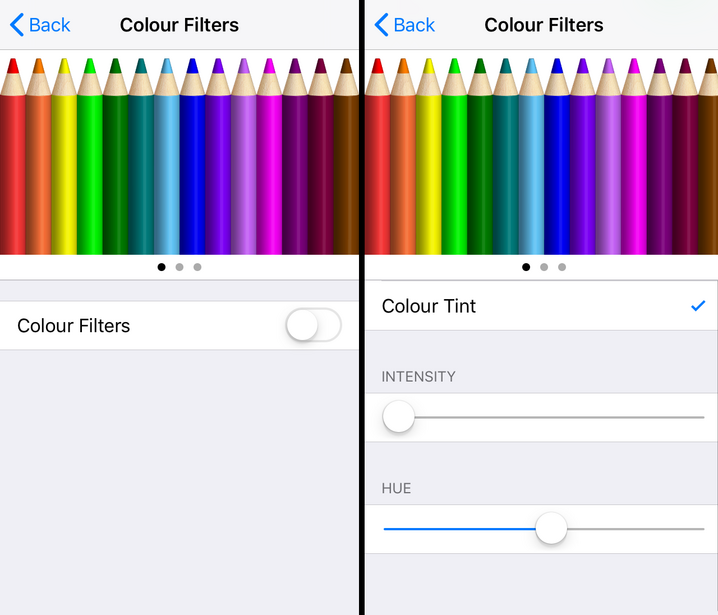
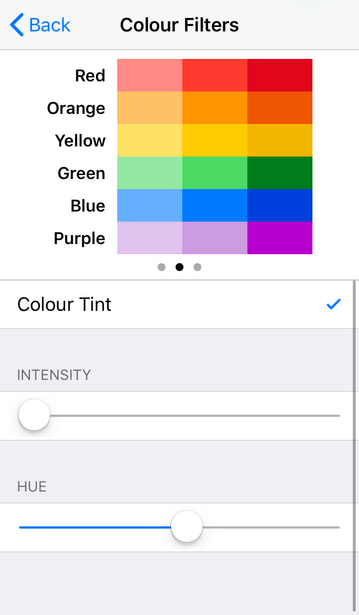
7. Select "Color Tint" from the list and play around with both the Intensity and Hue slider till you get something that looks more color accurate. When you are happy with what you have you can exit out of settings completely.
And that's all there is to making your screen's color look closer to how it should. I must say, this is the first iPhone that I have had to adjust the colors on, but I'm glad I now know how to do it. I also jumped onto my iPad to do the same and the difference was quite dramatic. While the majority of the population may not even notice such color differences on-screen, photographers are more likely to see them and want things more true to life.
This quick fix isn't just about optimizing things for when you read your favorite photography sites or browse social media. Having accurate colors will show off your images in their best light if you happen to show a prospective client your work on an iPad. It also has huge importance for those who shoot and edit photos directly on their phone. Many photographers rightly stress over getting their computer screens accurate so their phones should be no different. Is this technique going to get you precision colors from your device? Absolutely not. It will, however, get you in the right ballpark which if you saw my screen before the change was miles away from looking accurate.
Have you ever needed to "recalibrate" your phone's screen before? Do you know of any other useful related features buried in Apple's IOS settings? We'd love to hear from you in the comments below.
Lead image by Youssef Sarhan, used under creative commons
If you're passionate about taking your photography to the next level but aren't sure where to dive in, check out the Well-Rounded Photographer tutorial where you can learn eight different genres of photography in one place. If you purchase it now, or any of our other tutorials, you can save a 15% by using "ARTICLE" at checkout.


Join the Fstoppers community for free
-
Post comments and join in the discussions
-
Browse the site ad-free
-
Share your work and get featured in the community
-
Compete in the photo contests for fun and prizes
12 Comments
Anyone else rocking an antique iPhone as old as mine?
iPhone 5s is to beat...
Thanks Paul — iPhone 11 Pro Max here and found the order to get to the calibration page was ‘Settings>Accesibility>Display and Text Size>Color Filters
After playing around for a bit I ultimately turned color filters off and accepted that the iphones AI is probably more accurate than my eyes will ever be!
Thanks for the update on newer iPhones it's much appreciated. Apple sure do love to change the location and names of existing features!
Glad your colors are looking good. If things do shift you'll know what to do...
Thanks for stopping by : )
Honestly, does anyone really bother with color calibration for 80-90% of their work anymore? With clients not having the slightest clue to what "calibrated monitor" means and the general public not knowing the first thing about it either, what is the point? The majority of work is going to screens that have never been and never will be calibrated.
Yes,
1. Looks better on my monitor when editing and viewing.
2. Best to set a baseline of correctness, even knowing it may be viewed on devices where colors are off.
3. What if you or they decide to print? Are you going to re-edit for print? Of course not. Just do it right the first time. Don't be lazy.
Very well said. Best to get it right so that gap between you and them is as narrow as possible.
Reediting old work is not fun at all either!
Thanks for stopping by : )
I use a color passport on all my shoots and I calibrate my monitors, but not nearly as often as I used to. It's not a matter of being lazy... Clients literally don't understand what it is, so they don't do it. So if it looks red on their screen, but looks perfect on mine? Cool... I'll make those adjustments for you. Tired of explaining and being met with "What's that? But on my screen... Just make it look right" YOU GOT IT! If they decide to go to print, I know I have the correct colors. They won't be getting the same files I delivered for their web use.
I understand your frustrations and you are not the first person I've met that feels like you do about calibration. The real danger of not calibrating is that the viewers screen is further in the opposite direction to which you may be if uncalibrated.
For example, if your uncalibrated image is at -1 and 0 is calibarted. Then a viewer at 1+ is a massive distance apart.
Best to get it right so that gap is as narrow as possible. You may also be surprised to find you clients or customers do have calibrated monitors and then you will be in trouble if you do nothing...
Thanks for stopping by : )
In my experience, more times than not, clients just get annoyed if you don't do what they ask. They don't care to learn about calibrating when they realize they have to buy something and take the time to do it. Photography in the digital age...
I hear you!
Note to author, this does not work on newer iPhone as the menus are different.
Hey thanks for the heads up. As someone has already mentioned on the iPhone 11 Pro Max the order to get to the calibration page was
‘Settings>Accesibility>Display and Text Size>Color Filters
Having has iPhones from the very start I have found that the menus often get moved or renamed. It's annoying I appreciate. 9 times out of 10 the menu mentioned is still there somewhere...
Thanks for stopping by : )