
Aperture is one of our strongest technical creative tools as photographers and filmmakers. Although it’s simply just a hole for light to pass through, it can be used to create so many different effects in our images. By considering the effects it has and working with them, we can intentionally make very different images just by changing our aperture.
While our aperture may seem like a fairly functional setting that simply lets in more or less light, it has many more effects than that and can be used to creative effect. When we consider the results of changing our aperture, we can start to use different aperture values on different lenses intentionally to create very specific images. Just because your lens goes to f/1.2 doesn't mean you should always use it there (but it can be a great reason to!).
Depth of Field
The basic consideration for most of us, and one of the things we are taught first about our aperture, is depth of field control. If we stop down our lens we will get more in focus than if we open it up. So, f/11 will allow us to get more of our image in focus than f/2, for example. Of course, this is provided that subject distance remains the same.
We can use this in a couple of creative ways. Consider a cluttered workshop with a man hammering a piece of steel. By stopping down and getting the whole scene in focus, you might allow the viewer to explore all the little details your eye sees as you look around. However, by opening up your aperture, you might choose to focus just on the man’s intense expression or the hammer hitting the steel and leave everything else out of focus. This will give your viewer less to focus on and show them exactly what you wanted to without distraction. It will also leave their mind to fill in the gaps in the out of focus areas (we’ll talk about this a little more down below). Both of these, and everything in between, are valid approaches. Consider why you’re choosing this particular depth of field and make great images!
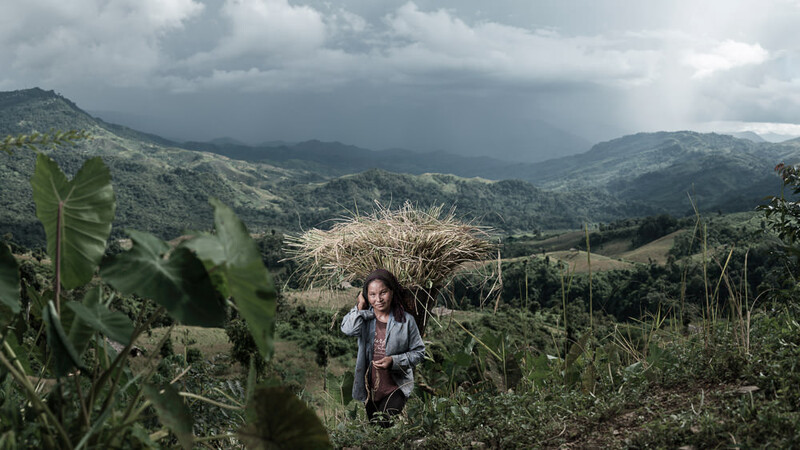
In the image below, I chose to work at f/11 with the Fujifilm GFX 50S and GF 110mm f/2. Working wide open would not have rendered any detail in the mountains or approaching storm. I wanted those in my image to tell the story of where we were, but still have the farmer as the focal point.
Sharpness
Your aperture also plays a role in sharpness and depending on the lens you’re using, there may be a very pronounced difference in sharpness (especially towards the corners of your image) as you stop the lens down. Very few lenses, if any, are at their sharpest wide open (yes, even those gorgeous Sigma Art lenses and Zeiss Otus behemoths). So, if you’re intention is to have corner-to-corner sharpness and the most detail possible, stopping your lens down to f/5.6 or f/8 (for many lenses) will be the sweet-spot for their detail rendering capabilities.
One common example for wanting corner-to-corner sharpness is a group photograph. I’m commonly called on to make these at corporate events, and I immediately stop down to between f/4 and f/8 depending on the amount of depth-of-field I require. I’m usually using my Fujifilm XF 16-55mm f/2.8 for these types of shots. It is an extremely sharp lens and offers great performance in the center of the frame. However, the corners at f/2.8 can be softer than I might like. The last thing I want is to have one of the VIPs out of focus!
Vignette
Most lenses transmit more light to the center of the frame than they do to the edges. This results in the corners of the frame being darker than the center, especially at wider apertures. This loss of peripheral illumination is known as a vignette.
With the advancement of digital post-production, a vignette is no longer something you should try to avoid in most situations with most lenses. If you want it gone, it’s often a simple click in your software of choice to remove it. So, don’t choose your aperture in order to remove the vignette as you’re photographing. That may have other undesired effects. Rather, if you want a vignette, open up your lens and embrace it.
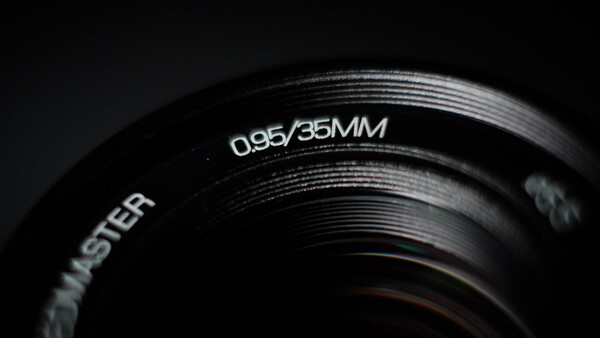
The combination of a slightly softer image with dreamy bokeh and a hefty vignette can be quite beautiful at times. Understanding how to make this happen and when you might want to use it is the creative side and your intention should play a major role in the decision to go for this effect. This is actually one of my favorite uses for the Mitakon 35mm f/0.95 and my primary reason for keeping it around when I have technically excellent Fujifilm lenses that do 95% of the same job “better”.
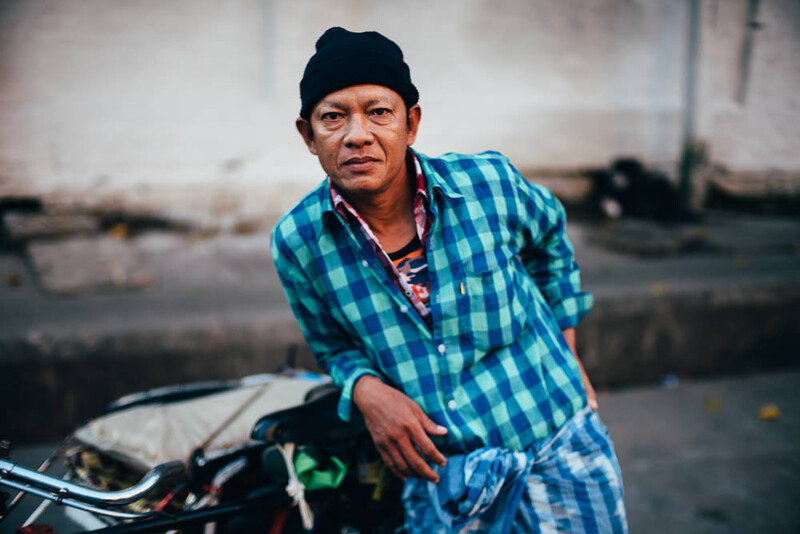
The image below was made on that lens at f/0.95. As you can see, the detail rendered is slightly soft, the vignette is heavy, and the depth-of-field is extremely shallow. Overall, this creates a very different feeling from a photograph made at f/5.6 in the same situation.
Feeling or Mood
As I mentioned above, your choice of aperture can be used to create a certain quality to the image. This doesn’t necessarily need to be the soft, dreamy, vignetted image I spoke of above. A photograph that has sharpness throughout the frame or displays details we cannot see with our own eyes can evoke just as much feeling as a dreamy image.
One great way to evoke a feeling is to use selective focus. By using a wide aperture and focusing on just one part of your image, you can encourage the viewer to look at that first. By then including other elements at various degrees of legibility (sharpness), you can give the viewer other parts of your image to explore and think about. Without being about to make out details, the viewer needs to use their existing knowledge and infer what those things are and what relationship they have to the in-focus subject. This can create a sense of mystery in the out of focus areas. Just imagine a well lit and in-focus man in the foreground and an out-of-focus man in the background striding towards the camera with something in his hand. Combining focus with light and gesture can create extremely interesting images.
For more ways to use your aperture creatively, please read my previous article with five quick tips on how to make your aperture a creative tool.
In Conclusion
It really doesn’t matter which aperture value you choose if you’re doing it with intent. Choose the aperture that you need to create the picture you want. The ideas above are simply the beginning of the creative ways you can use your aperture to achieve certain types of images. What are your favorite ways to make use of your aperture? Do you know any other photographers who make great use of it?

Join the Fstoppers community for free
-
Post comments and join in the discussions
-
Browse the site ad-free
-
Share your work and get featured in the community
-
Compete in the photo contests for fun and prizes
10 Comments
at least one should have knowledge to do it intentionally
Thanks for this article. I'm among the many photographers who spent a good chunk of time early in my career shooting wide open as often as possible. As I began to understand aperture better and the effects it had on my work, I find myself trying to stop down as much as possible more often than not these days.
Didn't we all. Knowing when and where to use it comes with time and practice, I think. That f/1.4 love is so seductive at times!
...not forgetting our old friend diffraction for those starburst effects.
Indeed! I actually mention that in the linked article, so I didn't want to double up! :)
I used to like shooting wide open. it was a fad I went through.
today I pay a lot of attention to the background and what it does for my image. I will change the aperture on the fly according to what I want or dont in it and even if I want some of the background to come though to enhance the image.
I sell prints and I'm here to tell you that in many cases, blurred background/foreground receives a lot of praise. Of course, most are not seasoned photographers, but it really does invoke a smile. This is one of my best selling prints. I get nearly as many comments about the blur as I do the doe with a piece of her ear missing.
I don't buy the 'it's a trend' thing when it comes to blurring the background. But, it can be overdone. I also do a lot of long exposure night shots and will invoke the 'diffraction rule' and shoot at f16 specifically because there are bright pinpoints of light that will enhance a shot.
Knowing how to use this stuff is probably second nature to nearly all that haunt FS. But it's always good to have a reminder.
All great points, indeed. I think when most people talk about blurred backgrounds being a fad, they're talking about blurring them for the sake of blur. Overusing blur because you haven't started to learn composition techniques is what people are talking about.
Love the image, by the way. It's almost like a face-off! :)
Thanks for the kind words! I was actually photographing birds at a private conservation area, Ft. Whyte in Winnipeg, when this lovely lady wandered into the scene. My main reason for shooting wide open was due to the overcast conditions and the lens I was using, a Sigma 100-400 f5/f6.3. So at 400mm, f6.3 isn't a very large aperture, but she was fairly close so the background/foreground did compress nicely.
"Combining focus with light and gesture can create extremely interesting images." very nice and simple if anyone notice to that.