An important part of growing as a photographer is shooting personal projects. If you are a food photographer, it can be extremely easy to get stuck in a rut because you are shooting the same modern images over and over. An easy and important way to combat this is to shoot food as fine art.
At its very essence, food photography is still photography. I think it is important to go back in time and study the experts in still life paintings. Especially painters from the Baroque and Romanticism eras of art if you really want to learn the artistry of capturing story and emotion in your food images. After you have studied them for a time, use images of the past to inspire your images of the present. And if you need to copy them to help you to understand the techniques, that’s fine, too! Just don’t go selling them.
Here are four areas in which you’ll improve by looking into the past to improve your present.
1. You Will Become an Expert in Modified One-Source Directional Lighting
If you are interested in shooting food, it is important to have an intimate knowledge of one-source directional lighting. I’m not talking about available light, such as the sun, unless you are using a cucoloris or cards to modify the sunlight in some way. The reason it is important is to give you the ability to create evocative images in any situation with nothing more than an off-camera flash and a DIY modifier to knock out ambient lighting.
Also, this type of lighting produces the biggest hunger response when viewing food images. It triggers an ingrained evolutional response in us. Especially if the lighting intensity and direction mimics the intensity and directionality of sunlight during periods when we have typically consumed food throughout our evolutional history. The way we react to food is primal.
The painters of old not only knew this, but they also had extremely limited lighting when painting and eating when indoors. And the position of the light relative to the food that changed throughout the day is also very important. If I am sitting at my kitchen table, the light is to the left of me in the morning, in front of me at lunch, and to the right of me at dinner. This changes for everyone depending on a number of factors, but each will still evoke that primal response. Rarely do we eat with the light behind us, which contributes to one of the many reasons why one should not front-light food images.

My chicken korma image is one of my favorites and I'm not sure that is going to change anytime soon.
One of the Dutch painters who I love to study, Pieter Claesz, is adept at using modified one-source directional lighting in his still-life food painting to both tell a story and evoke emotion.
The first time I really felt as if I got a hold of this technique was when I was shooting a chicken korma image that really called for modified one-source directional lighting to tell the story, give a feeling of the warmth one feels when eating the dish, and relay the emotion of this dish.
2. You Will Expand Your Understanding of Emotional Color Palettes

Still life: Fruit by Robert Sheldon Duncanson
Often when we think of Baroque or Romantic painters, we think of the European greats. But Robert Sheldon Duncanson is an American Romanticism-era painter most known for his landscapes. However, he also did a few still-life paintings of food, making use of Baroque-era color palettes and emotional evocation, without the religious or political story infused within the painting.
Lighting also tended to be more diffuse and even but still directional. The thing to also study in these images from both periods is the use of warm tones and cool tones to create mood. Modern color theory tells food photographers to use cool backgrounds and props with warm-colored food because it causes the food to pop out of the image. You may have also heard or read about needing to find a balance and creating separation. But when you look at the classics, especially this fruit painting by Duncanson, you can see how cool and warm tones are mixed throughout the subject to create emotion and lead the eye throughout a complex “hero”.

This image took me hours to style and minutes to shoot. There was much rejoicing.
My Charcuterie board image was my first attempt at using this technique and I was more than pleasantly surprised with how it turned out. It was also the first image where I really succeeded in creating my personal style that had always been in my head, but I had a really hard time creating it in-camera. Studying the lighting techniques and color palettes of these artists helped me to break through that creative barrier.
3. You Will Expand Composition Beyond Rule of Thirds

Still life with ham, lobster and fruit by Jan Davidsz de Heem
The rule of thirds is a wonderful place to start when learning any type of photography. However, when it comes to food photography, triangles — especially golden triangles — and diagonals produce the strongest food images. Everyone talks about motion in images, but people have a tough time understanding motion in relation to still photography. In still photography, it is very much about leading the eye throughout the entire image, without it distracting from the “hero”.
Let’s go back to the Dutch painters and look at a still-life food image from Jan Davidz de Heem. A lot of his compositions include one large triangle with negative space. But if you look closer, you will also see the golden triangle being used, with the center of interest beginning around the intersection of the line from the top-left corner intersecting with the diagonal that runs from the bottom-left to top-right. De Heem also placed the lobster on that full diagonal with the claws pointed down towards the center of interest and the figs pointing up. But when we look even closer, there are lots of triangles within this image, all leading the eye through different micro-stories.
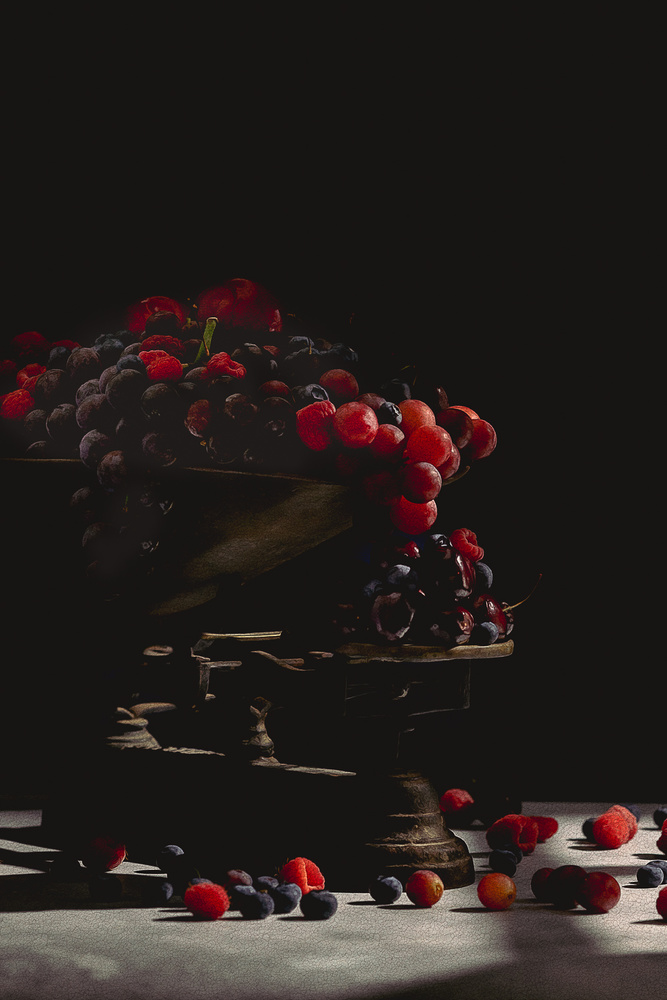
I love triangles—especially golden triangles—in my own work. My fine art photo below, titled "Before The Fires" is another example of an image that makes use of modified one-source directional lighting, cool and warm colors throughout the main subject area, and a golden triangle with negative space. When I first shot this image, my motivation was to be Romantic and evoking that joy that comes at the beginning of summer up here in British Columbia when all the local fruit is available at the stores and farmers market. The day after this image was taken, it turned into a Baroque image because it captures that moment in time right before all the cherries from the orchards cooked on the trees and the wildfires burned Lytton, B.C, before the rest of my province.

4. You Will Truly Nail Shooting In-Camera
When working on a commercial food photography job, the client is usually present and approving the images on the spot. As a result, you need to be able to do most of your work in-camera and come up with a Lightroom preset that works for most of your images to give the client an accurate idea of what the final color corrected image will look like. You also need to worry about Truth in Advertising laws, so you want to keep your Photoshop use down to just spot removal of crumbs or highlights on props that were missed during the styling stage.
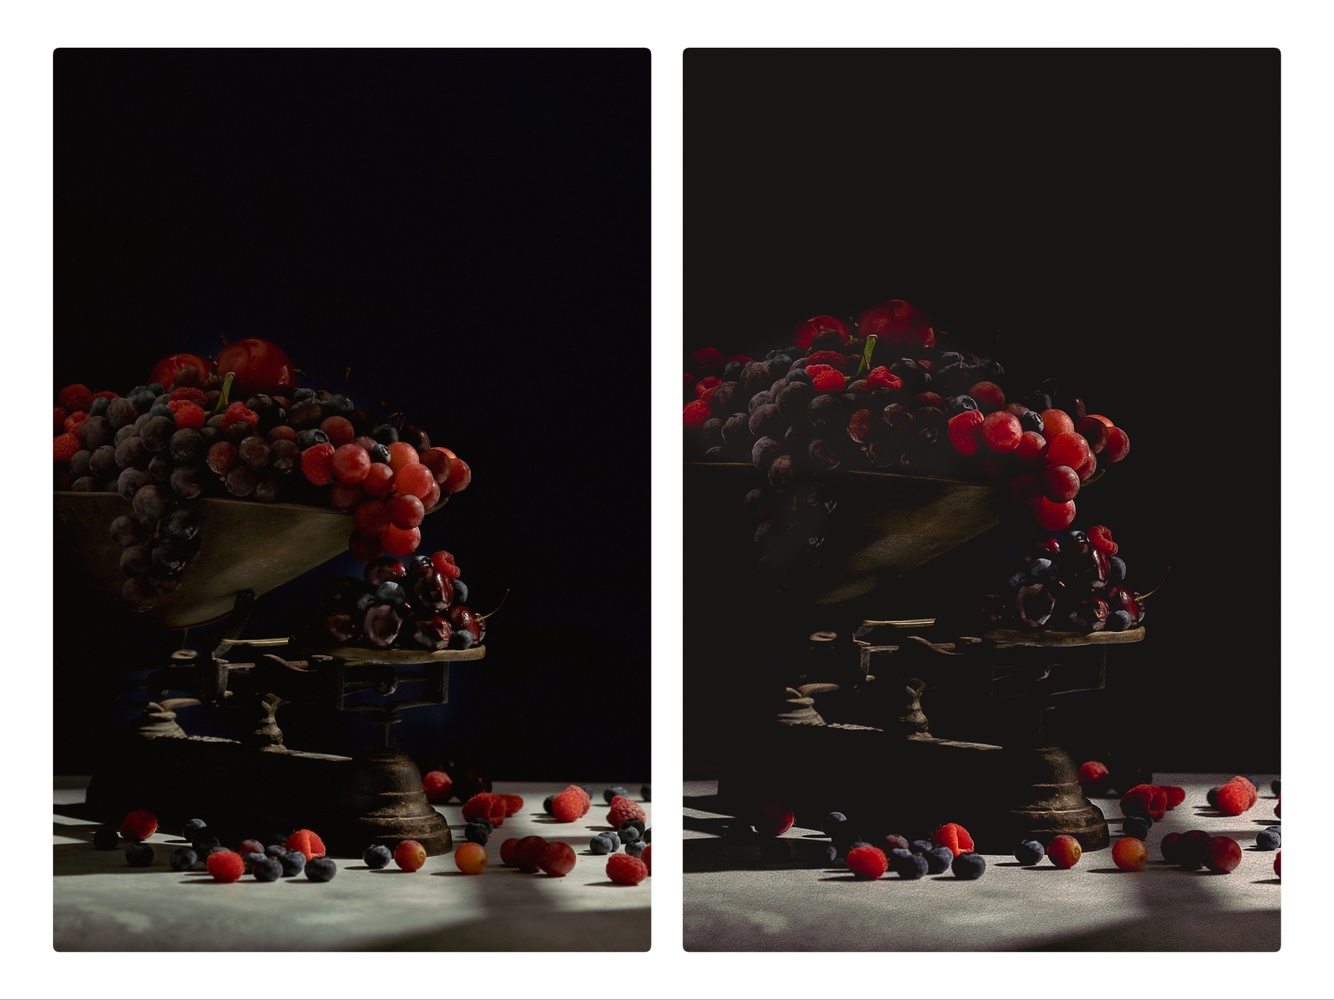
When doing fine art photography, you do have the choice to make greater use of Photoshop, like applying a crackle layer and some oil painting filter as I did to "Before the Fires" to make it look like an old painting. That was the only thing that was done in Photoshop. The rest was done in-camera.

Left: Before the Fires out of camera. Right: Before the Fires after giving it an old painting look in Photoshop.
Commercial food photography is a different animal because of the client situation and advertising laws. A lot of Baroque and Romantic still-life painters also fall under Realism. When you put the above three points into practice, in no time will you be able to do most work in-camera with Lightroom as your darkroom.
I hope this helps you to become more creative in your food photography and help you to overcome any ruts. Is there a particular era of paintings that informs your photography?
All classic paintings used in this article are in the public domain.


I specialize in Food images and this article is quite accurate, I enjoyed it.
This is excellent! Studying the historic masters of different media is always a beneficial thing.