One of the most difficult things in editing isn't knowing how to color grade, use radial filters, or Photoshop. It's knowing what a photo needs once you sit down to edit it and these five tips should help guide you in tackling any photo you have.
As someone who teaches editing techniques often here on Fstoppers, they can be really important to progress in developing your skills in photography. However no matter what level you’re at, just starting out or an editing guru, knowing what a photo needs can be quite difficult to figure out. I have photos that sit in my catalogs for years because I just don’t know what to do to them and struggle to even start sometimes. Recently I've been doing live editing streams where I take user-submitted photos and edit them live on my YouTube channel and the most frequent issue or problem I see is users just not having good direction on how to edit a photo.
They have all the tools and are even using them but not necessarily improving their overall photo. Couple this with the fact that I continually come across my own photos that sit in my catalogs because I don't know where to start. Well, hopefully, all of that ends now, or at least gets easier using a methodology I came up with to try and help myself and others improve their editing. Something to keep in mind throughout this video is there is no “absolute” way to edit a photo and many things are left up to your artistic expression, thus if I show you a photo and say I did this or that on it, it doesn’t mean you couldn’t do something else.
What's the Subject?
The first and likely the most important question to ask is, what’s the subject of your photo? By the end of your edit, your subject or subjects should be obvious to your viewer. Techniques you can use to help this are making sure the luminance on the subject(s) is the brightest part of the image, or that there are leading lines connecting each major subject within the image, and many times in something like portraiture your focal plane will determine the subject.

Many times landscapes won't benefit from things being out of focus such as our first image which happens to be focus stacked. Thankfully if you wait for the right conditions, lighting can be all you need. I think it can be argued that the major subject in this photo is the mountain range in the background. There's a lot of elements that were captured in camera to help here such as leading lines through the image or how the range is centered and takes up nearly 50% of the composition. But let’s take a closer look at what the image looked like before the edit to get an idea of how editing specifically changed the photo.

This is straight from the camera with lens correction applied, note this is only one of the 5 photos used to focus stack our final image. Notice how the unedited version feels a lot busier, our eyes have a harder time at knowing where to look. I knew that within the edit I wanted the brightest parts of the image to be the mountain range, the pathway, and the foreground flowers. The key within this edit was that I didn’t need the range to be the first thing my viewer looks at even though I said it was the major subject in the photo. This is because the leading lines throughout the photo allow a viewer's eyes to land on multiple spots in the image and take them through the image regardless of where they start. Knowing my subject or subjects and putting importance on them within the edit is always the first question I ask myself because it’s going to drive the majority of my edit.

What happens if your photo doesn’t really have a subject and it is more of an image of an entire scene. The image above doesn't have any subjects or objects. It's more about the atmosphere, colors, and moment. In recognizing that, those factors become the subject of the photo. The texture of the clouds, the color gradients in the sky, or the atmosphere. Speaking of colors and atmosphere, it leads perfectly into our second question.
What's the Mood?
A lot of times this answer will come via the conditions you took the photo in, of course, if you’re shooting landscapes. If you’re shooting portraits you might have to put more emphasis on your edit to help convey a specific mood. Regardless it’s important to figure out what feeling you want a viewer to see and every photo should have the intention to convey a feeling. Were the conditions foggy and atmospheric, were they warm and vibrant like our first example, or are they cold and blue?

This first photo was taken on an overcast day in Iceland where there is very little contrast or dynamic light in the scene. It's moody, dull, and the color palette is basically all shades of green.
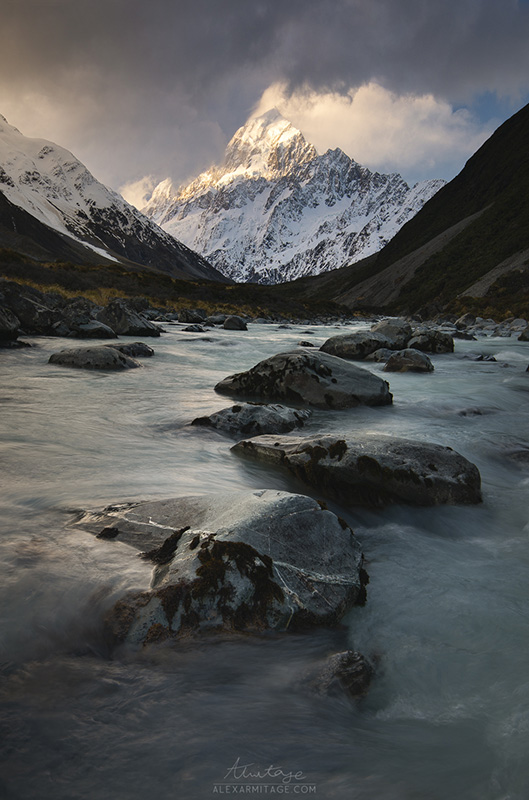
Compare that to this cold yet vibrant image taken in New Zealand. Both images have a cold feeling to them but besides that, they are very different. Notice how contrasted and textured the image from New Zealand is compared to the soft atmospheric feeling from the Iceland image. If I tried to edit either of these photos like the other it just wouldn't work.

If we look at the Iceland photo straight out of the camera we can see how flat the lighting was when the photo was taken. In recognizing this, and knowing the conditions when the photo was taken, I made the decision in my edit to dramatize that mood. I raised the black values, graded the colors to make those greens really pop, and overall brought out a bit more contrast in the photo. Making a decision on mood, saturation, colors, or style can really help decide how you want an edit to go.
What's Missing?
If you could change the conditions when you took the photo, would you change anything? Asking this question and knowing the answer might further guide you into knowing what an edit needs. Many times as photographers we have to get creative in how we capture our photos like underexposing an image to get every detail or taking multiple exposures with the intent of blending them together.

There are a lot of elements in this straight from camera raw that help our viewer know exactly where to look but it's missing the most important element, luminance. When I edited this image my first and only goal was to do my best to bring out more light on the tree which I did by using a range mask in Lightroom, I did a write-up on this exact technique here.
An extra tip here will be knowing the limits of your camera. I knew that if I underexposed my image that I could recover details in the shadows reliably within the edit. Sometimes when you capture an image you'll already know what it will need once you get it on a computer and remember it's much easier for me to write about what I've already done to an image because I already solved the puzzle!
What Isn't Important?
Opposite to figuring out what's missing from your photo you should ask what isn't important that is there. Most photos you take have areas that simply aren’t important in the photo. That doesn’t mean you need to remove them, but you should make sure they aren’t distracting to what is important in the photo when your edit is done.

There’s a lot going on here, especially before the edit. This is a time blended photo meaning I took elements from different times and combined them together. Let’s focus on what isn’t important in this photo. The bottom leaves are important but are not the subject, the houses on the right are important but shouldn’t be the first thing you look at. The area in the top left is not important. Yes, it exists to contrast the right side of the frame where there is light, but mostly it’s not an area a viewer will ever really look or care to look at. It exists so other parts of the photo stick out.
Going through your photo and categorizing areas that are important and not important can give you much-needed guidance in tackling hard edits. Instead of trying to decide what a photo needs all at once, you can break it down into sections which can really help with busy photos like the example above.
What's the Crop?
To this day I still struggle with cropping some images. You'll have images that the crop is obvious and others that you move around a hundred times. Recently I discovered a good methodology to figure out exactly how to crop an image but this is a deep topic, something I likely need to make an entire article.

Some photos will be versatile. In the above photo, I could crop it multiple ways, and trying to decide which is perfect isn't in my best interest, otherwise, I might go back and forth forever. I could print this photo as a 2x1, 4x5, 2x3, 5x7, and I'm sure plenty more without losing the important parts of this photo. That said I did end up choosing a crop that I found ideal and that's how I would likely sell the image or the version I put online, but in reality, the photo works many different ways which make life easier.
That isn't the case many times and there might only be one crop that really works but how do you figure that out? Go through the 4 questions we went through above and you should have an easier time cropping your image.

We can use our first example image to draw a better idea of what I mean. Technically I could crop the image to be larger on the top and bottom but by cropping it down I am emphasizing not only the size of the Dolomites but also cutting out areas that don't matter in the foreground and sky. This is something you'll continually need to exercise and if you happen to watch my streams you'll know I don't always figure out the crop immediately where I'll have to revisit a photo numerous times to narrow it down.
Recap
- What's the subject?
- What's the mood?
- What's missing?
- What's not important?
- What's the crop?
No matter what skill level you’re at, I think going through these steps can help guide anyone in approaching a difficult edit. Some photos are absolutely going to be easier than others. I have photos I knew what to do right away and I have photos I still haven’t touched because I just don’t know what I want to do yet. The next time you sit in front of an image to edit and you feel stuck try going through these steps and see if they help.
I'd love to hear if you found any of this helpful and if so please let me know down below and as always, thanks for reading.


Being busy and distracted it took me a while to read through the entire article and watch the video, but I found this to be very helpful!
Thanks a lot for putting this together.
Hey thanks Tim! I can't watch every video posted on YouTube ever but it felt like this topic doesn't get covered enough.