
Having the sun in your shot while shooting landscapes during the sunrise or sunset contributes a lot to the impact of your photos. But how do you deal with unwanted spots and flare?
While landscape photography can be done during any time of the day, it is, without a doubt, a more common practice to shoot landscapes during the golden hour, especially the minutes closest to the sunrise or sunset. The golden hour is not just a time where the colors in the sky are more vibrant and the light becomes relatively softer. Because of the direction of how light from the sun hits the clouds in the sky and the ground the light can better emphasize the separation of multiple layers in the shot. This can apply to many layers of clouds in the sky that would be hit by light in varying ways, and this can also apply to foreground elements that are lit from the side.
https://www.youtube.com/watch?v=AjYLAeZVXc0
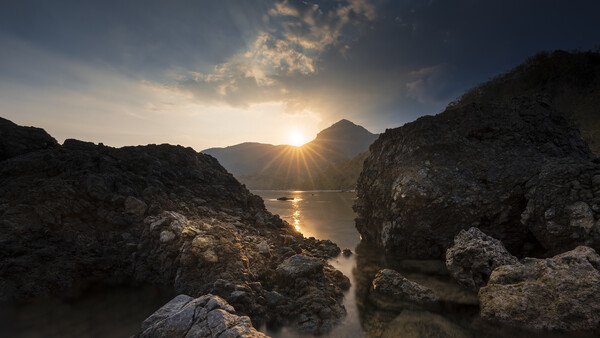
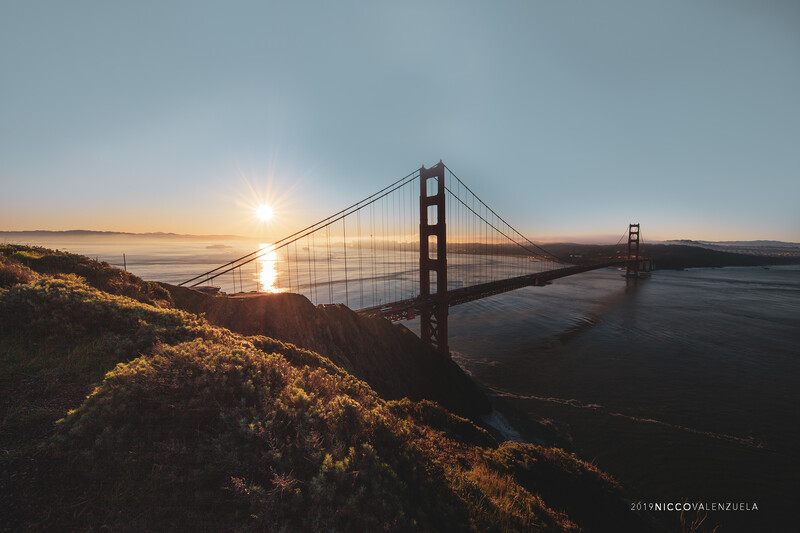
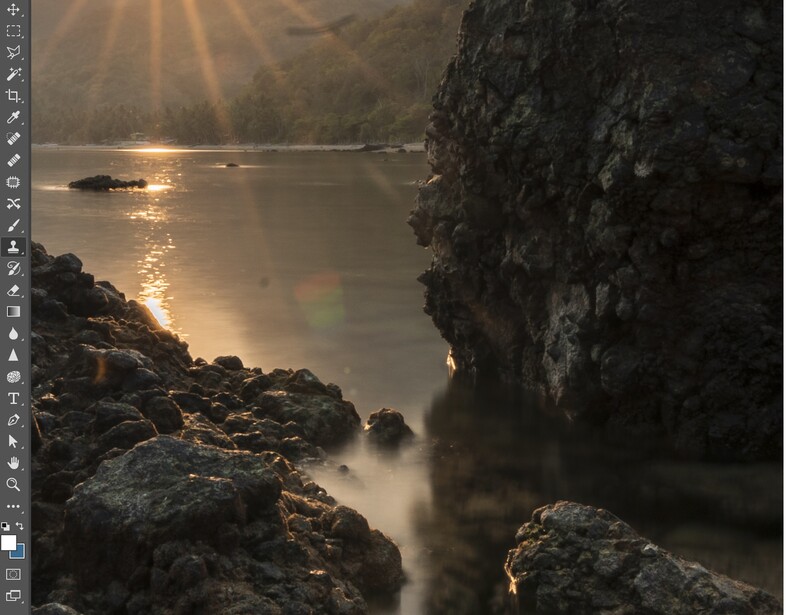
During this time, it is also an obvious option to include the sun in your shot, especially when the position of your foreground is in the same direction where the sun is setting or rising. The sun can be seen in different forms during this time and it all depends on how much it is being covered by clouds. On a fairly cloudy day, the sun can appear to be a faint ball of light, and this is perhaps the easiest to shoot. However, on a clear day, or with just enough cloud cover to get enough unobstructed windows, a more intense sun can be seen, which is what is perfect for capturing the sun with a burst.
Factors Considered for Sunbursts
To successfully include sunbursts in your landscape photography composition, there are a few factors you need to consider. Knowing these factors shall help you better expect challenges in both shooting and post-processing and ultimately solve these problems for a cleaner execution of the shot you have in mind.
Sunbursts are seen on your photographs when the sun is shining intense light directly onto your camera. Two factors contribute to the bursting of the light, which are the aperture blades of your lens and other objects that may be partially and minimally obstructing the sunlight. Examples of the latter are thin clouds, mountaintops, buildings, and other foreground elements you can put between your camera and the sun. The general rule for aperture is that since you put more of the aperture blades in the light's way as you make your aperture smaller (and increase the f-number), this leads to more rays on your sunbursts as well. However, it is important to know the sweet spot of your lens for sunbursts, which is basically the aperture value that give either the longest or simply more attractive bursts.
For the second factor, anticipation is key. As you decide on your composition for a specific shot, you can already predict what visual elements will probably obstruct your view of the sun as it sets or rises. This way, you can plan a few minutes ahead so that the angle from which you are shooting will get a partially obstructed view of the sun and give you attractive bursts of sunlight. This is the easier part of this process. The bigger challenge is managing the other visual artifacts that arise from photographing direct sunlight.
Lens Flares
Flares are generally unavoidable when shooting with the sun in frame. However, they can be manageable, requiring just one simple condition, which is having immaculately clean glass. This concerns not just the glass layers of your lens but also every single layer of filters that you use in shooting landscapes. When all the layers are free from moisture, dust, smudge water or oil from your hands, and anything else that might degrade the clarity, the resulting lens flare can be as simple as a single speck if you have the sun in the middle of the frame. Having the sun away from the center would result in a few more specks as the reflection is separated among the different layers of glass but should generally be easy to manage when all layers are clean.
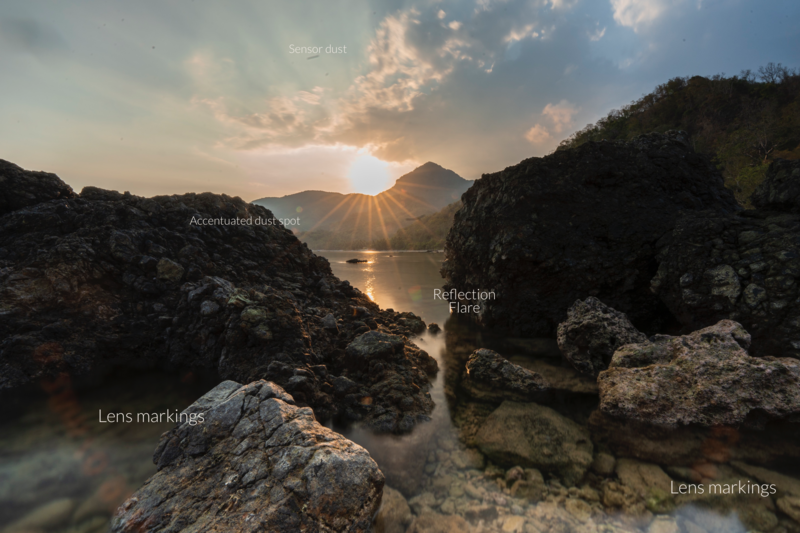
Another artifact that may arise that looks similar to a lens flare is the reflection of (usually white) markings on the non-glass front of the lens. These markings often show the focal range and features of the lens and the filter thread size. Whenever these markings reflect light even to the slightest extent, the reflections bounce back and forth to the layers of the filters we use, causing them to be reflected onto the glass and onto the sensor itself. The simplest way to manage these is to cover them up. You can do this by using matte black tape to cover the white markings or if you want a more permanent solution, painting over it can also work.
Dust and Spots
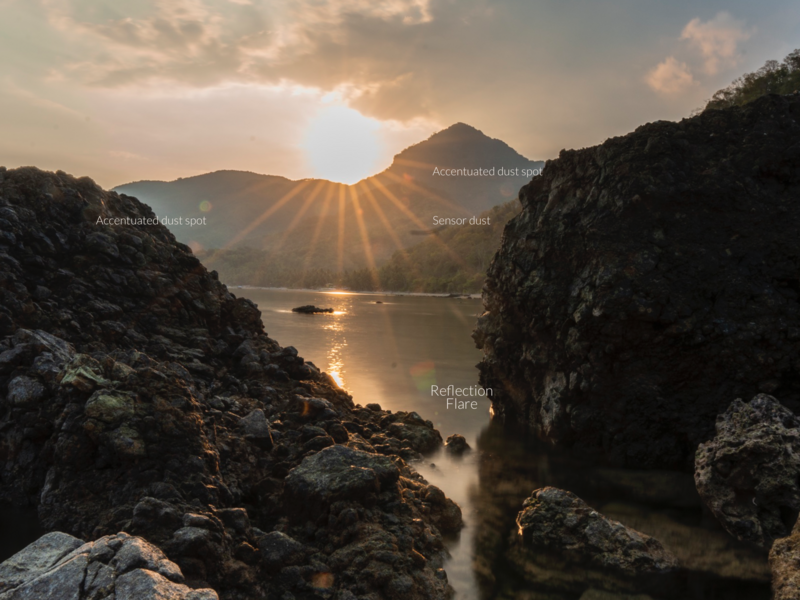
In the same way that anything in the sensor's way will cause a reflection of light between the glass layers, the direct sunlight hitting small specks of dust will behave the same way. Dust on your lens or filters is usually minimally visible unless cropped and zoomed in drastically. However, the direct sunlight intensifies their effect on the image, making them more pronounced. This is even clearer when the dust particles are close to the rays of the sunburst, which is why paying close attention to that area is crucial.
Dealing With Flare and Dust Spots
The simplest yet most tedious way to deal with both flare artifacts and dust spots on your images is obviously manually removing them in post-processing. This can be done in Lightroom, Photoshop, or almost any post-processing software available. There are a variety of tools available that can remove these unwanted specks, such as using the Spot Healing tool, Clone Stamp, and more. They all offer unique ways to remove a speck from the image by sampling out a cleaner portion of the image to replace the area and blending that sample into that spot. The most important thing to remember when doing this is to use the smallest brush size possible that will cover just the speck so that you don’t edit out any necessary details.
Another way is to use time-blending to capture a version of the shot without the direct sunlight. This means shooting another exposure before or after the sun is in frame with the same exact camera angle and blending those parts into the affected parts of the image. This might also mean having to tweak the exposure and color temperature of the flare-less exposure for it to blend well into the primary image.
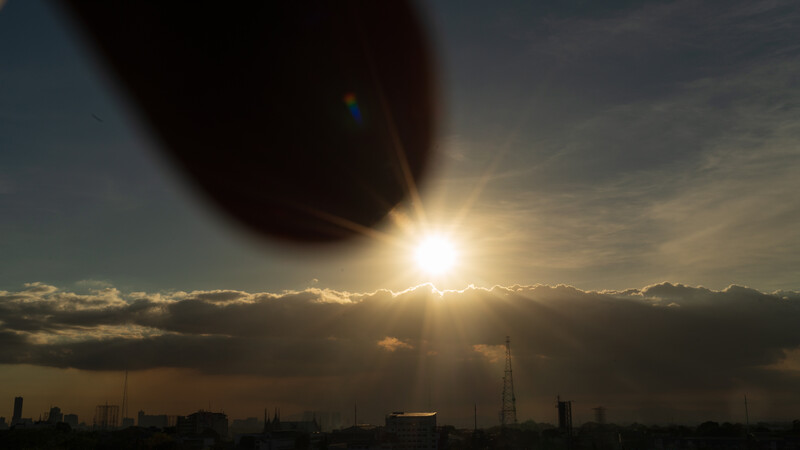
The last option is commonly called the “finger method,” which is using a finger or any other object (like a pen, a stick, etc.) to cover the sun in one exposure to get a version of the shot without the flare and the emphasized dust spots, and similarly, blending the clean areas into the main image. This way, you have a clean version of the shot with the same color temperature that is easier to blend into the primary image with the sunburst.


Join the Fstoppers community for free
-
Post comments and join in the discussions
-
Browse the site ad-free
-
Share your work and get featured in the community
-
Compete in the photo contests for fun and prizes
6 Comments
Ive started embracing the sun in my shots rather than trying to stifle/correct it... a bit of flare doesnt hurt either:)
Thats true. Sometimes it even adds a bit more impact :)
Great article. I love using the sun in my landscape work. A bit of flare also adds character. Even when it doesn't turn out as good as expected, it still makes a unique shot. With the right foreground elements, everything just comes together.
True!
I love trying to get sunbursts n my sunset photos. I have found the lens makes all the difference.
Yes. Its the most irreversible factor. :)