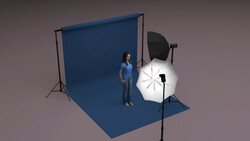
Interested in learning some new lighting setups when using a beauty dish? I've created a video sharing five different ways that I utilize a beauty dish for my studio portrait work as well as discussing some of the benefits of each setup.
While I am demonstrating these techniques using the Profoto OCF beauty dish, keep in mind that you can do the same setups you see in the video using any beauty dish. You'll likely see that there are two common varieties: one with a silver interior and one with a white interior. Generally speaking, the white interior dishes usually cast a somewhat softer light on your subject which keeps your specular highlights down a bit. Silver adds a lot more secularity which comes in handy when you're photographing someone with good skin and want to bring more attention to the texture and detail.
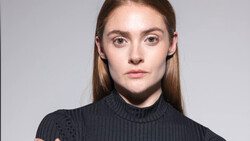
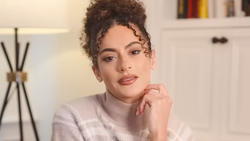
While the first and second setups in the video are my two most common ways of using a beauty dish, I've experimented with using it as a fill light a lot more lately with some interesting results. I mentioned it in the video but here's an example below of an image where I used a beauty dish as a fill light directly pointed at the model in front of them. You can watch the behind-the-scenes setup in this video.

I hope that you found these setups useful. My goal is to produce more videos showing how I use various light shapers as I did in this video and will hopefully improve them based on the feedback I get on this video. If you have some specific light shapers you'd like to see talked about, let me know in the comments section.
Join the Fstoppers community for free
-
Post comments and join in the discussions
-
Browse the site ad-free
-
Share your work and get featured in the community
-
Compete in the photo contests for fun and prizes
18 Comments
Fantastic!
Thank you!
The video was focused all on the model and you shooting them and very very little of the placement and set up of your key and any fill, aside from that under chin reflector. If you blinked, you missed the position of where the dish was pointed, that’s how split second it was.
I know you filmed this with the purpose of what it’s like being in one of your photo shoots, and that’s fine, but you can’t toss this in an article saying it’s a Bts featuring your lighting setup when it’s not. You really need to film one clip of your session and then another focusing specifically on your lighting style so you can use one for promotion and one that can actually fit into an article like the you just wrote.
Where are your videos to compare too? Love to see your behind the scenes educational free content.
It is free content because it is sponsored by PROFOTO, it is an "advertorial" so of course it is free.
It was a pretty comprehensive video. It really didn't require much sleuthing to figure out where the lights were placed. Standard clamshell and loop lighting for the most part and one set up as a hair light.
I can only assume that you read the article starting from the end of it and didn't make it to the beginning. The Bts video was only to show the example of where I used the beauty dish as fill. Its an older video that's just showing another way that I remembered using a beauty dish. The actual "5 ways" video is at the very beginning of the article, and there should be enough angles there for you to pause the video and see distances. Hope that helps!
Thanks MQ
My pleasure!
Interesting video. I especially liked the fifth setup.
Thank you! The 5th was my personal fav too :)
Great job! Ever add the power setting of the strobes?
Thank you! I usually don't add the power since its all going to depend on your shooting environment. I will keep that in mind though for future videos and just add a mention about it :)
I realize it might require just a little more work but I'd love to see comparison's between each shot. Maybe just put the photos side by side and talk for 10 seconds to detail the differences in setup. "Shadows brighter here, hair light more pronounced in this setup, eye light shape different, etc." Just my opinion though, enjoyed it :)
Thanks for the feedback. I totally agree with you on that. I've noticed that when I do longer videos explaining stuff in that kind of detail people complain that the video is too long. I will try it out in the next installment of the series and see what the overall consensus is 😀✌️
pretty cool
Why 4000/th sec...
I was wondering that too.
And then I wondered if it's a feature of the Sony A7, or the Profoto triggers?