Using Lightroom’s object selection mask, you can target specific areas in your photos for precise adjustments. Here's how to get the most from it.
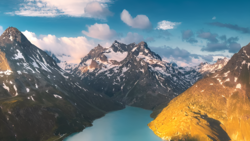
Coming to you from Christian Möhrle with The Phlog Photography, this informative video shows you how to perfect an HDR image using precise selections. In the masking panel, choose the objects mask. There are two ways to use this tool: brush and rectangle select. With the brush active, you can paint over objects, and Lightroom will detect them. For example, select a rock by painting over it. Use the overlay to see the mask. Make the rock brighter, increase the temperature slightly to match the surroundings, and add clarity for more structure. This makes the rock a focal point.
For more complex selections, use the rectangle select. Draw a rectangle around the mountains in the background. Lightroom does a great job selecting these areas. Adjust the exposure and highlights to bring out details in the mountains. Increase the temperature to give them a warm, golden hour glow, and add clarity.
To work on the sky, create a sky selection. Use a linear gradient to make the top of the sky darker. Subtract a radial gradient from the bottom part of the mask to focus on the top. Lower the exposure to create a dramatic effect. Create another sky selection to brighten the top part of the sky using a linear gradient. Increase the whites to add brightness behind the mountains.
These are just some of the selection techniques and related editing approaches, and when put together, they make for powerful final images. Check out the video above for the full rundown from Möhrle.


Join the Fstoppers community for free
-
Post comments and join in the discussions
-
Browse the site ad-free
-
Share your work and get featured in the community
-
Compete in the photo contests for fun and prizes
No comments yet