Natural light can elevate your portrait photography with its soft, flattering qualities. Whether you're shooting indoors or outdoors, mastering natural light is key to creating beautiful, professional-quality portraits.
Austen Hunter, an accomplished portrait and headshot photographer, shares his insights on how to harness the power of natural light effectively. With the right techniques, you can transform your portraits and capture stunning images that showcase your subject in the best possible light.
Key Takeaways
- Natural light is soft, flattering, and accessible, making it a valuable tool for creating professional-quality portraits.
- Timing your shoots during the golden hour, blue hour, or on overcast days can provide the most flattering and beautiful light for your subjects.
- Use techniques like backlighting, positioning your subject near windows, and utilizing diffusers or reflectors to modify and enhance natural light effectively.
- Mastering the use of natural light requires understanding its qualities and adapting your approach to different lighting conditions for the best results.
The Value of Natural Light in Portrait Photography
Natural light is a favorite among photographers for many reasons. One of its greatest benefits is the soft, flattering illumination it provides, which is often difficult to replicate with artificial lighting. This natural softness can enhance skin tones and create a warm, inviting atmosphere in your portraits.
Another significant advantage of natural light is its accessibility and cost-effectiveness. You don't need expensive lighting equipment or complex setups to achieve stunning results. With just a window or an outdoor location, you can harness the beauty of natural light to create professional-quality portraits. Additionally, natural light allows for more flexibility and spontaneity, making it easier to capture candid moments and genuine expressions.
Natural light can transform your portraits, offering a soft, flattering glow that artificial light often can't easily replicate. — Austen Hunter
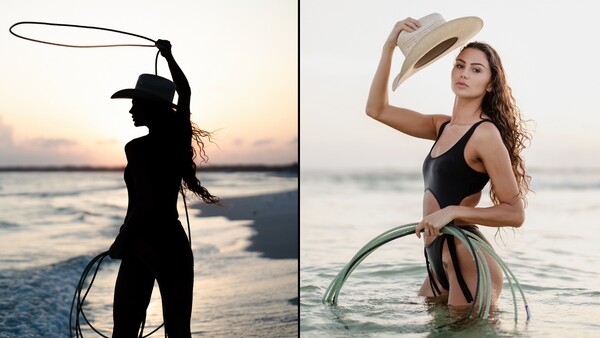
Examples of portraits taken with natural light show the versatility and beauty it offers, from the gentle glow of the golden hour to the even, diffused light on an overcast day. These qualities make natural light an invaluable tool for portrait photographers aiming to capture stunning, authentic images.
Best Times for Natural Light Portrait Photography
Timing is everything when it comes to natural light photography. The quality of light changes throughout the day, and knowing when to shoot can make a significant difference in your portraits.
-
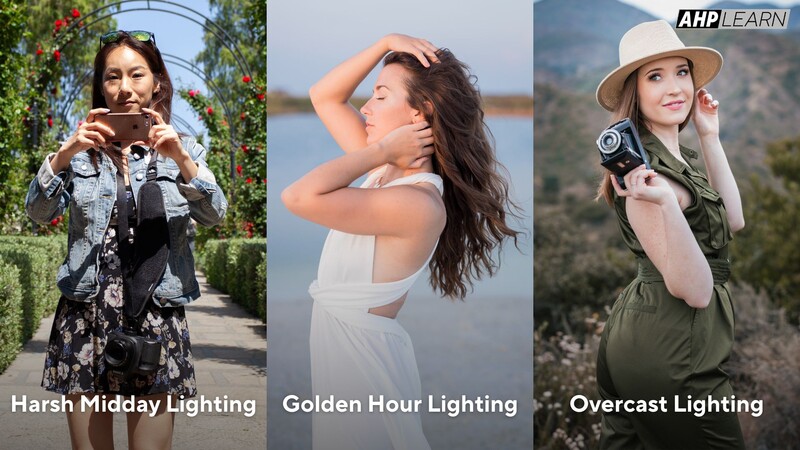
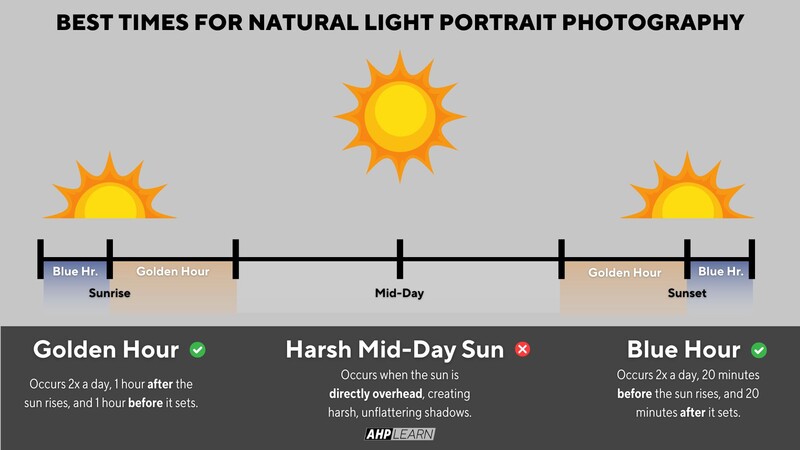
Golden Hour: The golden hour, just after sunrise and before sunset, is renowned for its warm, soft light. This time of day provides a flattering glow that enhances skin tones and creates a dreamy, ethereal look in your portraits. The low angle of the sun produces long shadows and a gentle gradient in the sky, adding depth and dimension to your images.
-
Blue Hour: The blue hour, occurring during twilight, offers a cooler, softer light with a bluish tint. This time is perfect for creating a serene and tranquil mood in your portraits. The light is diffused and even, which helps in avoiding harsh shadows and highlights. During the blue hour, you may need to raise your ISO to ensure your camera captures enough light, as natural light levels are lower.
-
Overcast Days: Overcast days are ideal for portrait photography because the clouds act as a natural diffuser, softening the light and reducing harsh shadows. This even lighting condition is great for capturing details and creating a balanced exposure without the need for additional modifiers.
-
Avoiding Harsh Midday Sun: The midday sun, especially on clear days, can create unflattering shadows and highlights. The direct overhead light can be harsh, casting strong shadows under the eyes, nose, and chin. If you need to shoot during this time, seek shade or use diffusers to soften the light. If you must shoot at midday, try to position your subjects in shade cover, such as under a tree, to eliminate harsh midday shadows.
By understanding the best times for natural light photography, you can plan your shoots to take advantage of the most flattering and beautiful light available, ensuring your portraits always look their best.
Techniques for Using Natural Light
Effectively using natural light requires understanding how to position your subject relative to the light source and using the environment to your advantage. Here are some techniques to help you make the most of natural light in your portrait photography:
-
Positioning Your Subject: Place your subject so that the natural light falls on them in the most flattering way. For example, positioning your subject at a 45-degree angle to a window can create beautiful, soft shadows that add depth to their face. For outdoor portraits, placing your subject so the light hits them from the side can create a dramatic effect with defined shadows.
-
Using Window Light for Indoor Portraits: Windows are an excellent source of natural light for indoor portraits. The light coming through a window is usually soft and diffused, especially if the window faces north or is covered by a sheer curtain. Position your subject close to the window to take advantage of this soft light. You can experiment with different angles to see how the light affects their features and mood.
- Utilizing Open Shade for Outdoor Portraits: When shooting outdoors, open shade provides a great way to avoid harsh sunlight and still get evenly lit portraits. Open shade can be found under trees, next to buildings, or anywhere there is a large shadow. This type of lighting helps to eliminate harsh shadows and keeps your subject well-lit without the need for additional equipment.
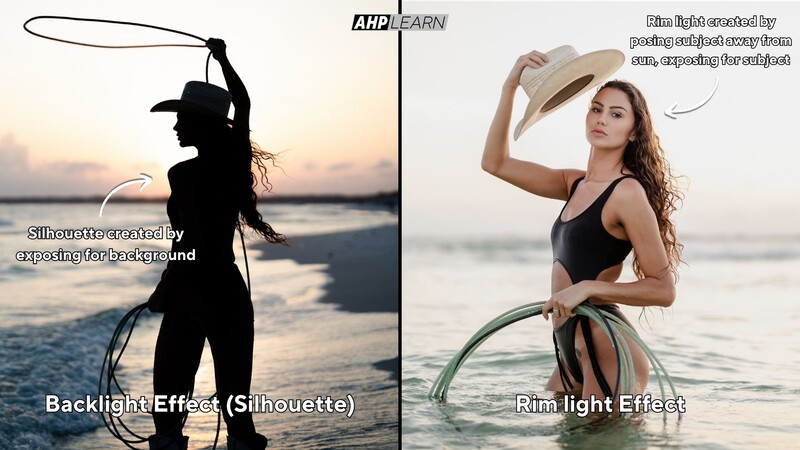
- Backlighting and Creating Rim Light Effects: Backlighting can add a magical, ethereal quality to your portraits. Position your subject with the sun behind them, creating a rim light that outlines their hair and shoulders. This technique works particularly well during the golden hour, adding a warm glow to your portraits. To prevent your subject from becoming a silhouette, use a reflector or a fill light to illuminate their face.
Mastering the use of natural light is key to creating beautiful, professional-quality portraits. — Austen Hunter
Modifying Natural Light for Portrait Photography
While natural light is beautiful on its own, there are times when you might need to modify it to achieve the desired effect. Here are some ways to control and enhance natural light for your portrait photography:
-
Using Reflectors to Bounce Light: Reflectors are an excellent tool for bouncing light back onto your subject, filling in shadows and adding highlights. A white or silver reflector can be used to brighten the subject’s face and add a sparkle to their eyes. Position the reflector opposite the light source to direct the reflected light onto your subject.
-
Diffusers to Soften Harsh Light: On bright, sunny days, the light can be too harsh, creating strong shadows and highlights. Using a diffuser can soften the light, creating a more even and flattering illumination. Diffusers come in various forms, such as translucent panels, umbrellas, or even sheer fabric. Place the diffuser between the light source and your subject to soften the light.
-
Natural Reflectors in the Environment: Sometimes, you can find natural reflectors in the environment, such as walls, sand, or water, which can help bounce light onto your subject. Position your subject near these surfaces to utilize the reflected light. For instance, a light-colored wall can reflect sunlight onto your subject, providing additional illumination.
Examples of Modifying Natural Light for Different Effects
-
Softening Shadows: On a sunny day, use a large diffuser to soften the harsh midday light. This creates a gentle, even light that flatters your subject.
-
Adding Warmth: In the golden hour, use a gold reflector to bounce warm light onto your subject, enhancing the natural glow.
-
Creating Drama: For a dramatic effect, use a silver reflector to add contrast and highlights to your subject’s features.
When you modify natural light, you can take control of your lighting conditions and create portraits that are both beautiful and technically excellent. Experimenting with different modifiers will help you understand how to achieve the perfect lighting for any situation.
Practical Tips for Natural Light Portraits
Achieving beautiful natural light portraits involves more than just finding the right light. Here are some practical tips to help you make the most of natural light in your photography sessions:
-
Finding the Right Location: Choose a location that offers ample natural light and interesting backgrounds. Look for places with large windows, open shade, or reflective surfaces that can enhance the lighting. Scout your location ahead of time to understand how the light changes throughout the day.
-
Adjusting Camera Settings for Natural Light: To capture the best natural light portraits, adjust your camera settings accordingly:
- Aperture: Use a wide aperture (e.g., f/1.8 to f/2.8) to create a shallow depth of field, which helps to isolate your subject and blur the background.
- Shutter Speed: Ensure your shutter speed is fast enough to avoid motion blur, especially if you or your subject are moving.
- ISO: Keep your ISO as low as possible to maintain image quality, but increase it if necessary to compensate for lower light conditions, such as during the blue hour.
- Neutral Density Filters: When shooting in bright conditions with a wide aperture, use neutral density (ND) filters to reduce the amount of light entering the lens. This allows you to maintain a shallow depth of field without overexposing your image.
-
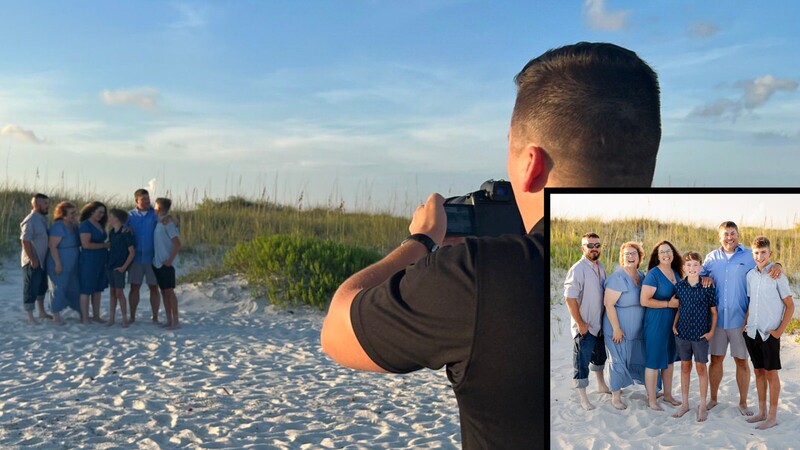
Communicating with Your Subject: Build a rapport with your subject to make them feel comfortable and relaxed. Explain your vision for the shoot and how you plan to use the natural light. Give gentle direction and positive feedback to encourage natural expressions and poses.
By implementing these practical tips, you can enhance your natural light portraits and achieve a variety of looks and moods, making your photos more engaging and visually appealing. Experimenting with different techniques and settings will help you develop your skills and create stunning portraits every time.
Frequently Asked Questions
Q: What is the golden hour, and why is it good for portrait photography?A: The golden hour is the time just after sunrise and before sunset when the light is warm and soft. It enhances skin tones and creates a dreamy, ethereal look in portraits.
Q: How can I modify harsh sunlight for better portraits?A: Use a diffuser to soften the light, or position your subject in open shade to avoid harsh shadows. Reflectors can also help bounce light back onto your subject.
Q: What are neutral density filters, and when should I use them?A: Neutral density filters reduce the amount of light entering the lens, allowing you to use a wide aperture in bright conditions without overexposing your image.
Q: How do I achieve a rim light effect with natural light?A: Position your subject with the sun behind them to create a rim light around their hair and shoulders. Use a reflector or fill light to illuminate their face and avoid silhouettes.
Final Thoughts
Mastering natural light can significantly elevate your portrait photography, enabling you to create stunning, professional-quality images. By understanding the best times to shoot, positioning your subject effectively, and using modifiers, you can harness the beauty of natural light in your portraits. Keep practicing and experimenting with these techniques to refine your skills. For more tips and resources, check out the AHPLearn merch and educational materials to continue your photography journey. Happy shooting!


Join the Fstoppers community for free
-
Post comments and join in the discussions
-
Browse the site ad-free
-
Share your work and get featured in the community
-
Compete in the photo contests for fun and prizes
4 Comments
OK, but why is there a woman with a lasso standing in the ocean? Doesn't all that water make it hard to even use a lasso? Why is she wearing only a bikini? Wouldn't she need at least chaps to lasso and ride a wild whale safely?
Really, though, the question is: does Fstoppers even *want* women photographers to feel welcome here?
If a photo of a beautiful woman makes you feel unwelcome, thats on you, not them. I'm sure the woman "in" the photo loved how it turned out.
...no suggestion for on/off camera flash for fill?
The answer is in the title.