
Hard drives fail, computer programs get corrupted, and companies have data losses from time to time. If you rely on Adobe to keep all your files and settings safe, then you may be in for a shock if things go majorly wrong. Make sure you have the following four items manually backed up while you still can.
My version of Photoshop got corrupted recently. I won't bore you with the details of what happened because I'm not exactly sure who or what is to blame for the catastrophic failure. A spring clean of my computer and a fresh install of the editing program did the trick thankfully. I am always surprised when I do start afresh with Photoshop by how vastly different I have things set up from the original stock install. All the various presets, third party extras, settings, and preferences you introduce over time can really change how the program looks and feels. A new install of Photoshop can feel like going into your kitchen to make a meal, only to find all the pots and pans have been moved, and those countertop gadgets are nowhere to be seen.
The good news is that all your creature comforts in Photoshop can be easily restored with a few clicks. Adobe has a useful migration option which will pop up when you install a newer version of the editing program. This works because the installer will look for any older versions of the software on your machine and knows which necessary files to copy over. These files should also be stored on Adobe's Creative Cloud server which means as long as you are using the same credentials as before, you should be able to migrate them over. Problem is, what happens if you lose your Creative Cloud details or something drastic happens and Adobe loses your files?
This may all seem a little far fetched but data can get lost and users do get locked out of their accounts from time-to-time. One example of being "locked out" of your Creative Cloud is if you work for a company and use their computers and then you part ways with said company. Unfortunately, it's likely many companies will close down as a result of the pandemic and impeding recession the world is about to face. Another example could be shooting on location in the middle of nowhere, where circumstances force you to move to a new machine. Without the Internet, you can't access your Creative Cloud and migrate anything over. This is why it's best to play it safe and have all those various plugins, presets, and settings manually backed up somewhere safe where you can easily access them.
So What Needs Backing Up?
Depending on how you use Photoshop, there could be several things that are well worth backing up. If it's been a while and you can't remember what exactly you have changed or installed on the program, I would advise working through this list and exporting the following.
1. Presets
Presets are things like workspaces, brushes, gradients, and patterns that you may have made yourself or downloaded off the Internet in the past.
Exporting Your Presets
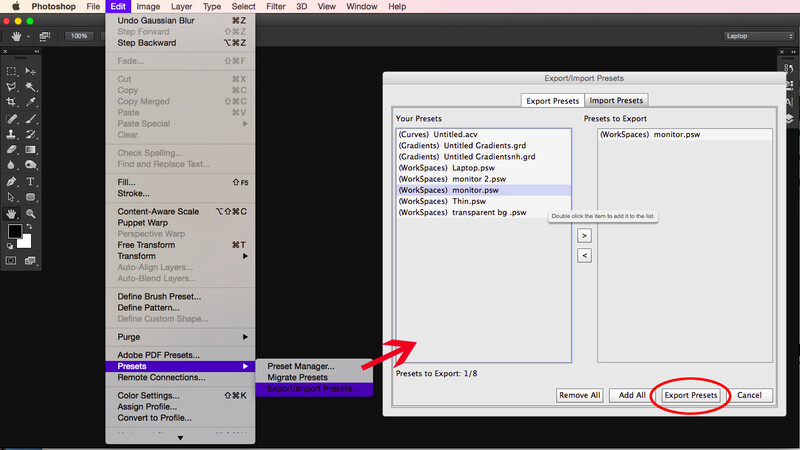
- Click Edit > Presets > Export/Import Presets
- Choose Export Presets.
- Select the desired presets and move them to the Presets To Export column.
- Click Export Presets.
- Photoshop will bring up the save dialogue box and ask you which folder you'd like to save the files in. To avoid any confusion, I would save these in a folder called "Presets".
Importing Your Presets
When the time comes to import your backups into Photoshop this is how you do it.
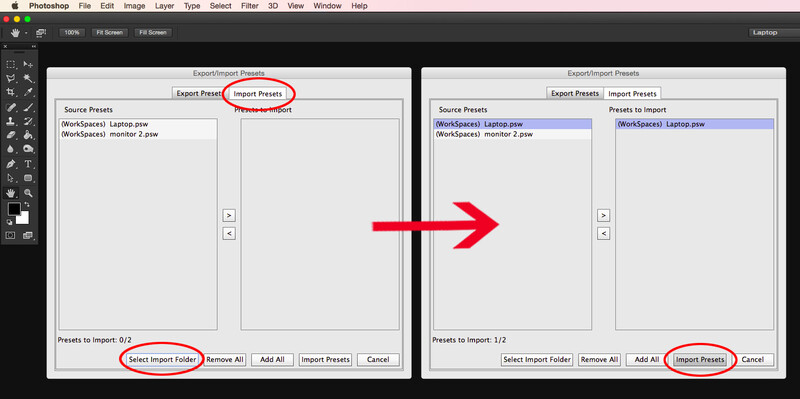
- Choose Edit > Presets > Export/Import Presets.
- Select the Import Presets tab at the top. Click on "Select Import Folder" at the bottom.
- Photoshop will ask you to locate the folder where your presets are. Navigate over to the folder you made called "Presets" and click on the particular preset folder (not the individual files) you want to import.
- Back in Photoshop, select the preset you want to install by double-clicking on it. This will move the preset into the "Preset to Import" column on the right. Press "Import Presets" at the bottom to import the selected preset. If you want to import everything in that folder you don't have to do each one manually. Just use the "Add All" button followed by the "Import Presets" button to import everything at once.
2. Settings
Photoshop has several setting files that you should also consider manually backing up. While some of the names of the settings are the same as the presets we just backed up, these files are actually different. The setting files will have ".psp" after their name and are worth making copies of if you ever want a future version of Photoshop to look and feel how you currently have it.
On a Mac navigate over to:
<Username>/Library/Preferences/Adobe Photoshop <version> SettingsOn a Pc navigate over to:
<Hard Drive>\Users\<username>\AppData\Roaming\Adobe\Adobe Photoshop <version>\Adobe Photoshop <version> SettingsFrom here, you can copy and paste all the files you want to back up. For me, the brushes and gradient settings are things I use often so I have copies of these saved. To avoid confusion, I would keep the file names the same and store them in a folder called "Settings" along with all your other backups. When the time comes to import these settings it's just a matter of following the relevant path mentioned above to locate the folder and paste the contents into the same space.
3. Actions
Actions are a series of prerecorded tasks that you play back in the program to help automate repetitive editing jobs. I have actions for resizing files or adding my copyright info to a file. This can save a lot of time when editing large volumes of files. Having to recreate these trusty actions would be a chore if you lose them so make sure you export these files and back them up.
Exporting Your Actions

- Choose Windows > Actions.
- In the Actions panel flyout menu, select the folder of actions you want to export. Click the down arrow in the top right-hand corner of the flyout menu which will bring up a long list of options. Scroll down to "Save Actions."
- Photoshop will bring up the save dialogue box and ask you where to save the file. To avoid any confusion, I would leave the file name the same and save the file in a folder called "Actions."
Importing Your Actions
When the time comes to import your backups into Photoshop this is how you do it.
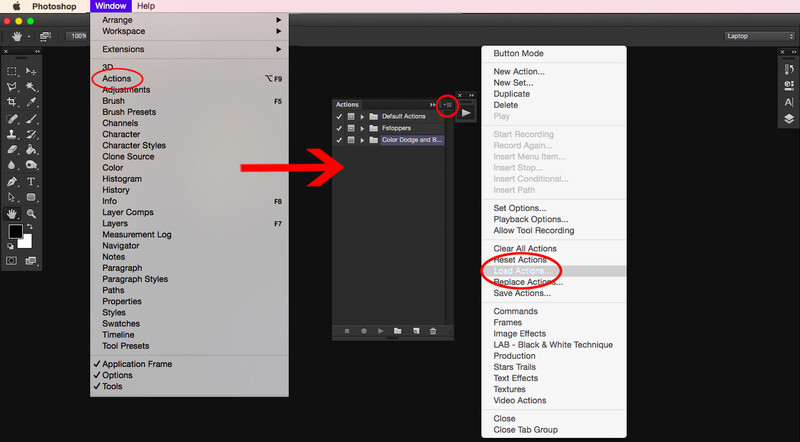
- Choose Windows > Actions.
- Click the down arrow in the top right-hand corner of the flyout menu which will bring up a long list of options. Scroll down to "Load Actions."
- Photoshop will ask you to locate the file you want to import. Navigate over to the folder you made called "Actions" and import the set of actions you want to import.
4. Plug-ins
Plug-ins are mostly third party add-on programs that give additional functions to Photoshop. The more advanced plug-ins cost extra but are often worth their weight in gold as they can dramatically improve a photographer's workflow. As a result, you must have backups of all your plug-ins.
On a Mac navigate over to:
On a Pc navigate over to:
<Hard Drive>\Program Files\Common Files\Adobe\Plug-Ins\CCFrom here you can copy and paste all the files you want to back up. To avoid confusion, I would keep the file and folder names the same and store them all in a folder called "Plug-Ins". When the time comes to import these files it's just a matter of following the relevant path mentioned above and pasting the contents into the same space.
It's worth noting that some plug-ins don't always work well on different versions of Photoshop. If your plug-ins are 10 years old you may run into some issues if you try and use them on the newest version of the program. Adobe suggests you do clean installs of plugins using the most up to date version to help avoid any potential issues with incomparability. I would agree with this where possible but obviously, that can't always be the case. What I would say is that if you do end up doing clean installs of any plug-ins, make sure you don't forget to export out any templates or settings you may have inside those third party programs.
So there you have it, how to manually back up all the various plugins, presets, and actions that make Photoshop feel like Photoshop to you. For those light users of the program, this might all seem a little bit overkill, but for heavy users of Photoshop, those customizations can make quite the difference. Imagine jumping into your car to find all the controls are not usually where they used to be. I'm sure you could still manage to get to your destination but the journey may be a whole lot bumpier. The other great thing about having these files stored locally is that you are free to move to other machines that you may occasionally use. I often work in commercial studios where I have to be connected to their workflow and ecosystem. As a result, I use the studio's computers instead of my own. By having all my presets etc on a handy USB stick I can easily make Photoshop feel like home wherever I am.
Do you have all your presets, settings, and preferences backed up? Is there anything else you like to make sure you have copies of? Please share your thoughts in the comments below.
Lead image by Free-Photos, via Pixabay used under Creative Commons
If you'd like to take your photo editing to a new level, make sure to check out the variety of Photoshop tutorials and plugins that will speed up your workflow and help you create stunning, professional work. Save 15% by using "ARTICLE" at checkout.


Join the Fstoppers community for free
-
Post comments and join in the discussions
-
Browse the site ad-free
-
Share your work and get featured in the community
-
Compete in the photo contests for fun and prizes
2 Comments
Backups are critical! I downloaded a device driver for a new card reader and after installing it, my MacBook Pro wouldn't boot! Card reader vendor was worthless, blamed Sony for the bad XQD driver which they clearly didn't test it and said they couldn't do anything to help me. Having a Time Machine disk continuously attached to my Mac saved my butt. Took 8 hours to restore 1.5TB of data, but I didn't lose anything. Apple Support was also wonderful during this ordeal. Apple Care is not cheap but worth every dime.
The card reader went back to B&H for a full refund...another tip, buy only from a seller with a good return policy.
after a similar situation, I set myself up to automatically synchronize data to the cloud and NAS through a small Handy Backup program