
With photographic lighting, there is plenty to learn. Each surface requires its own type of light and every modifier produces its own signature light. One other element we must always consider, though, is the photographer’s intent.
One type of question I get so often when teaching lighting to various students is "How should I light this?" or "What do you think of this lighting?" Although I understand this question is coming from a good place and a desire to learn, I always counter it with a question of my own. Specifically, "What are you hoping to achieve?" Once both of us understand that, we can begin to make decisions on how to light your subject and evaluate any lighting you have done. It's a hard question to answer when you're beginning and your head is full of new technical information, but it is a necessary one for choosing the best lighting for a given situation.
Intent should be a huge part of how we consider any photograph. Seeing as light is our primary raw material, it stands to reason that we should also consider our intent when working with artificial lighting. Intent could be as simple as “Let’s make something that looks as cool as possible.” It could also be a deeply emotional decision about how you want the viewer to perceive your subject, or it could be more functional, as in the images below.
The portraits below are all very simple and required minimal equipment to make. All three were lit with a Godox AD200 in a large white umbrella. The camera and lens were a Fujifilm GFX 50S with the GF 110mm f/2. Any camera body and a short telephoto lens will do, but I love the rendering of this combination. Let’s jump in and look at the lighting.
The First Portrait
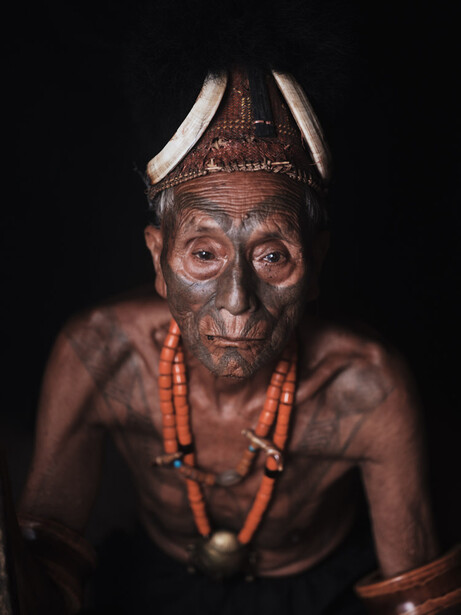
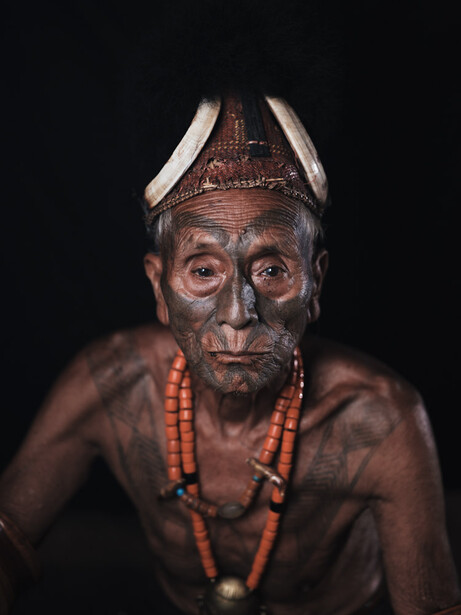
In this first portrait, my goal was to create an image for my Tattoos of Asia project. This project aims to show the beautiful facial tattoos that have been part of so many cultures on the Asian continent and tell the stories of the individuals that wear them still. The goal here is to clearly show the tattoo and the face of the wearer.
The function of the light in this image is to illuminate the subject and eliminate distraction. Thus, I chose a position for the light that would show both sides of his face while still having some direction so we could appreciate the texture of his skin.
I placed the light to camera left at around 30 degrees away from the camera and raised it up high. Then, I raised the light higher than I normally would so I could have my subject look up at me. That way, I could achieve a fuller light on his whole body (with the falloff you see going down his chest) and achieve depth-of-field separation between his face and chest. Keeping the light in close meant that I could use the inverse square law to send my background black and achieve my distraction-free goal as well.
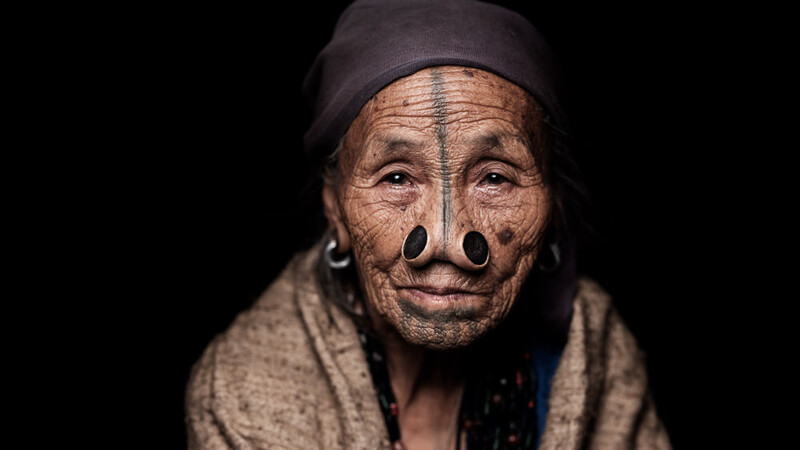
Another potential way to achieve lighting that checked both of these boxes would be to have the light above the subjects face pointing down. You can see the result of that light position below. Both are valid ways to achieve the result I wanted and I have used them for different faces during my work on this project.
The Second Portrait
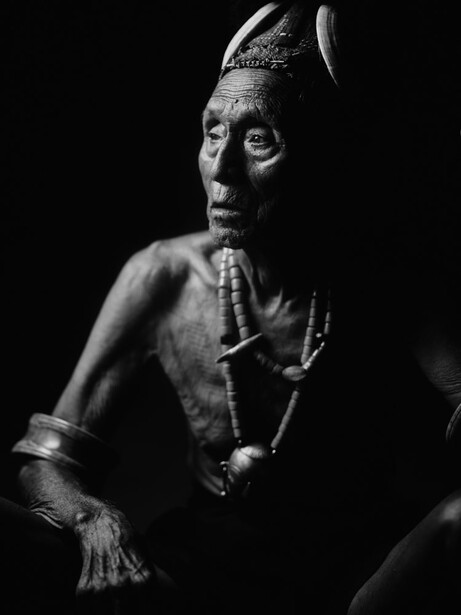
For the second portrait of Gangloi Gangsha, I wanted something that represented how I felt while talking to him. As an older man, he had so many stories and would often drift off into thought as he told them. I wanted a portrait that represented him in that way. This would be separate from my project and didn’t necessarily need to show his tattoo in all its glory. This could be a quieter portrait about him and not his marking.
Rather than revealing, the function of the light here would be to place shadow where I wanted it. I brought the light down about a foot and moved it much further around (approximately 70 degrees to camera left). The goal here was to keep part of him in the shadow and keep an air of mystery to him as he gazed off into the distance.
The final step here was to have him look just past the edge of the light closest to me. That would create the pattern of light you see on his face here. Since I photographed him from the side of his face where the shadow fell, I’ve created what is known as short lighting. This is a great style of light to use when you want to make someone appear mysterious or thin them out a little. It’s also great for character portraits as it leaves the viewer to consider what details might be hidden in those shadows.
An Augmentation
One quick and easy way to create an alternative image to those above is to use a rim light. A rim light is basically one that comes from behind the subject and seeks to create separation between it and the background. If you look back at the first and third portraits in this article, you’ll notice that both fade into black and there is no clear edge to show where the subject ends and the background begins. If this is something you don’t want in your images, there’s an easy way to augment this lighting.
For the image below, I decided to experiment with having a rim light to define the edge of my subject. This light is a Godox TT350F that I carried just in case I might need a second light. Since rim lights don’t need to be as high powered as key lights in most cases, I was able to get away with this minuscule speedlight for this purpose. Ideally, I would love to have had a second modifier to put it in but as I wasn’t traveling with one, this shot was made with a bare speedlight.
The flash is placed just outside of frame to camera right behind my subject. I sat it on a table behind him and finessed the angle until it was just skimming his left-hand side. Using a modifier such as a small umbrella on this flash would have achieved a softer look to that light, allowing it to blend in more.
In Conclusion
In a matter of moments here, I created two images that served very different purposes by simply moving the light a little. I encourage everyone to make this one consideration when lighting each and every time, "What is my intent?". This question will allow you to create images that serve purpose as well as looking great. I talk in great depth about this in my e-book with Fujilove. Check that out for more practical lighting ideas and exercises.


Join the Fstoppers community for free
-
Post comments and join in the discussions
-
Browse the site ad-free
-
Share your work and get featured in the community
-
Compete in the photo contests for fun and prizes
6 Comments
in second portrait, it's better that used smaller aperture; because the old mans two eyes is not in focus. it's good that we control ourselves when using fast lens.
Interesting point. It would definitely create a different image. My goal was not to render detail, but to create a mood. Keeping everything in focus would have changed that significantly. Thanks for chiming in!
These are wonderful. Not the point of your article, but clearly these people trust you, which says how personal skills are important.
Hi Rod! Thank you. Indeed, that is a whole other topic. There's a lot to unpack there. I'm currently working on a series about intent and the role that it plays, so please stay tuned! There's a little more in there on trust.
Hi Dylan - I just downloaded your lighting ebook and had a quick scroll through before work. It looks amazing i cannot wait to set aside some time to have a proper read and practice the techniques. At first glance though i'm super impressed with what it contains.
Alex! So glad you jumped on board. Flip to page 160 and be sure to join our group as well! Happy flashing!