
I had been using a Mac since I first started photography and retouching. Over the years, I upgraded my Macs and used them without a problem, and all software that I have been using worked flawlessly. The Mac has several advantages such as ease of use, a perfect interface (OS X 10.6 Snow Leopard is still my favorite by the way), advanced file and folder tagging, and security, but there was a problem that led me to change my mind and switch to Windows: very high price tags and limited customization options.
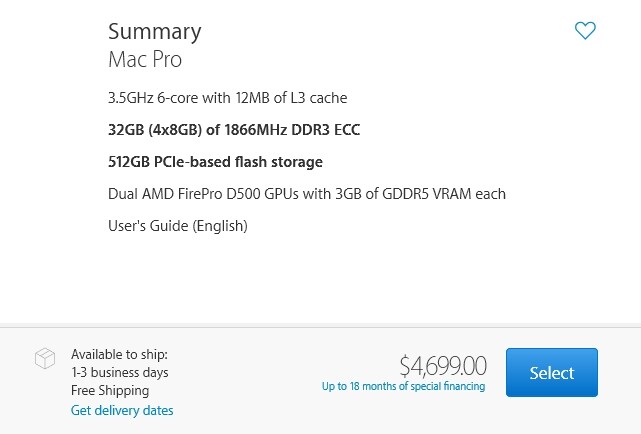
First of all, I wasn’t after a portable solution, as I already own a MacBook Pro Retina for tethered shooting and on-location use, but I was definitely looking for a reliable workstation to use. While I was searching Mac Pro specifications and price, I decided to look for an alternative solution and that was the time when I started thinking about switching to the dark side: Windows and PC. I had never built a custom PC before, and I haven’t been using Windows since 2004. All I remember about PC and Windows was problems and errors. Everything about picking the parts and building it by myself was exciting but at the same time, I still had hesitation. I finally made up my mind when I calculated the total price of the parts of my custom PC. It cost roughly $1,600, whereas a Mac Pro with similar specs was about $4,700. Mac Pro was really small and its design was really good, but I wouldn’t spend three times more just for that. I thought that I should take this risk and switch all my system and daily computer habits as well.
Choosing the Parts
Processor and Motherboard
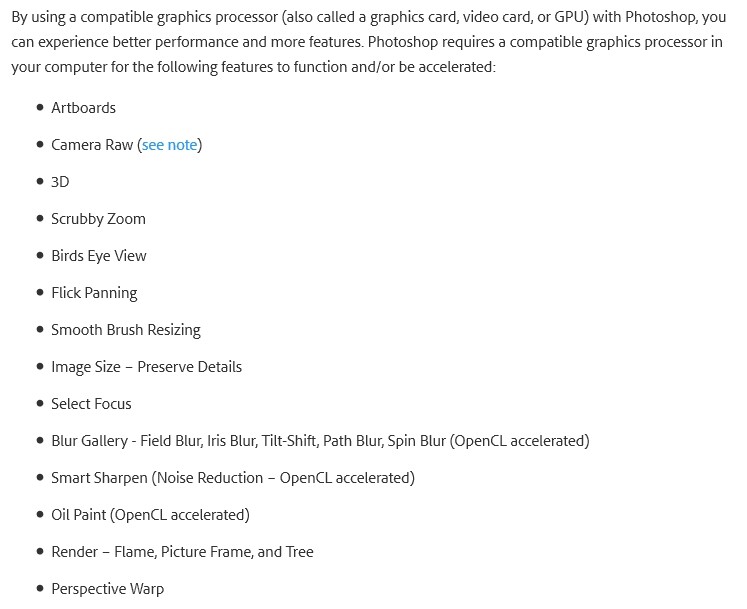
I said that I wasn’t after a portable solution, but I always hated the big-sized usual PC cases. To make it compact enough, I decided to go on with a small-sized (Mini-ITX) motherboard and a case. While it has some advantages about size and look, it has also some disadvantages such as limitation of adding extra graphics card or a sound card, as it has only one PCI-E slot. But it wasn’t a big deal for me, as I was only aiming to use this machine for retouching on Photoshop and 3D rendering purposes. Also, as it is stated on Adobe’s website, there is no need for a second graphics card:
Photoshop currently doesn't take advantage of more than one graphics processor. Using two graphics cards does not enhance Photoshop's performance.
Also, I chose a six-core processor over a four-core processor to get better performance in Photoshop and better computing performance, especially for 3D modeling and rendering. According to Adobe:
Photoshop generally runs faster with more processor cores, although some features take greater advantage of the additional cores than others. For most users, the increase in performance that more than six cores provide, doesn’t justify the increased cost.
Graphics Card
NVIDIA cards are rapidly evolving and I wanted an affordable graphics card with sufficient specs for my workstation. I chose a compact-sized GTX 970 to run some Photoshop features flawlessly, and so far, I’m happy with it. In the future I can upgrade it whenever I want. Also, keep in my mind that a good graphics card accelerates some specific features in Photoshop.
RAM
Having 16 GB of RAM would have been enough, as the minimum requirement for the latest Photoshop version is 8 GB, but if you are working with multiple images with lots of layers you can experience memory problems. Therefore I decided to use 32 GB of RAM in this build.
Photoshop uses random access memory (RAM) to process images. If Photoshop has insufficient memory, it uses hard-disk space, also known as a scratch disk, to process information. Accessing information in memory is faster than accessing information on a hard disk. Therefore, Photoshop is fastest when it can process all or most image information in RAM.
Complete Parts List
- Motherboard: ASRock X99E-ITX/AC LGA2011-v3
- CPU: Intel i7 5820K 3.3Ghz (6-core, 12 threads)
- Graphics Card: Zotac GTX970
- RAM: Corsair Vengeance 32 GB (16 GB x2)
- CPU Cooler: Cooler Master Seidon 120V Plus (water cooling)
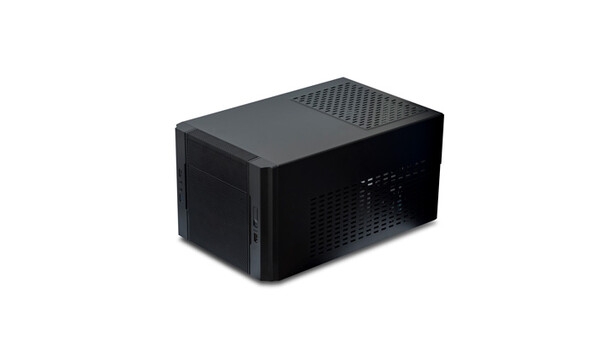
- Case: Cooler Master Elite 130
- Power Supply Unit: Corsair CS650M
- Storage: Kingston 480 GB SSD + Seagate Barracuda 2 TB HDD (for backup)
- OS: Windows 10 Pro
Total cost is approximately $1,600.
Windows 10 Experience
To be honest, I still miss OS X, and it really took some time to adapt to Windows and its shortcuts. Within this period, I already started using this PC as my default workstation, and luckily I haven’t seen any blue screen, or unexpected program errors. Also, I modified most things on Windows with native customization options to achieve a OS X-like look, such as a black-colored mouse cursor and top-positioned task bar. So far, the performance is already perfect, and day by day I’m getting used to it. In the meantime, I barely have gotten used to the Windows keyboard and started using a mechanical keyboard which I really like more than my Mac keyboards.
Photoshop and Retouching Experience
I tested my new system with 16-bit 36 MP and 80 MP raw images. Working with these images in Photoshop was really flawless and even with multiple images opened, I couldn’t notice any decrease in performance. The only problem I noticed was in saving 4-5 GB PSB files was taking a bit long and I think it is because of the SSD, which was connected via SATA port. A PCI-based SSD would probably handle this faster, but that would be too much expensive. Other than that, the only thing that slowed me down at the beginning was the placement of "alt" and "Windows" keys, which is used frequently in Photoshop. So, if you are thinking of switching to Windows from Mac, be prepared to learn all of Photoshop's shortcuts once again.
Build and Installation Notes
- When using high capacity RAM, some motherboards don’t recognize them and don’t boot due to an un-updated BIOS version, so it is better to find low capacity RAM such as 4 GB or 8 GB just to boot the PC and update the BIOS.
- The Wi-Fi card on the motherboard that I used was really unstable and some other user reviews also supported this issue, so I changed that with an Intel Wi-Fi Card.
- If you want more options for your system, don’t limit yourself with the Mini-ITX's form factor. You can get a Micro-ATX size motherboard (one size bigger than the tiny sized Mini-ITX) which would allow you to install dual graphics cards or PCI-E based SSD.
- If you are living in a hot place, be sure that your computer is cool enough to run properly. It is better to create good air circulation inside your case with additional fans. If you set your fan speeds properly, you wouldn’t hear any annoying fan noise.
- Building a PC by yourself is really fun and exciting, and it has many advantages such as the ability of changing and upgrading the parts whenever you want. Even if it looks too complicated and technical, don’t hold back yourself, there are lots of tutorials on YouTube and the manuals that come with the parts are very useful. This was my first building experience and it took about 45 minutes with watching some videos and reading the manuals. If I've done it, you can do it.
- If you are migrating from Mac, be aware of the difference in file type systems. On this new PC, I started using my backup hard drives in exFAT format which can also be read and written by Macs. It is better to avoid using third-party file format compatibility software as they can cause errors on your disk which may result in data loss. This is the only thing that bothers me right now as I have lots of archived data in my hard drives which are in HFS+ format (the default OS X format with zero Windows compatibility).
Conclusion
Using a Mac or Windows is like using a Nikon or a Canon camera (Pentax would be considered Ubuntu at this point), however, after a while it is really easy to adapt a new operation system, and the result is satisfying for me. Even though I still miss OS X, the performance that I got for this price point and the new Windows 10 made everything easier. If you have similar experiences in switching systems or custom PC building, please share in the comments below.


Join the Fstoppers community for free
-
Post comments and join in the discussions
-
Browse the site ad-free
-
Share your work and get featured in the community
-
Compete in the photo contests for fun and prizes
86 Comments
great post! I've considered doing a video series on building a workstation at home because I've never done it before and I need to learn.
Thanks Lee! I'm looking forward to seeing that video series!
Lee, I'm going to be taking apart my PC here to clean it in a day, If I put a video of me building it would you consider putting it on Fstoppers page if I do it well? P.S. I build gaming PC's all the time for people.
Sure, if it's relevant to photographers/videographers.
Its super easy i just built one last month!
I've been building my own PCs for over twenty years. It is really simple compared to when I first put together my first rig. The only thing you need to make sure you you get right is making sure you have compatible motherboards, CPU and memory types.
Just recently put together a new setup in my office. Added LEDs for good measure haha
^sweet looking set up man! I gotta say though, editing under that ambient condition would make my edits all whacky and stuff O_o
Thanks! They are RGB LEDs so I can make them any color or just white.
I own a Macbook Pro as well, but for a workstation I go Hackintosh. Best of both worlds. Look up Tonymacx86 for foolproof recipes.
From 2008 to 2014 i was all about Mac, I even worked at the Apple store which is where i learned Final Cut 7. In those 6 years i owned different version of the 17" Macbook Pro... and i was always at the Genius Bar with some hardware problem. Basically mac laptops are not made for 3D render or four hour upon hours of video editing and after a year they would give me huge problems. So 2 years ago i switched back to PC because i needed a more robust computer for editing and 3D. I bought an MSI and although i had wifi issue's it worked way better and i still use it today. But last month i decided to go with a new desktop build. I used 2 Xeon processors for a total of 16 cores, the new GTX 1080 and the ssds from my laptop. the full part list and set up is on my PCPartpicker http://pcpartpicker.com/b/P7f8TW. My friend just ordered a 12 core Mac Pro for the office and spent $10K, my computer out-specs his and i spent 1/5th of the price! Unfortunately apple is more worried about selling phones these days and it shows.
Also i found a work around that lets me use VMWare to run Mac OSX using 6 of my 16 cores, just in case i need to run something on the mac side!
Ever build a HackIntoch (specific PC guts wirh OS X OS) ? I built a dual boot system for a VFX artist a few months ago and he's very impressed with being able to boot into either OS X or Win10 whenever he needs specific programs.
Yeah i did. But Hackintosh builds suffer from lack of support for newer hardware. I want to be be able to freely add and take away parts without checking a list of compatibility before i did. For example my os is booting off a PCI card of 2 MSATA SSDs in RAID 0 and i have a USB 3.1 card as well both of which would probably not fly in a Hackintosh build. Whenever im in Chrome, or Adobe or Cinema4D the OS fades away to the point that I really do not care what OS im using as long as i can get my work done quickly and efficiently and not break the bank. Thats what a full windows build offers me.
I was also a mac user from about 2006-2015. Built my first pc. Full size tower, i7 4790k, 16gb ram, EVGA SC GTX 1080 (was a gtx 970), ASUS maximus VII hero mobo, Samsung SSD for the OS, and a western digital 4tb for storage. Have to say I love the performance I got out of this pc a hell of a lot more.
1080 will be my next move Korey ;)
Apple makes great computers, but they rarely update them. The Mac Pro hasn't been updated in 3 years!
I don't really want to trade in my iMac for a PC, but Apple is leaving us little choice at times.
http://buyersguide.macrumors.com/#Mac is a good resource on Apple updates or lack there of.
Definitely Brian, that was another reason why I switched, I didn't want to spend that much money for a "late 2013" Mac Pro
Check out this PC by Origin, https://www.youtube.com/watch?v=KH3I7SvBoUg, Its like the iMac but better because it uses a desktop GPU instead of a laptop GPU in the iMac. You can configure it (or upgrade it later) with a Xeon processor and ECC memeory, iMac's cannot do Xeons. And it supports 2 SSDs and an NVME M.2 SSD which blow the PCIe SSDs out of the water without even trying! Just google NVME SDDs and look at the almost double performance gains. And its closed looped water cooled to it runs quieter and cooler and faster than the iMac under load.
Or for a Mac Pro replace ment check out the MSI vortex, https://www.youtube.com/watch?v=s2334eeA9Zs, Which is basically a Mac Pro like PC!
Yes the Mac has an amazing OS and i prefer it hands down to Windows, but would you rather get your work done faster or look a a more beautiful OS.
Thanks for the links. I'll be sure to check them out :)
"When using high capacity RAM, some motherboards don’t recognize them and don’t boot due to an un-updated BIOS version, so it is better to find low capacity RAM such as 4 GB or 8 GB just to boot the PC and update the BIOS."
It helps to examine ALL the specs of a MB before purchasing RAMM. There are many levels of clocking (speed) that will work with every MB. They way you worded that install was to purchase slower and smaller RAMM, just to get a PC up and running? Mnay MB now can overclock both RAMM and the CPU for blinding fast performance. If they older BIOS is installed on the MB, just install a single RAMM chip installed of 2 ( or what ever combo you're using).
I build massive GPU workstations for various VFX groups and can get amazing results without breaking the bank. (Was there a special reason you wanted a $308 MB? just curious?)
Hi Lane,
some motherboards don't support 16gb ram stick with default BIOS even if you use only one slot,
I learned it after I bought my 16GBx2 sticks :) My MB didn't accept even one stick.
I chose that MB just for it's size actually, and I think it is the only m-ITX x99 motherboard in the market right now
Yeah right now it is the only MITX x99 board. I also like that it supports Xeon processors. I want to use this board in my next build!
I have been a PC user from the start, I actually liked DOS and thought the Original Macs were toys. I am a fairly serious amateur photographer and use Adobe.Lightroom and Photoshot with the NIK plugins along with Corel x10 paintshop pro. I do a lot of panoramic stitching and do all my work on an hp 8 core AMD processor with 8 GB of ram. I find it very fast but my largest files are about 800 MB and these big stitched images are like 12000 x 8000 pix at 300 DPI. I am still on windows 7 as win 10 offers no new features that I am interested in. Not sure what the author is doing with 4GB files but good PC work stations are up to the job. Building computers is easy these days and I have built several in the past and often buy used computers and soup them up
Apple is boutique computer maker for the timid brand conscious consumer. Steve jobs played on this with his reality distortion field.
I'm creating large composite images with hundreds of layers :)
While Windows seems to have more or less caught up, Apple was often first with significant technologies. Those of us who adopted Macs when they did something Windows didn't - like system-wide color management - may be inclined to stick with the historical leader. For the longest time, Windows was playing catch-up. MacOS was also the first with multi-language support. I've been hearing the "toys" and "boutique" dismissals since the 1980's, and always felt these characterizations were misinformed.
Agree, Apple cannot compete with well built PC
Lucky you don't live in Australia. That Apple Mac Pro set-up costs $7,619.00 here :/
Hi Stephen,
Acutally I live in Melbourne, VIC :) and yeah I know, the local prices are so high, but the parts on my post are based on US prices fyi ;)
Cheers
Fellow Melburnian... nice post! :)
This is great article for a beginner. I would love to see more information about the processor and video card. There are 3 processor types - AMD, Intel Desktop Core and Intel Xeon. Why did you choose a Intel Core processor? Apple Mac Pro use Xeon. Besides cost what is the difference between the processors? Why not use Xeon? It has more power. There are two types of graphic cards - game and workstation. Why did you pick a game graphics card? Why not a workstation card? What is the difference? Is one GPU better than the other for Photoshop CC? Maybe you could list 3 configurations - budget, mainstream and power user.
Hi Robert,
AMD: I really didn't want to go on with an AMD as Intels are always more powerful per core even 8core AMDs are cheaper. But 6 core Intels beat 8core amds up on benchmark tests. Plus heat is still a big issue on amds and I think their technology is kinda outdated. I'm talking about processors, not gpus as there are good amd gpus on the market
Intel i7 vs Xeon: you can overclock the i7 cpus, but you cannot overclock xeons. Also, with Xeons you can use 256GB of Rams installed but I will never go more than 64GB in total (i7 limit)
GPU:
It is a gaming card but it is cheap. 256bit and it has enough CUDA cores for computing rendering. I didn't want to invest on GPU at the initial step as gpu based rendering has still some way to go, after that I will decide to go on with AMD or Intel high-end graphics card.
p.s: This would be my next post :)
Bue xeon is cheaper and you can take xeon without gpu, and photoshop don't need high clock speed, just lightroom, but you mentioned just photoshop. Photoshop likes rams.
While Xeons do not support overclocking, if you look there are some that can be overclocked. There is a reddit feed about one part in particular here, https://www.reddit.com/r/overclocking/comments/2ywtko/intel_e51650v3_ov…. I plan to use the E5-1650 for my next build. Xeons are made to run 24/7 without issue and support ECC (ERROR CORECTING) memory. Xeons are basically i7s with more cores, and ECC support!
I wish this mobo supported embedded GPU from CPUs. Then instead of getting the mid-step with some cheapo card one could get powerhorse later and still have viable machine.
Hi Burak,
Why don't you consider raid 0 for performance?
alone raid 0 is useful for suicide(data genocide, holocaust... etc). instead of raid 0, using raid 1 0 or 0 1 is mandatory.do never suggest anyone to use raid 0 alone.
I use RAID 0 for my OS and applications. And in the future I plan to have all work on a separate RAID 5 NAS. In my opinion RAID 0 is always going to be faster and is worth the risk of a crash if I only loose my OS and Apps which can always be reinstalled. And if you're particularly smart when you make a clean install you clone it so that in an event of a crash getting back up and started again wont take as long! You can also remap your Picures, Documents, Downloads etc. folders to another more secure drive so you truly dont loose anything!
This post very much reflects my experience last time I needed a new system. The parts are a little newer than my system build, and I've always come from a PC background (but have always had serious GAS for Mac gear). The cost difference was simply not justifiable for me...and as others have mentioned, I'm in Australia...so Mac tax is doubled here.
yeah current prince in AUD is $7620 here and it is crazy
This is my current workstation rig:
Intel Core i7-5930K
Gigabyte GA-X99-UD4P
Intel Core i7-5930K
Fractal Design S24 Liquid Cooler
G.Skill 64Gb DDR4-2400 RAM
nVidia Quadro 4200
Plextor M6e 256GB (Primary OS)
Intel 750 - 400GB (scratch/temp drive)
2 x WD Blue 4Tb drives (LTS - manually mirrored)
Seasonic PSU (I think 650w)
Fractal Define case
I chose the 5930 over the 5820 because I'm using a NVMe drive and it has 12 more PCI lanes so I avoid any risk of bandwidth starvation, I have two SSDs the Plextor is the older o the two and is the main drive it's fast enough for day-to-day work especially with the software that Plextor provides (RAM Drive). The Intel is purely for putting video and cache files on. The 4Tb drives are the storage drives out-with the NAS. The Quadro is a inherited card from a friend who does 3D design.
The reason for the RAM is that I got a good deal and when dealing with multi-layer P1/Hassie images you do end up using it all!
Currently I do have dual 24in panels but will be shifting over to dual 27" in the next few months.
@Daris Fox
this is what I call a real rig!
Aye, it's less than half the price my friend paid for his top of the range Mac Pro with the all the perks he could get and my own out renders his rig. I rendered out some of his movies and sometimes it's half the time others it's about a third faster through Adobe Media Encoder and the same settings.
He's seriously looking at swapping out his system as he no longer can justify the wasted time. He loves OS X but at the end of the day it's costing him business and it's really the final straw for him after what Apple did with Final Cut Pro.
I've also used the rig to stitch 20 PhaseOne 100mp RAWs together to form a panoramic. That took around 55Gb of RAM to render out. The I/O usage on the scratch disk was also fascinating to watch during the process and surprise me how much Ps actually used it. To be honest I was more than a little surprised that Photoshop didn't crash during the process!
This is an awesome build. Have you seen this: https://www.youtube.com/watch?v=s2W0Lsf7hec
Thanks for the article, I read it with great interest.
I've been a Mac user for over 10 years and never crossed my mind to switch back to Windows, mainly because of the hassle of doing so.
It is getting very tempting though. I exclusively use the MacBook Pro for work on location, and upgrade it every year. The last three I had all had issues with screens - from ghosting to 100s of dead pixels, to bright patches, and screen peeling off where it rubs with keys. Other Apple products are giving me issues too.
Quality is not there anymore. OSX is full of bugs that never seem to get fixed.
I don't know whether this is the case too with the Windows platform these days. Probably the last hurdle keeping me from switching to Windows is the effort I need to make to get my work/life synced between my computer, and (an new) phone platform?
Thanks for reading my post Tino,
I had exactly same or similar problems with you,
well I use an iphone and probably my next phone will be another iphone, but just for that stuff and etc. I would still keep my macbook pro. I had uniformity issues on my screen and even on Imacs the screen starts to degraded by time as many other people experience the same. I even had a dead bug behind my screen on my previous macbook pro (true story) I know it is a big hassle to change the system completely but I gave it a shot and so far I really liked. If it was windows 8, probably I wouldn't say the same, but also we always have a chance to use these machines with Hackintosh install. I haven't tried it yet as I have concerns about the stability, but so far; I just consider this as my main work computer and actually I'm fine with it. tl/dr: I definitely recommend :)
Windows has gotten a lot better, still not perfect by any means but Microsoft is now the most OS agnostic company providing some key apps across the board. MS also actively encourages you to give feedback on how to improve their OS and much of the changes in the recent Anniversary Update reflects on that feedback. You'll hear a lot of unfounded stories about Win 10, whilst some of those do have legitimate concerns it's, especially about telemetry, so far none have been borne out as fact or MS has listened and backed down.
At the moment if you're dependent on the latest and greatest Apps stick with iOS. If Apps are not an issue or you can live with some third party alternatives the Windows 10 Mobile is a decent solution that's getting better. MS is now pushing W10 mobile as a enterprise/business solution than a consumer. It does have some unique features (Live Tiles/ Continuum) and synchronising messages across devices and notifications. Still not on par with Apple but the next update in 2017 will add more feature parity. This said you can get some of the cross-device compatibility with Cortana. Continuum allows you to connect the phone to a monitor, TV to turn it into a psuedo-PC with being to use the mouse/keyboard or just a keyboard and the phone as a touchpad. This ties into the UWP (Universal Windows Platform) system where you buy one app and, in theory, it work on any Win 10 device if the developer has optimised it. Still early days for Continuum but manufacturers are getting behind it and UWP does work and saves you cash instead of buying an app for desktop and phone, you just buy once now.
One device I swear by is the Surface Pro, Apple just doesn't have anything that can compete with it especially if you rely on tethering. The hardware is top notch but drivers have been a mixed bag especially at release but that's more Intel's problem than Microsoft's as it's affected most of the current generation of Intel processors. All this said being able to do quick edits on the go is a great ability and clients always ask what is the device is and where can they get one!
MS also syncs much of your systems settings using OneDrive, uploading files is still a pain but it works as advertised and it gives you the web version of Office for free. Limited space but if you have Office 365 then you get up to 1Tb.
There are several drivers available that allow MAC volumes to be read by Windows. Some free others cost low bucks. Using ExFAT is not a good idea as the file system has no resilience and is very inefficient on large disks. Better to NFTS. I Believe it is also possible to read NTFS on Macs.
To run OSX in a virtual computrer is easy using VMware - there are some prebuilt VM machines available on the net to save you having to do it yourself.
Keith
I found myself in a very similar situation. I converted to a Mac Mini back in 2011, and it was great for general use, but as my needs grew for a more powerful computer and the Mini was just pretty much a closed appliance once you upgrade to SSDs and 16GB or RAM. As I shopped the Mac lineup for a new computer, I found the iMacs were out, I did not want to buy a screen and then a matching screen for dual monitors. Laptops were out, too many performance compromises made to save battery power and size. That left the Mac Pro, at $7000 for the system I would like. Sure they are well made systems. Server grade processor, server grade memory. Even a bit of wiggle room on adding cards to it. But still pretty locked down on HW compared to a PC. But Macs are also yesterday's tech, even when new. The long development cycles really hurt.
Being no stranger to building my own Windows PCs, I naturally started looking at that route. Windows has made great strides in closing the gap with OSX (while Apple has only made modest improvements) to the point that Windows 10 vs OSX is a bit of a yawn. Even some advantage to Windows, because if you did not like the way Apple did something in OSX, Apples official answer is "our way or the highway". With Windows, you can customize or find an program to let you do so.
I came up with a i7-6900k, water cooled running at 4.4 Ghz, 64GB of RAM, GTX 980 GPU, 500GB M.2 system SSD. So for $2900, I have a system that out performs the $7000 equivalent Mac Pro. I am pleased with how quiet I could make my computer. I did not care about looks, it all goes in an under desk cabinet.
Apple really needs to consider "opening up the box" with an enthusiast type system that can be upgraded and tinkered with. They are missing out on what remains of the desktop market, and just going after people who need a "pretty appliance" to accessorize their life.
You are definitely right David,
by the way, it is a really good setup, and probably my next move will be something like this
Its a minor mistake choosing an Nvidia gpu for users of Adobe and, well, nearly all of the photo editing software today. They have all abandoned CUDA in favor of OpenCL. Unfortunately, Nvidia still emphasizes their CUDA performance and their OpenCL performance has stagnated. A user migh as well skip the high end GPU. A 3 or even 4 generation old GPU will have awfully similar performance to a brand new 10x0. Its one of the few places where an AMD GPU is the superior choice. You may get much, much better performance in those optimized tasks with an AMD GPU. The advantages are even more noticeable with video editing.
But never, ever build a system for photo or video editing around an AMD CPU.