
Getting new modifiers is exciting. My first one was a simple umbrella with diffusion. As I progressed into my career, I invested more and more into various light shaping tools. The one I was most reluctant to try turned out to be the modifier I am currently in love with. And here is why.
It is safe to say that I own a few dozen light modifiers to create various effects in the studio and on location. Some, like the softbox, stay put away, while others such as the optical snoot come out on most shoots. I love all light, but for the style of work I do, hard light is more often than not the first choice. In order to create my work, I may use a Fresnel, a reflector, or just a simple bare-bulb flash. Until recently, when I decided to try out the Lindsay Adler optical snoot. And I wish I had an optical snoot from day one because using it opened up loads of creative possibilities which were unavailable to me previously. I think optical snoots are seen as somewhat of a specialist tool, but I assure you, you can use them to create everything from sunlight to diffracted light to fine light patterns.
Instead of being a review of the product itself, I will focus on all the fun I had with it on editorials, commercials, and just test shoots. I will deconstruct each of the images I created with the snoot to show you how you can use it in somewhat unusual ways.
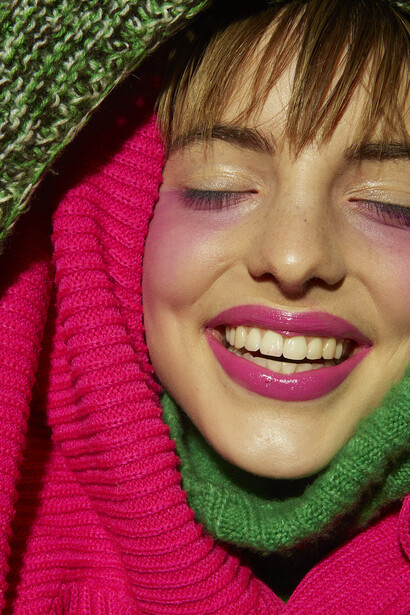
Valentine's Day
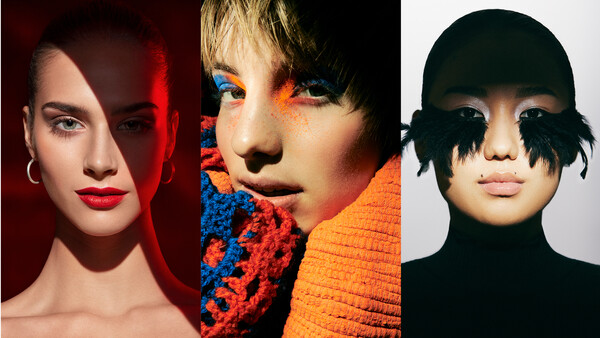
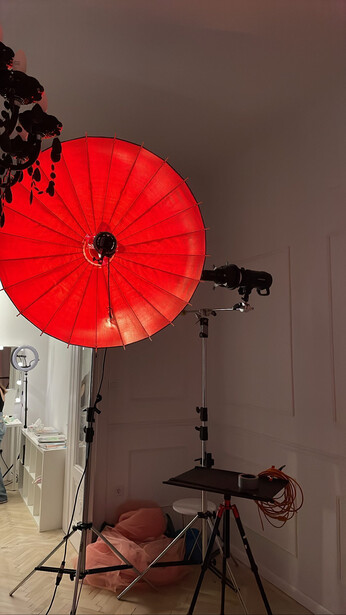
You may have seen these images on my Instagram. While fairly simple to create from a technical point of view, they were superb in the end. Themed around Valentine's Day, this photoshoot was all about the reds. I created it with only two lights, one of which was gelled and reflected on the background.
The optical snoot was right above me, and I focused it to be as crisp as possible. That way the light is at its hardest and the shadow edge is fine. The second light was a single Narrow Beam reflector with some red gel on it. I also used the barn doors to reduce the light spill. The red rim on the right shoulder of the model is just a lucky bounce from the studio walls. While not intentional, I liked it quite a lot when I saw it.

If you plan on recreating this image, I will help you out with a few tricks. A helpful trick that I can share is using your rim light both as a background and as a rim. Just place some foil to reflect the rim onto the background. Not only do you get a cool-looking background, but also a striking rim. And you can trick others by asking how many lights were used, as I do in my story.
Feathers and Muted Colors
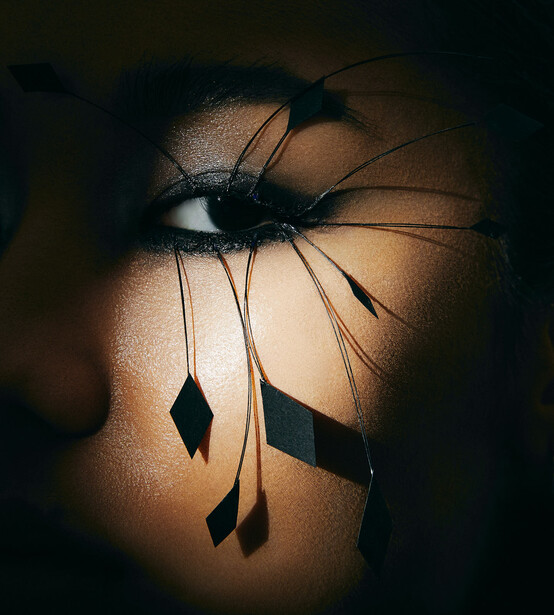
For this project, the goal was to take the color out and make it as subtle as possible. It was also decided that there will be gradients of exposure across the face and background. For some images, I used a Fresnel, while for other photos I opted for the optical snoot again.
The reason I opted for the optical snoot is that it allowed me to create pockets of light, while also giving an opportunity to faux soften the shadow edges. The reason I say faux is not only because it sounds fancy and screams “fashion,” but because it is actually true. The light softness is defined by how wide the shadow edges are. The thing with optics is that it turns light physics upside down. With optical snoots, you can make the shadow edges softer, but not the light itself.
By making the light beam out of focus, the shadow edge will widen, but it will still shift as you move the metal shutters. This will create a pretty cool light pattern that can be used to create artistic imagery. I used mine to precisely light parts of the model’s face. This image was once again created using two lights. One was an OCF magnum reflector with diffusion on top to even out the light spread, while the other light was the optical snoot.

The gradient on the background was created by placing the Magnum fairly close to the background in order to use the power of light falloff. A similar effect can be achieved with a narrow beam reflector and barn doors; however, the gradient will be horizontal as opposed to circular, as you see in the image.
You may say that I could’ve used a small gridded light to create a similar light pattern on the face. Absolutely right! But using an optical snoot gave me more room to play with the pattern itself, as it allowed me to get the right shadow edge width, and the light shape itself.
Sunlight
How do you actually create sunlight? Well, of course, by using a Magnum reflector! Well, of course not. Why bother with it when you can just use an optical snoot? I love using mine to light backgrounds in a way that replicates sunlight. Sometimes, I think I am a flash vampire because I create sunlight with flash, even when there is real sunlight in the studio. The beauty of the optical snoot is that it can be used to cast various patterns on your image. What is more, the clients love how it looks, because there is complete control over how it looks.
Final Remarks
These are just some dozens of ways you can use an optical snoot. It is one of those modifiers that seems niche, but when you get to know it, you realize the full potential it has to be an amazing way to create imagery. One use, which will be a separate article in itself, is creating sunlight. Yes, that’s right, the Magnum reflector is as good at creating sunlight as a knife in a gunfight.
Overall, I strongly encourage you to get your hands on an optical snoot and start playing around with what is a Swiss Army Knife of light shaping tools.

10 Comments
Omg Illya, stop. If I end up buying this I am going to hate you.
(Kidding! But we've chatted about this-- I might actually consider it soon.)
Someone's been pre-reading content :)) But I feel you! I love my snoot. Whatever you do, don't buy it haha. Dangerous stuff.
I only found out about the Lindsay Adler optical snoot on one of her Adorama vids last week... Want. That and a nice big Fresnel!
If only I could justify spending money on studio gear!
I 3d printed mine (found somebody on ebay/craigslist) including the cookies, total was about 50 bucks.
What filament did you use? I thought that even ABS would soften with how hot modelling lights get...
I used PETG - but now that you mention I changed my Elinchrom modeling lights to LED bulbs and the Jinbei have LED out of the box.
The only problem - and it's a BIG one when you are shooting- is that I find my strobes overheat (and shutdown!) quickly when shooting with an optical snoot.... You have to use a modeling light (to aim/focus) and I am sure this contributes to the problem. I use Good/Flashpoint- maybe Profits are more resistant to the overheating (for 4X the price they should be better at something!)
I use Jinbeis and Elinchroms and they don't overheat, the fans definitely work overtime tho.
I use godox optical snoot with Godox AD300 and no problem with heating
Optical snoots are great for lots of creative looks. They do tend to be very inefficient so getting an even moderate f/5.6 requires quite a bit of power or cranking your ISO.They also suck up and absorb lots of heat.