
Learning how to properly light the human face can be a challenge for many beginner and intermediate level photographers. Sure, you can grab a single light source, your significant other, and turn a Sunday afternoon into an experimental test shoot, but what happens when you want to start playing around with multiple lights? Figuring out where exactly to place your lights can be a daunting task, but luckily there are dozens of common lighting setups available for critique right on your television!
There is one place on television that without a shadow of doubt you can find interesting headshot lighting 24 hours a day. That place is the national news channels. I say "interesting" because sometimes, they produce flattering light that makes their guests look beautiful, and other times, they produce horrible lighting that you should never aim to reproduce. By simply watching a few hours of news, no matter how excruciating that may be, you are bound to find a few common trends that you can adopt to your own photography.
Below are four examples of lighting that I quickly captured before heading into the office (sorry for the cell phone quality). By reverse engineering the lighting setups, we can pick up a few great tips to employ in our own sessions and a few mistakes that we should definitely avoid.
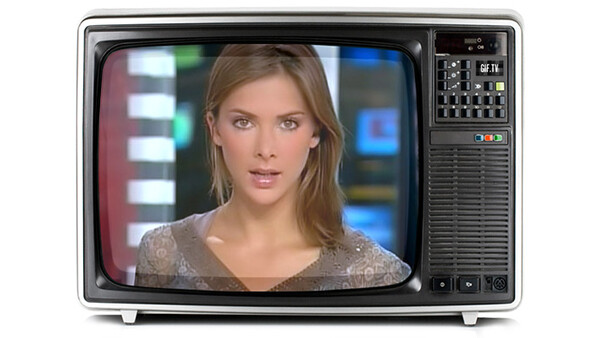
Soft Overhead Lighting
If there was one super generalized piece of advice I can give you for shooting 99% of all people in front of your camera, it is this: large, soft, overhead lighting is your safest bet. If you have not memorized the photography mantra "larger is softer," then now is a great time to commit this idea to memory. Basically, the larger your light source appears to your subject, the softer the shadows will appear on and around your subject. Soft light is almost always flattering, because it diminishes ugly shadows that magnify skin imperfections, sharp facial features, poor makeup applications, acne, and other facial features most people would like to hide. If you had only one lighting setup to employ on your next shoot, chances are you should go with the tried and true method of using soft lighting.
Now as you can see from the example above, you can tell this is fairly soft lighting because the shadows on the face have a nice gradient to them, and there aren't sharp shadows being cast from the nose, lips, or eyes. Now to be fair, the example above does have some shadows being cast by the light, and the lighting isn't the absolute softest light it could be, but it is still relatively soft compared to some of the examples we will see. If you look at the subject's eyes, you can see the reflection of the video light, which appears to be around 2 - 4 feet wide and positioned above the subject's head. This causes the shadows to be cast downwards (which is the direction we are most used to seeing shadows cast in nature), and it also allows the face to have some shadows, which give it a 3D appearance. If we were to increase the size of the light, say by bouncing light into a huge ceiling, we could soften and reduce the shadows even more.
Overall, this is a simple and clean lighting style that you can easily reproduce indoors by simply bouncing an on-camera light above and slightly behind you. Just make sure that the ceiling you are bouncing your light into is white in color to prevent color casts, and also make sure the ceiling is not extremely high, or your might have trouble getting your bounced light to produce enough light.
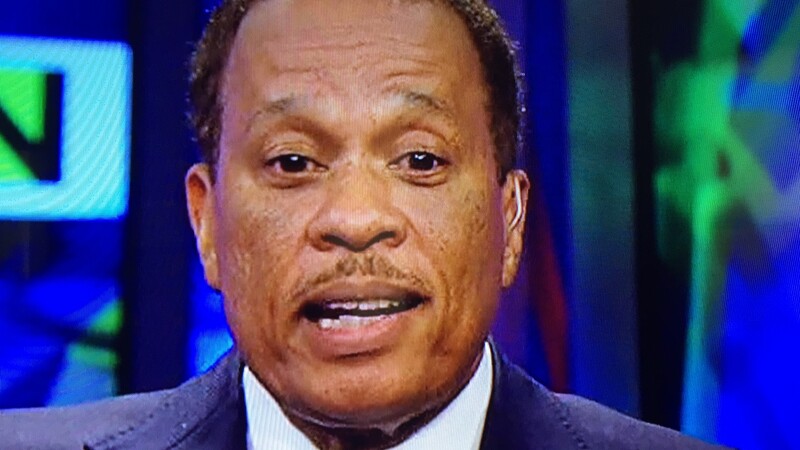
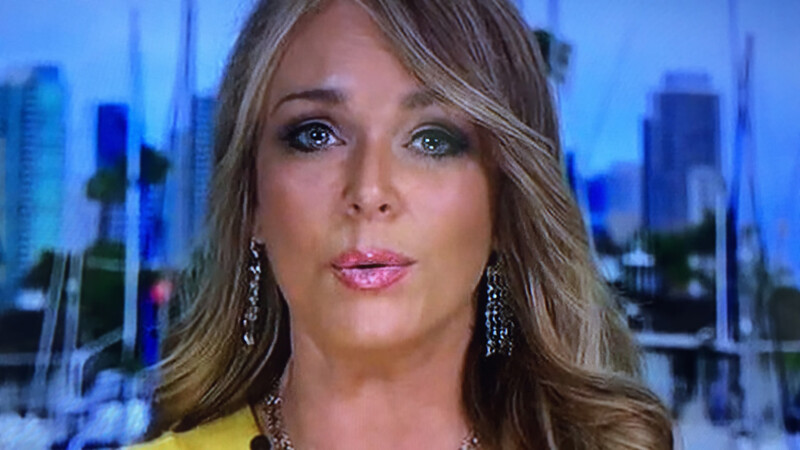
Multiple Small Overhead Lights
If you do not have a ceiling to bounce light from, you might consider just placing your lights above your subject and lighting them directly without any sort of modifier. This is exactly what the remote news studio did in the image above. By looking at the woman's eyes, you can see that it appears she is lit by two small circular lights from above. Both lights are pretty straight on from the subject, but one is slightly to the left of her nose and the other is slightly to the right of her nose.
The first thing you will notice from this lighting setup is the difference in shadow from the soft overhead example above. You can easily see strong shadows under her styled hair, under her nose, under her eyebrows, under her lip and across her teeth, and very strong shadows under her chin. I do not want you to get the impression that all shadows are bad, because we actually do want both highlights and shadows to give objects dimension and shape. However, using two small lights not only produces strong and sharply defined shadows, but more importantly, it creates very unnatural shadows that fall in different directions. You can easily see this by looking at the shadow under her chin. Instead of being a rounded shadow that mimics her natural jaw line, the shadow has very defined edges and comes to an unnatural point. If you look just below this point, you can see how both shadows from the left and right light extend past her jawline shadow and give an unflattering texture to her neck.
The reason newsrooms use this lighting is because it gives a strong contrasty light that makes each subject pop off the screen. Because they are lit from both sides, they also have the freedom to move around a little and still have the same overall lighting effect. It also helps reduce glare on the fake background behind the subject, which many times is actually a television screen and not a green screen like you might expect. If you watch the news carefully, you will notice that this lighting setup is most often used in the satellite news rooms, and it is not as commonly employed on the hosts who are in a much larger and much more professional environment.
Whatever reason the news agencies have for using this lighting, you as a photographer should almost never use this sort of lighting when taking headshots, because of the unnatural shadows it produces. One way you can tweak this setup and maintain the contrasty tone while preventing shadows being cast in opposite directions is to simply place one single light directly over the subject's nose. You can further adjust the length of the shadow by moving the light closer or farther away from the subject's forehead to get the ideal lighting effect you want. Two common modifiers used for this overhead lighting scheme are the beauty dish and the small softbox, although if you have an overly attractive subject who can handle harsher shadows, you can also choose to use a light with no modifier at all.
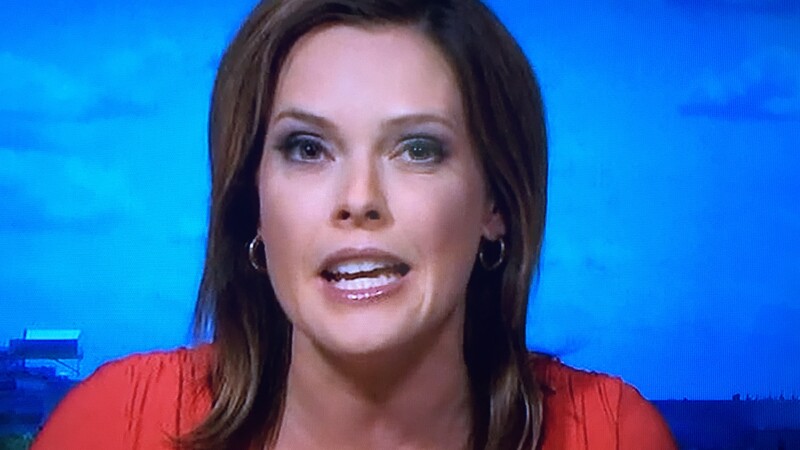
Flat Window Lighting
This next lighting setup is a very common lighting setup among headshot photographers, and it is for good reason. As you can see from the subject's eyes in this photo, the news agency has placed medium-sized lights above and below the face, as well as on both sides of the face. Essentially what they have done is created lighting in the shape of a square and placed the subject directly in the middle of this square. This lighting setup has been used by everyone from Martin Schoeller to Peter Hurley (who has a great photography tutorial that we produced on headshots) and is a staple that you should learn to reproduce for your own work.
Unlike the previous example where small lights are positioned above the subject and cast hard shadows down, this lighting setup is based on medium to large light sources that essentially remove all shadows from the subject. Since the lights are relatively large, they do not cast dark and sharp shadows like you see in the previous example. When you position the lights in a square, diamond, or triangular shape in front of your subject, each light adds soft light to the entire face while also diminishing shadows that accentuate imperfections in the skin like acne, wrinkles, and sharp facial features. Since this lighting setup is so flattering to both males and females, it is often called "beauty lighting," because it flattens the face and makes people look clean, well rested, and overall more attractive.
One slight critique I would give of this example is that the light below the subject's chin is actually a bit brighter than the other lights. This causes the the underside of his nose to a little brighter than it probably should be, and it also casts some soft shadows up onto his neck from his shirt collar. One way to minimize this effect would be to raise the light a little higher up, pull it slightly farther in front of the subject, and to turn the power down maybe a stop. You could also introduce a little more downward shadow by removing this lower light altogether and replacing it with a reflector, fill card, or sheet of white paper to bounce a small amount of light back up from below. If you want to see more professional examples of this lighting setup check out Martin Schoeller's Close Up Series or Peter Hurley's NYC Headshots.
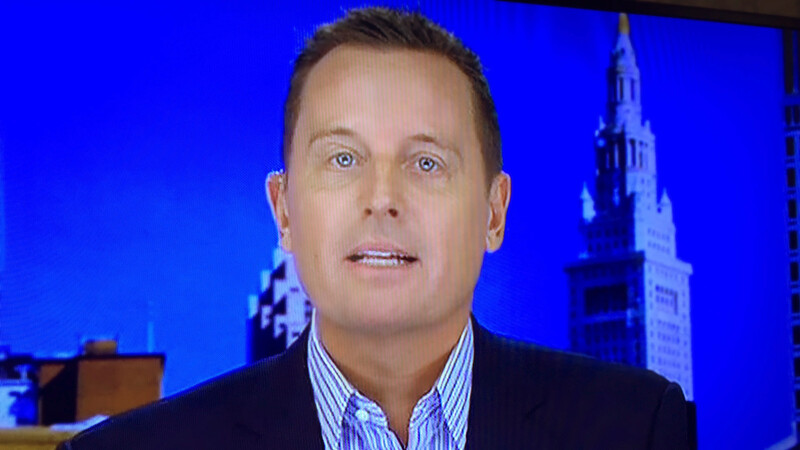
Tennis Court Lighting
This next lighting setup I rarely see in the photography world, but I see it all the time on the news. I call this "tennis court lighting" because it reproduces the shadow pattern a tennis ball creates on a tennis court at night. Basically, what the newsroom has done here is taken a lighting setup similar to example two above and tried to fill in the shadows by adding a third (or sometimes a fourth) small, hard light from above. As you can see, the results are less than ideal, and the subject's face has shadows going in all directions.
If you compare this image to the second setup above, you will notice that they have removed the hard shadow under the woman's chin by adding a new light source below the chin. However, unlike the previous beauty light example, which uses larger lights close to the subject, this lighting setup relies on much smaller lights that are spaced far apart. What this does to the face is allow each light to cast its own harsh shadow. Instead of having soft light that fills in the shadows from every angle, this example creates hard shadows everywhere. If you look at the right side of the girl's nose, you can see a lot of shadow creeping up towards her eye. This is caused by the small light placed below her. Her upper nostrils also have strong defined shadows that give that "horror movie" lighting effect we all usually try to avoid in our photography. Unlike the two soft light examples (first and third), which give the skin a soft and even appearance, this three-light setup creates a lot of highlights and shadows on the face, which results in the skin looking very splotchy.
I would be hard pressed to suggest a situation where this lighting setup might be one you would want to reproduce, but it is still important to understand why these three lights placed in this configuration give the effect they give. A great way to visualize how different multiple hard lights verses one large soft light will look on the human face is to compare the two tennis balls below. One is lit with a huge overcast sky and the other is lit with multiple stadium lights positioned around it at night.
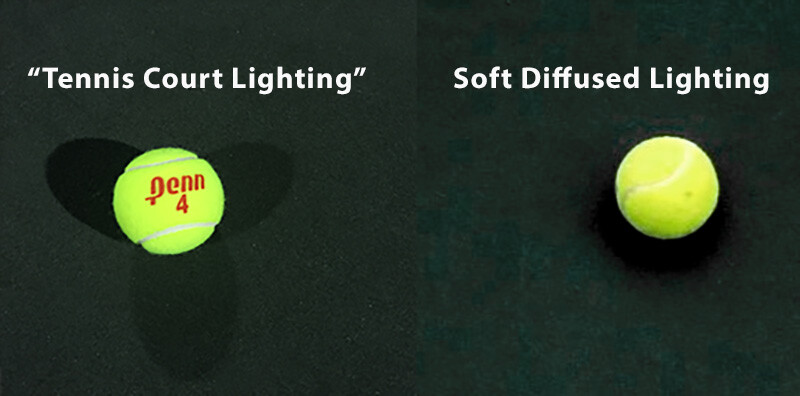
When I was first getting started in photography, I used to think that you could "fill in the shadows" simply by placing another light opposite of the light casting the shadow. While this does work when your light source is large compared to your subject, you will actually get more shadows if the lights are small and far away from your subject like you see in the tennis ball analogy above. So, the moral of this example is to either use large light sources when placing them around your subject to fill in the shadows or to try emulating the hard light we see naturally in nature by only using one hard light source. Once you start placing multiple small lights in front of your subject, you are going to get very unnatural and wonky effects.
Conclusion
These are just four quick examples I noticed on TV today that inspired me to write this article. If you watch interviews from different sources, you will undoubtedly find dozens of lighting setups to critique and add to your knowledge base. No one lighting setup is ever the "correct" arrangement for your photography project, but there are setups that are more flattering than others. There are some setups you might want to avoid at all costs or else your photography might look amateur and "cheap" when compared to other professionals' work in your area and online.
One thing I did notice when comparing these four images is that very little light was placed behind the subject to edge them out. You can see some backlight in the first example and maybe a little hair light in the third example, but overall, these images mainly show how different the key light can look depending on the modifier and light placement. Using both hard and soft light from behind is another great technique you can use to help sculpt your subjects and give them a 3D effect, so don't ignore that lighting, even though it isn't very prevalent here in these examples.
Reverse engineering lighting setups seen on the news and television interviews is pretty fun, and as you get more and more experienced with your own photography, you can use this resource to learn how to light without having to actually pick up your camera. I'll leave you with a final video that shows an interesting moving light setup recently used by CNN to promote the Democratic and Republican debates this last year.


Join the Fstoppers community for free
-
Post comments and join in the discussions
-
Browse the site ad-free
-
Share your work and get featured in the community
-
Compete in the photo contests for fun and prizes
4 Comments
Or buy the FStoppers Cinematic Headshot tutorial with Dylan Patrick! ;)
Ha true. Dylan's work is amazing but it is also a very stylized look that doesn't deviate much (which is what high in demand photographers typically do). If you are serious about becoming a better photographer then spend the money on education, if you are just getting started and have no idea what to look at....television is a great passive place to absorb info
Good suggestion, thanks.
I used to watch a lot live concerts and that is one way I learned to try different angles when ever I was shooting a concert. This doesn't even apply to new. Every video on tv just pay attention to every scene and you'll learn a new composition.