
Have you ever been shooting away with your camera, and you absolutely love the colors and saturation you see on the back of the screen...only to get your images home and have them look ENTIRELY different once you've loaded them into Lightroom?
Well for those of you who want your images to look like they did on your camera, i'm going to show you how to get that starting point back!
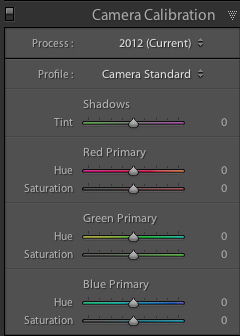
The secret lies in the Camera Calibration Tab in the Develop Module of Lightoom.
Based on the brand of camera, you may be presented with different options in your dropdown, but most cameras that shoot in RAW formats will give you the same "color" preset options that that you find within your cameras menu! For instance, the Nikon D800 files give me the following options for my Camera Calibration Presets;
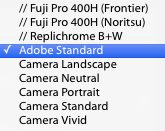
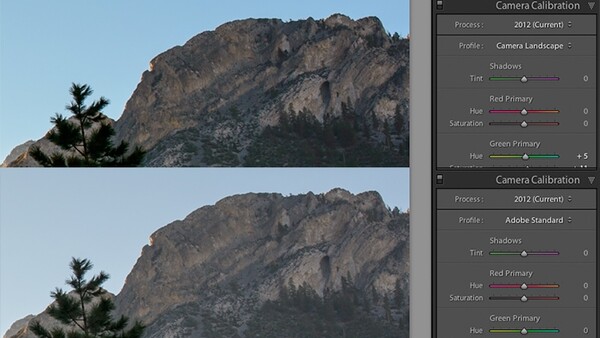
Since I have my camera set to the default/standard profile, to have my raw imports in Lightroom to look as they did on the back of my camera, we simply select "Camera Standard." Check out the sample images in the gallery below showing each setting and the "straight out of camera" version from Lightroom as "Adobe Standard".
Using these or any other Calibration Profile of your choice as your starting point, you can then adjust the Shadows and Red/Green/Blue sliders to take your images to the next level. The first slider you encounter is your Shadows which slides from green to magenta from left to right. This is especially handy when you've been shooting in places where bright colors are reflected on your subjects. For instance, you can push the shadow slider towards the magenta side slightly to help correct the green color cast that reflects from the grass/plants near your subject when shooting outdoors.
The next three sliders are for your Red, Green, and Blue Hues & Saturation. Use the Hue sliders to change colors from Teal to Purple and your Saturation sliders to increase, or decrease the intensity! Let your creativity soar here and adjust as you see fit for your images, (A double click on the slider bar will reset them back to 0).
For more information on how to use the RGB and Shadow sliders to enhance your images, check out Trevor Dayley's article Give Your Colors a Nice Kick With This Lightroom Trick.


Join the Fstoppers community for free
-
Post comments and join in the discussions
-
Browse the site ad-free
-
Share your work and get featured in the community
-
Compete in the photo contests for fun and prizes
15 Comments
Not to be a dick, but... duh. :-)
A whole lot of beginning photographers don't know a lot about camera calibration. I think it is a helpful tip.
Actually I think that's exactly what a dick would say.
Mine only shows embedded.
What the author forgot to mention is he is using presets he bought from other companies. Problem is not everyone wants to toss cash down for them. (of course the easiest option to make your own without having to dip in a profile editor is to get a X-Rite Passport Colorchart, it comes with software to work right from the export tab in lightroom). But of course to get the full use out of those presets or to make your own, you'd need to modify them (light conditions, sensor temp, etc can change those preset colors). If you want to start out making your own based on your specific camera in specific setting, you can with free software from adobe. Grab DNG Profile Editor from Adobe and check out this and prepare to have your mind blown: http://youtu.be/CzjcqX-eiXo (To help with making a camera specific color profile you'll need a gretagmacbeth colorchart, or x-rite chart, or x-rite color passport to help make profiling easier).
The only presets i have are the fuji/replichrome. the rest and the ones demonstrated are the ones that load when my Nikon D800 RAW files are loaded into LR.
When you use a JPG or or PSD/TIFF File you'll only see Embeded
"Have you ever been shooting away with your camera, and you absolutely love the colors and saturation you see on the back of the screen..."
Is it just me, or is the concept of looking at an image on the 3-inch screen on the back of a camera, in any number of environmental conditions, and saying "yeah, this rocks", sound like a really bad idea?
But remember that time we shot that wedding while tethered to your 27" iMac? Those images looked *awesome*. Dude, I'm sorry I yanked the iMac off your cart as I was running to get a shot of that cute ringbear(er). I guess you'll have to use that 3" screen until your iMacs fixed. And next time can I have a longer tether please?
The best you can hope for in using such screens is checking exposure to some degree, and judging whether your shots are sharp and in focus, or not. If you're going to start judging color on that screen, you're in deep shìt.
On an images with deep DOF it results in richer, more contrast colours, but on images with great bokeh, switching into the Standard camera profile (used during shooting) causes bokeh to have very visible colour stripes on gradiends, like a heavily compressed JPG. Why is that? Could it be just a preview need to be rebuild with the new profile?
I've experienced serious issues with posterization with the LR camera profiles in certain types of D800 files - particularly shadows with subtle colour. Adobe Standard has been the tonic.
I've only seen the OOF/bokeh problems you describe with the VSCO presets. Pass.
I find it rather hilarious the way people are hatin' on this article.
It's not like he said, "your is totally inferior to my smartphone." A comment like that would justify atomic warfare, but explaining where to select the camera profile seems pretty non-offensive to me. Maybe I've overlooked the hidden insult?
Great tip! This is good info for any photographer to have :D Thanks, David!
Dear Fstoppers,
The "Camera Standard" and other "Camera" profiles are NOT the same as the one Nikon or Canon or you-name-it uses. They are meant to be similar, but they look different from what you get when you shoot. Try using ViewNX or CaptureNX on a Nikon raw file or compare the raw + Camera Standard in Lightroom with a JPG shot using the same Camera Standard setting (in-camera).
They try to replicate, but it's just an attempt. You won't get the same look in Lightroom.
I overlooked this option in LR for years. It's a great tool to get some different results quickly, instead of working with the flat RAW image.