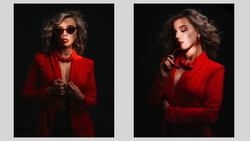
Did you know that Photoshop has a tool for applying different levels of blur across multiple points in a photo? Here is how to use field blur to create a shallow depth of field while keeping your subject sharp.
You are likely familiar with at least one of the blur tools that Photoshop offers. Gaussian blur is probably the most common option, but several others produce a unique effect. One function that you rarely hear talked about is field blur. This option allows you to apply defined levels of blur to individual points in your photo. For example, you can emulate a shallow depth of field by placing points of increasing blur that gradually move away from your subject. This option gives you complete control and is a better choice for creating a realistic look rather than applying a blur to an entire image and masking it off of your subject.
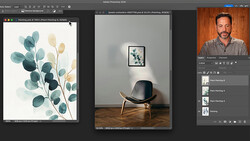
In this video, Unmesh Dinda of PiXimperfect teaches how to use this tool to create a blurry background in an image. Whether you prefer a creamier look in your pictures or the situation you were in didn’t allow you to get the look you were going for, this tool is a great one to learn. I also want to note that at the beginning of this short video, Dinda converted his layer into a smart object. He doesn’t explain why in this video, but this step is what will allow you to tweak your blur settings later if needed. This is important for mastering the realistic effect that this tool can offer. If you want to see how Dinda uses field blur, take a look at the video above.


Join the Fstoppers community for free
-
Post comments and join in the discussions
-
Browse the site ad-free
-
Share your work and get featured in the community
-
Compete in the photo contests for fun and prizes
9 Comments
Just don't, post blur never works. And this example is pretty ugly. Only slightly better than iPhone "portrait" mode. Gag.
This is never convincing. I don't care how hard you try, we as photographers know the difference.
Our clients however don't pick apart photos like we do and turn the art into a contest... so use with caution. Nothing replaces spending money on glass.
If your client is happy, who cares about what tools you used?
That’s what I already implied...
I agree, if you have a paying client, and they like it, by all means go for it, just don't go overboard like in the example here.
However, if you're doing this to compensate for cheap glass... just don't. It really does look awful.
Fully agree with what others have said on here. It's never convincing, not ever. If you want shallow dof, get a lens that goes below 2.8, or shoot much closer to the subject with a longer lens. Aside from that, faking it in photoshop is just plain cheating. You'll never get the organic dof look that a lens can provide. Just don't do it, because it never looks good. :P
Quick and easy, but I agree with other's that creating fake DOF doesn't really cut it.
I dig it. Good tip. Didn't realize you can do multiple points with field blur. I use it in my photo manipulations mostly. Super helpful to know/now use multiple points! Durp, can't believe I didn't realize this.
This is what amature photographers do when they're first starting off and only have a f4.5-5.6 lens that can't get that shallow depth of field.