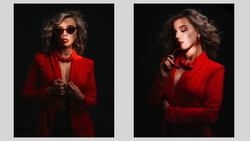
Image distortion is an issue that you often find in photography. This problem can cause parts of an image to appear improperly sized, stretched, or curved. Here is a great tutorial for fixing this common error.
Unmesh Dinda of PiXimperfect brings this quality tutorial on using Photoshop’s liquify tool to warp an image to make it appear more realistic. In this example, Dinda uses a photo where the model's facial features appear too large. His fix starts with converting a layer to a smart object. Converting to a smart object allows for the option to use the liquify tool to adjust the image continually.
Once he converts the image, he opens it in the liquify tool to repair the distortions. Most people have used the liquify tool before. It is the tool that allows you to drag and stretch specific areas of an image. However, its capabilities are more extensive than that. Dinda specifically uses two tools inside of liquify, the pucker tool and the bloat tool, to target precise areas in the photo and slowly adjusts the size either larger or smaller. In his last step, he explains how to use the reconstruct option, which is basically a slider that allows you to dial back how much of the change is applied.
This tutorial is not only a great example of how to repair a distorted image but also gives you the tools to get started with the liquify tool, which has several other practical purposes as well.


No comments yet