Changing a single particular color is easily done in Capture One, but it can prove to be a little bit more complicated in Photoshop. None of the tools found in Adobe's image editing software target colors such as orange, violet, azure, or other tertiary colors. However, there is a very simple trick to make it happen. I'm not talking about curves here, but an approach that will be extremely easy to understand, even for beginners.
The video shown above and created by The Invisible Touch explains very well. First, you must define the color you want to adjust precisely. If you have a color value, you could create a fill layer like shown in the video above or just find an area in your image that you want to target.

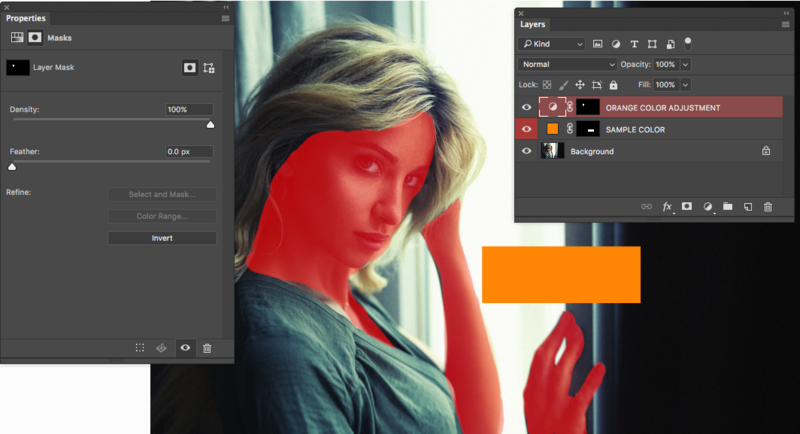
Once you have selected the channel, the rest is a walk in the park. And trust me, my paragraph above may sound complicated, but if you watch the video above, it will make sense, and everything will seem much easier. Now, while having the channel selected, click on the eyedropper tool (the first one above the color line) and choose the color you want to adjust. The sliders on the color line will move to target specifically the selection, and the channel's name will change, as you can see below.

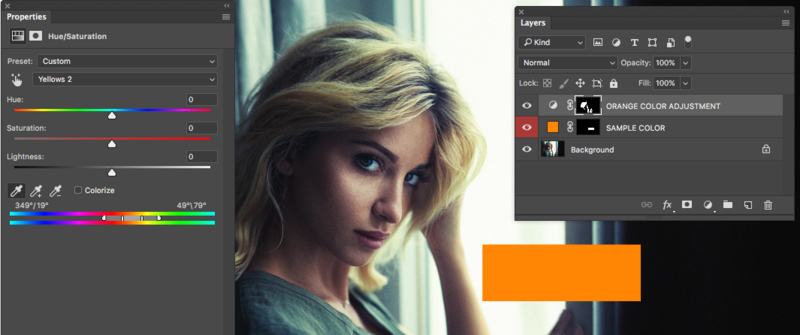
You now can delete the color fill layer (if you had one) and adjust your hue and saturation channel as you wish. It will target that one specific color only, making tertiary colors adjustments easier than ever!
For more beauty retouching tutorials like the video above, head over to The Invisible Touch YouTube channel. You can also discover their work on Facebook or their website.


Join the Fstoppers community for free
-
Post comments and join in the discussions
-
Browse the site ad-free
-
Share your work and get featured in the community
-
Compete in the photo contests for fun and prizes
11 Comments
"Changing a single particular color is easily done in Capture One..."
...and Lightroom, and I'm surprised Adobe hasn't put LR's color adjustment capabilities as a standard adjustment tool in Photoshop.
It has - it's called the Camera RAW Filter and allows access to all of LR's tools on a Photoshop layer. It's extremely useful and I use it all the time. Also, the above seems a very convoluted way of doing something that Selective Colour or Hue/Sat can do natively - and you can define the range of colours it targets, or even use the Target Adjustment Tool to click and drag in the image.
Yeah, but that's a bogus approach to that. I want those adjustments as adjustment layers, period. In order to keep them parametric, you'd have to make a smart object of every layer you'd want to process like that. Your comp will become extremely heavy real quick that way.
So, in my book, no, you don't have those kind of adjustments in Photoshop.
What, exactly, is wrong with Smart Filters? You want parametric adjustments, you got them...
Because they make your composite insanely heavy. You're dealing with sub-composites embedded into your Photoshop file, FOR EVERY SMART LAYER THAT YOU CREATE. This bogs down a project and makes it difficult to work with. If you have only one smart layer you may not notice it, but after three or four it's quite a problem.
There's no reason why they can't just make parametric operators to begin with. Motion Image compositors like After Effects, Fusion, etc. have had them for years.
Capture One let's you chose a specific color range, even one that isn't by default in the color editor tool. With ACR or LR, you are limited to the colors present in the HSL tool to my knowledge. The method above let's you edit orange, like te video shows, but also any other tertiary color or a specific range. If there is a method to do this with ACR, I'd love to know! :)
ACR can target a specific colour using the Targeted Adjustment Tool, which samples the exact colour and is not limited to some arbitrary colour like 'aqua' or 'orange'. Not as well implemented as in C1Pro but it's still useful.
The Targeted Adjustment Tool will change multiple HSL sliders which might turn out to be an issue if you already adjusted some sliders before. It does an almost similar job, but to me it's not as accurate as either the method shown in the article above or what C1 offers.
LR has a range of color controls, adjustable by discreet numeric control, as you can see below. The adjustment tool in CO is very good, but I always have to pull it out and enlarge it, because for me working in that little box simply doesn't allow for precise control. Reminds me of the curves tool in Photoshop, miserably small. At least you can enlarge the CO tool however.
Thanks, useful tutorial
thanks a lot for sharing this!