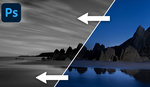
Are you looking for more realistic approach to creating a multidimensional blur background to your images? Check out this tutorial!
There may be times when you cannot quite create the intended blurred look on your photograph at the image taking stage, but perhaps the methods you have used previously during the post-processing have not yielded a realistic result and may appear flat or too fake. Colin Smith, the founder of PhotoshopCAFE, is bringing us a useful tutorial on how to add depth to your images through the application of varying levels of blur in Photoshop, resulting in a more natural looking result.
The beauty of editing tools is that there are a variety of ways how to arrive at the intended destination, however, some techniques are more versatile and polished than others. This tutorial is suitable for all levels of Photoshop users as Smith demonstrates how to create a depth map by explaining every single step along the way. As with most things in Photoshop, you can overdo it if you're not careful but the tools give you enough flexibility to tone it down to a natural looking effect.
This method can be found useful for various types of photography and the steps don't actually take too much time to complete. Would you consider using this technique? Do you arrive at a realistic looking final result in a different way? Let us know!


Buy f/4 zooms and f/1.8 primes. Set to f/16. Got it.
I think other than art directors, most people won't care about non-photographic blurred backgrounds. The more important idea is to create separation, not make it look like X lens.