
When going through hundreds of photos, workflow processing can be a real pain. Tools like Lightroom can help speed up the process, but nothing can compare to the Adobe Photoshop. Here are a few tips that can help you speed up your workflow process considerably.
Hot Keys
The first and most obvious way is to learn your hot keys for Photoshop. Most all of the tools in Photoshop have a corresponding button or series of buttons that will get you to that tool quickly and without having to dig through menus. Spending an evening to learn these can shave off minutes to a long night of editing, and those minutes can certainly add up.
 [Provided by WebDesignLedger]
Here is a cheat sheet to look at and get an idea of the hot keys available for Photoshop. Certainly not all of these are important, I’ll never use the shapes tool for example. Some of these tools however, are incredibly important to the workflow process.
Actions
I never use actions to edit my photos. While some people have made brilliant collections that allow you to achieve a look with a click of the button, I’m still a firm believer that nothing beats doing things manually. However, I find workflow actions to be among the most important things I use in Photoshop. Over time, I've built up a workflow for all the photos I take. So what I’ve gone ahead and done is create workflow actions that will create different layers for me with the click of a button. For example - I use Frequency Separation, Dodging and Burning, and a layer for watermarking for all of my images. So what I’ve done, is create a simple action that does all of this by pushing F3. This will drastically speed up my work process and let me get through more images faster.
I recommend that you develop these actions yourself, but if you’re looking for a quick and easy method to this, Fstoppers Writer Julia Kuzmenko has developed a set of actions that she has made available on her website, Retouching EBooks. The actions themselves are available for free download on the right panel.
Color Coding Menus
One of the many amazing features within Adobe Photoshop is the customization within the system. Not only are you able to rearrange your panels within Photoshop, but did you know you can also hide items within the menu as well as color code your favorite tools? While this may not be as fast as learning keyboard shortcuts, it can help shave down precious time navigating through menus trying to find the tools you’d like. Here is an example on what you’re able to transform Photoshop’s menu’s into to make it easier to look around and find the tools you need.
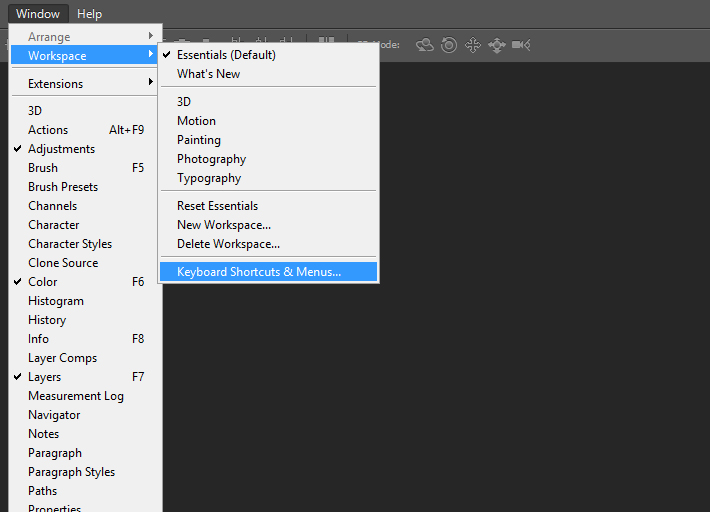
To do something like this, you need to go to Window>>Workspace>>Keyboard shortcuts & Menus. Within this page, you’re able to edit and alter all of your menus and keyboard shortcuts. I wouldn't recommend changing the keyboard shortcuts too much, as many have become a standard across all Adobe products, and learning them, rather than changing them will help make your life easier from product to product.

However, you are able to make things go from visible to invisible with the click of a button, you’re also able to color code your favorite tools to make it much easier to find later. When using Creative Cloud, these settings can be saved to your Adobe account, and autoload when logging into your Adobe account. This insures that all of your tools will remain with you, regardless of what computer you’re using.

Custom Toolbars
The final tool I want to show you for Photoshop isn’t built into Photoshop at all, but is an addon that Adobe offers for free on their website called Adobe Configurator. What this simple to use drag and drop tool allows you to do is create custom toolbars for your Photoshop. These toolbars can be as complex or as simple as you’d like, and can really help speed up your workflow. Below I’ll give you a brief explanation on how to build your own toolbars.
Step 1
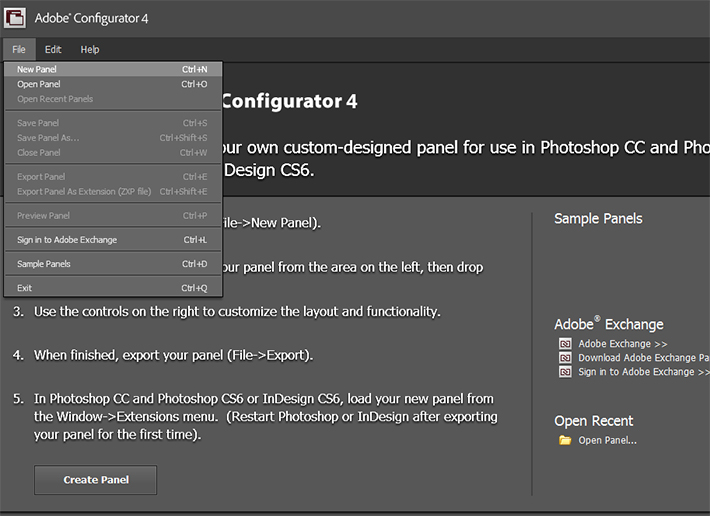
Download the Adobe Configurator from the Adobe website here. Install the program and run it for the first time. Upon opening it, it’ll ask that you create a new panel for the first time. Do so, and name it accordingly. For example, I named mine ‘WorkFlow’.
Step 2
Using a system much like a Microsoft Visual Basic from the early 2000s, you’re able to drag and drop tools onto your workspace and add commands to them. Before you do any of that however, you’ll want to fill out the information on the right dialog. Find a size that you feel will work well for your toolbar, that won’t be distracting or take up too much space. After those parameters are set, you’re able to start building your toolbar.
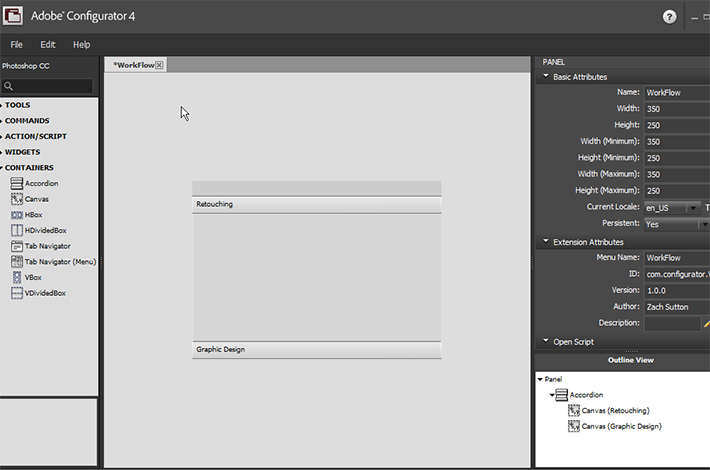
Because I do both retouching and graphic design, I have chosen to make an accordion menu within my toolbar, allowing me to go back and forth on collapsible menus, and maximizing space for my toolbar while keeping it organized.
Step 3
The basic buttons can be broken down into five categories.
Tools
Tools are all of the tools available on the default toolbar on the left of Photoshop. To add these to your custom panel, simple drag and drop them where you would like them to go.
Commands
Commands are going to be where you’ll find all the information on the top menu and side menus of Photoshop. If you have a plugin or something like that, you would add the button for them found in the Commands submenu.
Actions & Scripts
This is where you would add a button for an action already built within Photoshop. To add the action, you need to first drag the button onto your panel, and then configure the settings from the action itself. I have attached the image below to help explain what needs to be transposed into Adobe Configurator.

Widgets
Widgets are built to simply help organize features within your new panel. You’re able to add horizontal and vertical rules, as well as add text to help make sub categories.
Containers
This is where you can build additional pages for your panel, allowing you to keep things organized based on what part of your workflow you’re at. Each container has its own benefits and shortfalls, so be sure to experiment to find which one works best for you.
Step 4

When you're done adding all the tools you'll need, you will want to preview your panel within the Adobe Configurator system, to insure everything is placed properly want looks nice. If everything is set to you, you can now export your panel to use within Photoshop. To export correctly, you'll want to export to C:\Program Files\Adobe\Adobe Photoshop CS5\Plug-ins\Panels for Windows and /Applications/Adobe Photoshop CS5/Plug-ins/Panels/ for Mac users. This will then automatically add the option to use your panel within Photoshop.
Step 5
From here, you're able to load up Photoshop and go to Window>>Extensions and your Panel should be available to use within Photoshop. From there, you're able to move your panel to a non obstructive area within your panels, while having all of your tools in one place.

I've gone ahead and included my panel made for this tutorial available for download by clicking here. Feel free to use it as a guide, but I still recommend building your own panels, as I'm sure my workflow is very different from yours, and the only way to really increase efficiency is to find something that works will for you.
Hopefully this has helped you increase productivity while working in Photoshop. If you have any additional tips, feel free to post them below in the comments. Happy Editing!


Join the Fstoppers community for free
-
Post comments and join in the discussions
-
Browse the site ad-free
-
Share your work and get featured in the community
-
Compete in the photo contests for fun and prizes
10 Comments
Thanks for this info
Ofcourse :-)
Get a Wacom Intuos Pro tablet and learn to use / spend the time setting up the radial menu so that it "works" for you.
Window>>Extensions is grayed out on my PS cc =( any one knows how to fix it ?
You may need to have a file open first. Photoshop sometimes disables menu objects unless you're actively working on a project
Zoom In Zoom out buttons seems incorrect. Or I am confused.
They're right. You gotta hold Control/Command to do any of the features in blue :-)
No they are not right. Of course you press the common during zooming. But you put your words wrong.
You need to replace them. And trip load the keyboard shortcuts image. You can not zoom in with - then zoom out with +.
Read comments carefully.
Hey! So I dl'd the Panel and installed it correctly-- I can bring it up but it is a light gray box and its empty!
As you probably already noticed Configuator doesn't work for CC 2014 and you are probably looking for a solution.
We made a panel to install new custom tools in Photoshop CC 2014.
Check it out at : http://pspowertools.com
enjoy