Fstoppers has teamed up with the incredibly successful headshot photographer, Dylan Patrick to produce the 6 hour tutorial, The Cinematic Headshot. Dylan has become widely sought after in New York and Los Angeles for his unmistakably stylized portraits and actors headshots. In this tutorial Dylan will teach you his entire processes of coaching, lighting, and then retouching his pictures.
No Studio, No Problem
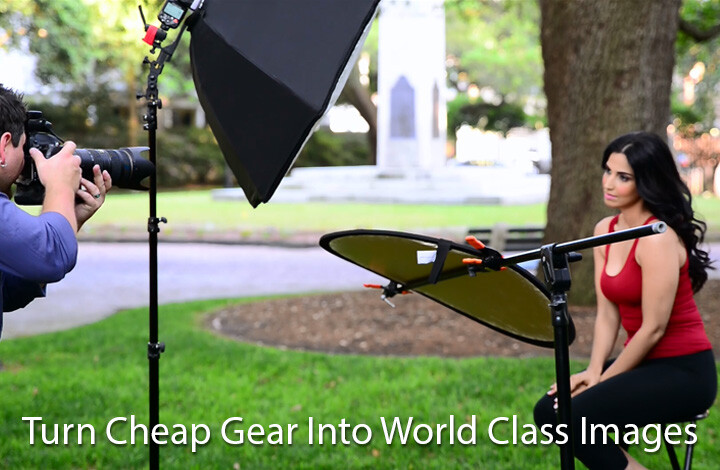
Within 1 year Dylan went from being a struggling actor/bar tender to a full time portrait photographer without ever using a studio. Managing natural light outside can be difficult but Dylan's lighting style brings the benefits of studio lighting out on location.
Learn About The Gear
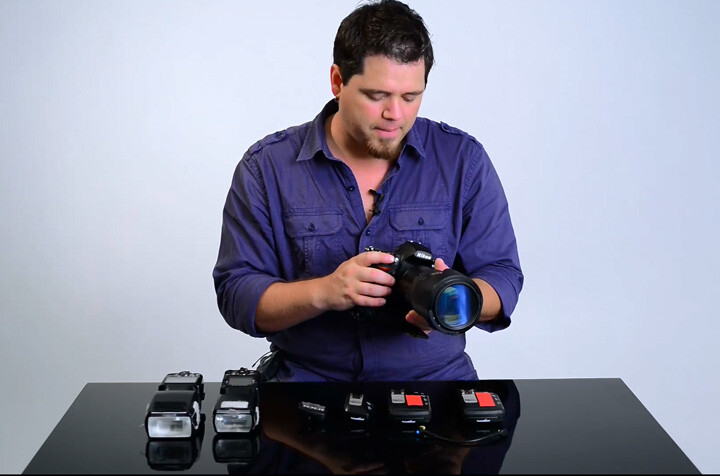
Dylan has simplified his bag of gear into just 1 camera, 1 lens, 2 speedlights, 1 reflector, and 2 modifiers. Photographers on any budget will be able to easily afford the equipment necessary to shoot similar images.
Learn How To Light
Dylan's photography isn't about expensive gear, it's about the knowledge of how to use what you have. In this tutorial you will learn how to light in ideal lighting situations, extremely harsh lighting situations, and even at night. Dylan's techniques will help you produce repeatable results in any location at any time of day.
Learn How To Edit
50% of Dylan's signature look can be attributed to his coaching and lighting, the other 50% comes from his post production. This tutorial includes 4 different RAW files that you can use to follow along with Dylan as he works. After following along in Photoshop for over 3 hours with Dylan, you'll know everything necessary to edit your portraits at a world class level.
Buy Now And Start Watching Today
This tutorial is a digital download. Immediately upon purchase you will be emailed links to download all of the chapters and Raw files. You can watch these mp4 files on a computer, burn them to a DVD or BluRay, stream them to your TV, or upload them to another device like an iPhone or iPad to watch at your leisure.


155 Comments
Thank you Hussein! I use AF-C mode.
AF-C, and you havent problem with sharpness? Its continuos right (for movement shoots)? I had problem with them while I was composing, because sharpening point was move out from eyes. I dont understand, how you can have so sharpen photos =).
On NIkon, I use AF-C with 51 points and 3D tracking or whatever it's called on as well. I found in AF-S mode at 200mm with such a shallow depth of field of the moved too much or leaned in I was more likely to slightly miss. With AF-C if they move or whatever it keeps tracking them, I just have it set up so that I only move 1 focus point out it on the eyes and then if they move it follows. But that's just my experience and I generally have no sharpness issues
Hi Dylan, I am new to Lightroom, I have a question about Camera Calibration Profiles, I use Nikon D800, but I don't see Camera Portrait V4 kind of profiles in lightroom. how can I get these profiles?
Hi Rajdeep! I believe you can download them off nikons website and it will walk you through how to install them, but you may already have camera portrait there which is not really much different from V4
Hi Dylan, I am looking on your photos and all are awesome. I know how do that, but isnt problem in when they lean to camera, their's neck are often hiding or shorter? What you think? Thx and have a nice day.
Hey David!
I don't see that as a problem. I think when they lean in it helps create more connection and an engaging expression, which are my main goals for any headshot, and they are not leaning that much, I feel it's an accurate representation of them. Sure changing any angle can cause the view of the neck to change but in the end It's not as important as nailing the expression and face, in my opinion. I also shoot to include the top part of the shoulders, so when casting directors look at it you get a good sense of the body type, if you get too close it could lead to more misconceptions about their body type in real life
Thank you very much for replies =).
my pleasure!
Any Presidents Day Promo Sales Codes coming??? :-)
The first two chapters of Dylan Patrick’s The Cinematic Headshot tutorial are packed with very helpful information about creating beautiful and consistent bokeh backgrounds for your portraits. As important as creating the bokeh effect was his explanations of how to work with and pose your clients.
The last four chapters are just one very good chapter on Photoshop times four. They are far too redundant with their information. I wish Dylan had reduced the number of Photoshop tutorials down to one and increased the how to shoot a bokeh effect, posing and work with your models (clients) up to five chapters.
Was I happy with my purchase? I was thrilled with half of it, and disappointed with the other half. Did I get my money’s worth? At the end of the day, I feel I will get my money’s worth. As I stated earlier, it needed more how to shoot bokeh and how to coach your clients and less how to use Photoshop.
Bottom-line: If you are familiar with Photoshop and post-production, but want to learn about bokeh and client control I give Dylan 3-stars. If you are relatively new to post-production and Photoshop, but want to learn about bokeh and client control I give Dylan 5(+)-stars.
Hey William! Thank you for the support and kind words. I do hope you feel you got your money's worth and enjoyed the parts you found useful. I also want to thank you for your honest feedback. As with most things of this nature trying to cater to everyone's skill levels can be difficult so we tried to accommodate a breath of information for a variety of different skill levels. I'm going to be looking at putting out more on the Cinematic Headshot that you may find useful so keep your eyes peeled! Thanks again!
I am looking forward to your next tutorial.
Bill
Just bought the video. I have some people that want me to do corporate headshots for them over next week and I came across this video. I liked what i saw and bought it. Hope it works out for me.
Still watching the videos so i haven't tried it yet but can i pull this off with umbrellas. and if i can what type?
Yeah you can use umbrellas. The key is to get the lights as close to your subject as possible so you probably want to use "shoot through" umbrellas so the tip of the umbrella is close to the models face with the light shooting through it towards the model (most umbrellas fire away from the model and bounce light back towards them).
Patrick is correct Gbenga, you can definitely use umbrella's just watch out for that wind! I hope you enjoy and don't hesitate if you have any questions!
Hey Dylan... just curious what you typically deliver in a headshot package? How many images, how many different looks? Also, how many of the images that you deliver do you perform extra post processing to, like removing skin blemishes, redness, smoothing of the skin, etc. I hope my question isn't confusing. I'm trying to ask if you deliver just basic edits like color correction, tweaking the exposure vs. full blown glamor edits.
Hey David! The amount of images delivered varies from person to person but anywhere from 150-250 maybe less or more depending on the arrangement i have with them. Those images are scoured over and go through a basic RAW processing and weeding out the clunkers, from there they choose the ones they would like retouched, that can also vary depending on a number of factors but it is anywhere from 1-5 unless it's a corporate client than it is one per person.
Very interested in this course. I have a question though. I don't have access to a 70-200 2.8 (saving the coins for it) but I do have a 100 2.8. Do you think I could get good results using your technique?
The 100 macro lens is an interesting choice because you can usually focus closer to your subject than other telephotos lenses which in turn allows you to get super blurry backgrounds. So the short answer is yes, you can do it with a 100mm. If you want the super compressed backgrounds though you will need a much longer telephoto. Dylan shows the difference between 50, 85, and 200mm in the tutorial so you can get a good idea of how focal length affects the overall image
Thanks Patrick!
Bought it and watched it 3 times already!! Ordered some gear I needed as I usually shot in studio. Can't wait to get outside. I do have one question. I like to use a tripod have some back issues so its a lil easier on me...lol So my question is if I go with the 80-200mm 2.8 that doesn't have the VR on it. Would it really make a difference since its on a sturdy tripod? Trying to save some dough if possible. Thanks again!!
So glad you are enjoying it John! You can certainly opt for the 80-200 to save some coin. The VR is handy but if you don't mind shooting on a tripod for the slower shutter speeds you are good! Just remember if you are shooting at 200mm you will need to have a shutter speed of at least that to minimize shake....except of course if you are on a tripod :) Don't hesitate if you have more questions!
Thanks couldn't resist. If I want the best results gotta get the best so went with the 70-200mm. Thanks. Could you perhaps create a tutorial or list you setup on your d700 or the one you used to have. How did you have it configured. Whats the best settings you think. Thank you
The best settings are going to vary, but you want to have your flash sync speed set to 1/250th Auto FP, in the flash setting menu on the camera. I tend to set my white balance to 4760-5000k and leave it, and my typical settings are around !SO 200-320 f/3.2 1/1000th-1/2000th sec. I also have my focus mode set to AF-C
You are awesome man!! Thank you so much. Hope to meet you one day case even though you dont know it you are really like a virtual mentor to me...lol. Not in a creepy way but I hope to emulate not imitate your style. Just love the cinematic headshot feel and in NY there are so many great locations. I live in a building with an accessible roof at 37 floors so I am dying to shoot with all the glimmer of the city bokeh'd out. Thanks again!!
Have one more question for you and thanks ahead of time for your time and response. I couldn't get the 36 octal so I got a 27.5 inch octa. Considering the Inverse Square Law when I shoot using my 27.5 as my main light besides having to get it a little closer to my model do you see any other disadvantages to using this one rather than the 36"? Will my light be harsher? I will play with it but wanted to hear you opinion. Thank you!!
chances are your light will be a little harsher...but I'm sure it would be fine...I get my 36in and 39in really close for the softness and at times I'm working with a very small window to shoot in, so you would have to get it even closer which could pose a problem, but work with what you have while you have it!
Thanks man. Appreciate all the advice and help. Yeah did notice that the light was a bit harsh so had to use both diffuser panels. But I think I am going to order the 36 or 40 inch octa. Maybe use this one for when I need a harsher light. Maybe for a fashion shoot or something. Thanks again!!
lee is such a talented marketer.He makes you want to buy the products even before you finish watching them.
Planning on purchasing this tutorial, but before I do, I want to make sure a certain lighting setup will work. If I have the Elinchrom strobe with a Canon 600EX-RT Speedlight, what trigger setup would work with these two light sources? What would be a good substitute for the Pocketwizard? I'm just starting out and most of this is new to me. Any advice or info is very much appreciated. Thanks in Advance!
Hey Laura! Elinchrom strobes aren't compatabile with HSS but they can work with HyperSync. Check out the article here called "demystifying high speed sync" and it can explain the differences. I do believe your canon speedlight is compatabile with HSS you will just have to have a trigger like the pocketwizard flexTT5 to be able to get into the higher shutter speeds. There are also more affordable options from yonguno, Indra and others. Check out Fstoppers.com/dylanpatrickgear for more info on what I use, and hit me up if you have more questions at dylan@dylanpatrickphotography.com
So worth the $200!!! Next paycheck, I'm getting the tutorial!
Quick question Dylan; I'm going to purchase your course but do you have an approx. cost for the lighting, modifiers and reflectors that you use / suggest? I don't have anything except a Canon 6D, so I need to see if I can squeeze all of your recommendations into my budget :)
Hey Joy! Check out Fstoppers.com/dylanpatrickgear and there will be links to everything so you can price it out. With things like light modifier's you can always substitute with things you already own until as well. I think anything 36in and bigger is good for a key light
Hi Dylan, I love your retouching but I can't get the frequency separation to work; I follow along with your video on one of my own images but as soon as I take a sample from an area using the Healing Brush tool and then try and "paint" over a blemish, it paints over it in fluorescent yellow! What am I doing wrong?? Thanks Dylan :-) Damon
Hey Damon! Check to make sure that you have the "texture" layer highlighted be sure that is the layer you are working on, sampling the "color" layer for blemish removal will cause this. Also just double check all the blending modes are right as well. Sorry for the late reply man! Anymore questions don't hesitate to shoot me an email at dylan@dylanpatrickphotography.com!
Looks excellent from the Intro Video. What is the music title used in the video? I totally loved it.
Over the past few weeks I've been experimenting with this setup and this weekend I finally purchased the Hotrod Octa 36" for my main lite. I've got 2 x Yongnuo YN568EXII's along YN622 triggers. Shooting with a Canon 5D Mark III and 70-200 f2.8L IS II.
The problem I'm having is controlling the flashes for high speed sync through the Canon flash menu. When I choose 'M' for manual mode it doesn't seem to work. The flash is firing but shots are dark even at full power. If I choose 'ETTL' shots come out OK with my setting at around 4:1. I'm shooting at f/3.2 at 1/1600th with ISO between 320 and 400.
I've probably not given enough information for you to reply effectively but, I'm a bit lost and hoping (somewhat aimlessly) that somebody here has experience with my setup.
Thanks in advance.
Hey Dean! Sorry for the late reply. Pocketwizard hijacks the TTL communication system to communicate the sync timings for HSS. So your flash does need to be set to TTL. However if you are using the yonguno controller (yn-622 I think) set that to M for manual. This will allow you to adjust the power level up and down while still allowing the communication of HSS info. Feel free to email me if you have more questions dylan@dylanpatrickphotography.com
Thanks Dylan, think we've nailed this quite well now ;)
Dylan Patrick - Can you tell me if this video is closed captioned or any plans to add CC to the video? Deaf Photographer here and would love to check out the video.
Hey Bill, no closed captions unfortunately but I'll see if we can make something like that happen although it might be awhile until we can get it sorted out. Email me at dylan@dylanpatrickphotography so I have your info
I just finished watching part 1 and I am hooked. I can't wait to practice this setup. I am so glad that I purchased this course.
I bought it an hour ago and still haven't received a download link
we can check it tomorrow when our offices open. It probably was emailed to the email associated with your paypal if you did not change that. Log into that email and you can find the links. If not, we can resubmit them tomorrow. Please email our office with your order details.
Hi, Dylan... I tried to replicate your result... the only different thing is... I was using a 26'' Westcott rapid box... if I place the light close to my subject the hotspots are showing up and the light is getting harder if I pull the light back a little... and there's no contract on my subject's face... is that because of the size of my softbox ?
It could be due to the distance of the strobe from the diffusion material. If you have a speedlight that is close to the front of the box then a hotspot will probably be more pronounced than if the speedlight had one of those diffuser caps and was placed 3' away from the front of the box. You can also try adding diffusion material in the middle of the box to help lessen the light coming out of the center. We added this to our FlashDisc and it helps balance the light coming from the middle and the outer edge of the modifier.
Patrick gave you some good idea's above, but I also think that 26in is too small for a key light to get the kind of lighting I get by using the 36in. I also think Octa's are more forgiving in terms of how the light hits the clients face, and what it does when they move their face. If you can't get a new bigger modifier then I would say add some more diffusion and try to keep the light as close as you can