Fstoppers has teamed up with the incredibly successful headshot photographer, Dylan Patrick to produce the 6 hour tutorial, The Cinematic Headshot. Dylan has become widely sought after in New York and Los Angeles for his unmistakably stylized portraits and actors headshots. In this tutorial Dylan will teach you his entire processes of coaching, lighting, and then retouching his pictures.
No Studio, No Problem
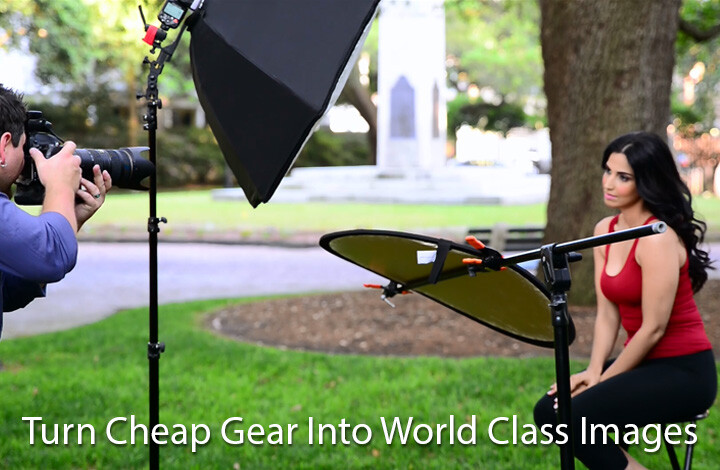
Within 1 year Dylan went from being a struggling actor/bar tender to a full time portrait photographer without ever using a studio. Managing natural light outside can be difficult but Dylan's lighting style brings the benefits of studio lighting out on location.
Learn About The Gear
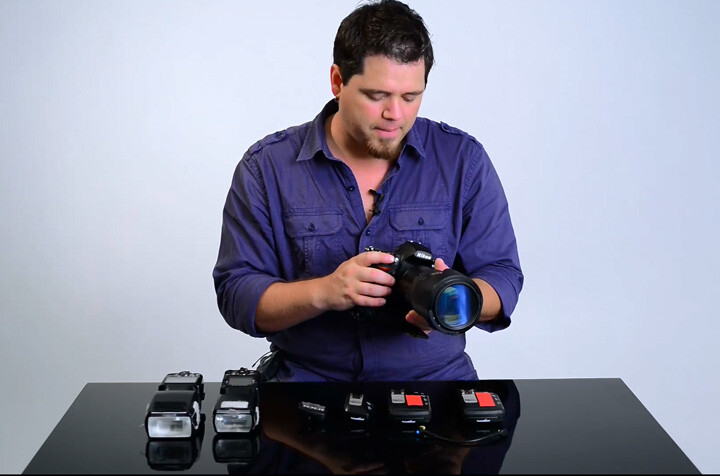
Dylan has simplified his bag of gear into just 1 camera, 1 lens, 2 speedlights, 1 reflector, and 2 modifiers. Photographers on any budget will be able to easily afford the equipment necessary to shoot similar images.
Learn How To Light
Dylan's photography isn't about expensive gear, it's about the knowledge of how to use what you have. In this tutorial you will learn how to light in ideal lighting situations, extremely harsh lighting situations, and even at night. Dylan's techniques will help you produce repeatable results in any location at any time of day.
Learn How To Edit
50% of Dylan's signature look can be attributed to his coaching and lighting, the other 50% comes from his post production. This tutorial includes 4 different RAW files that you can use to follow along with Dylan as he works. After following along in Photoshop for over 3 hours with Dylan, you'll know everything necessary to edit your portraits at a world class level.
Buy Now And Start Watching Today
This tutorial is a digital download. Immediately upon purchase you will be emailed links to download all of the chapters and Raw files. You can watch these mp4 files on a computer, burn them to a DVD or BluRay, stream them to your TV, or upload them to another device like an iPhone or iPad to watch at your leisure.


155 Comments
Very exited about this tutorial...just bought it!!! It fit perfectly for my kind of job hope to learn a lot, same as the Commercial Wedding Photography tutorial. Downloading...
Thank you so much, and I hope you enjoy! If you have any questions please don't hesitate to ask!
Didn't even finish watching the promo video and bought it. Looking forward to this one!
Awesome Victor! Thank you! If you have any questions don't hesitate to ask!
I've been hoping to build a similar portfolio next year (real estate, architecture, interiors, headshots) after a move to Boston. This purchase, along with Mike Kelley's Fstopper Original, makes it a perfect 1-2 punch for me -- a guy on a budget who doesn't have studio space or the money to buy Kino Flos. Thank you!
Awesome Ian! If you need anything don't hesitate and thank you so much!
I purchased this and am halfway through the first video. Very thorough so far. One question though, it says to visit fstoppers.com/DylanPatrickGear to see the gear you use. However, the page says "Access Denied".
We are still putting the final touches on that page. It should be live tomorrow
Ok....no problem. Thank you :)
it's up
Thank you :)
Glad you are enjoying everything Jerry! If you have questions you know how to find me!
Thanks Dylan !
Thank you Gorge!
Looks so cool!!! Just when i saw the images for the first time I knew I would love to learn how to shoot like this! But then I saw the price... I can't justify paying that much money on it :/ just a poor college student hahaha :p I will have to try with what I already know!
Keep on producing high quality content and 1 day I will have the money to buy them :-D
I understand your point 100%, but look at it like this....that $200 you spend on this vid will improve your work tremendously (not saying that your work isn't already good, but) and you will gain more clients and it will pay for itself with 2-4 new clients depending on how much you charge.
I know hahaha but since i just do photography while i study for now i cant justify the price. As i said, one day mayby things will be different and i will buy it! Either way, looks awesome and the pictures are soooooooo cool! But for now, i will put that 200$ on rent for next month :p
Thank you so much for your kind words Nicolas! I've been in your shoes and completely understand. Not to worry the tutorial isn't going anywhere, it will be here to purchase for a long time! Paying rent must always come first!
He list the items used in the photoshoot, not much gear is needed and I can quickly recreate the look, just looking at the images is enough for me to see what's happening in the photo, he also list one main, one kicker and a reflector also shown in the photo. Not much else to it.
does the video go over how to get the same effect without the ac3, minitt1 and the flextt5? i have everything except those... maybe with nd filters? let me know thanks :)
Hi Steven, as that's what I use we didn't use any other triggers, however there are other triggers that are capable of High Speed Sync. The use of Neutral Density filters is possible as well, however it doesn't allow as much flexibility in terms of time of day. So if I want to have two sessions one a 12 and one at 4, the one at 12 may require more than a 2 stop ND filter (I've tried you may have to go to 4 or 6 stops), in which case you run into possible problems of not being able to clearly see and read your models expression (which for me is paramount and the reason I don't use them), along with other possible vignettes or color issues. in the later afternoon however you could possibly get away with an ND with no major issues. The lighting style, and coaching style along with the principles of getting my look could still be easily applied to any method that works best for you. If you have any questions don't hesitate!
sounds good thank yo very much for the reply :) looks like an awesome video... :) keep up the good work.
I use Canon Speedlites. They communicate perfectly and can be used with high speed sync. The pop-up flash on my new camera works as a Master and my two Speedlites can both be set as Slaves. I also have a flash commander that I can use as the Master and I can control each Slave individually with that. Believe me, I am on a TIGHT budget, so you can get by with much less than Pocket Wizards (until you can fit them into your budget). These headshots are done in a small area, so it's really not a big deal to have to walk over to your Speedlite (or Speedlight for Nikon) to adjust settings... especially if you have an assistant who can do all that for you.
What's goin on with Patrick's hair...he's a few missed showers from singing with the Counting Crows....
easy...I love the Counting Crows....wait did I just admit that in public...crap.
Question, is there anything on shooting interior on location headshots or is the entire video dedicated to shooting outside, I realize the whole background thing kind of goes out the window but still just curious.
Thanks for the Question Paul, everything in the video is done outdoors, however, you can easily adapt the same principles to shooting indoors! As far as the background goes, while it's certainly something I focus on as it is a part of my style there are plenty of indoor backgrounds that look awesome out of focus...grab your camera, throw the lens out of focus and take some test shots, because I've shot in bars and hotel lobbies and the backgrounds can still come out very cool, and the indoor stuff generally doesn't require High Speed Sync. I've also used hot lights to light up indoor spaces when it's too dark. The image below was shot in a bar with basically the same lighting setup and adding a hot light
https://fstoppers.com/photo/12755
hi, i noticed in the trailer u shot a female model in shade and the same model at nite,,,so is this look possible without High Speed Sync......can it be achieved at max camera sync speeds like 1/250 , 1/160.......amazing work Dylan P.
Thank you for your question David! If you are asking can the night shot be done at normal sync speeds the answer is yes, and it's the only way I do it. That particular area of the tutorial is more about a how I shoot at dusk and the style I look for in the shot. Dusk shot shutter speeds tend to be around an 1/80th or so of a second. Thank you for the kind words!
Hi Dylan, I have a Canon 6D camera body with Max Sync Speed of 160. I haven't purchased the video yet, so here's my question: Will I be able to make use of all your techniques or will I need to use different gear that will support faster sync speed in order to achieve the desired results? Thanks!
hi Dylan. I just purchased your video. Could you please let me know what file will have your gears in it?
Thanks :)
Hello Gorge! Thank you so much I hope you enjoy it! If you are looking for my gear list head over to fstoppers.com/dylanpatrickgear
Just wanted to thank Dylan and all the guys at Fstoppers who put the effort into making such great content, I've gone through most of the tutorial and it's definitely 5 stars from me. You've made professional information (previously inaccessible) available to so many and allow others to improve their skills and art.
So for that thank you very much.
Now all I need to do, is use the Camranger and take an awesome selfie :)
Thank you so much Usman! I'm so happy to hear you are enjoying it. If you need anything don't hesitate!
So can I get this in the UK? And what's it going to cost me?
Hey Chris! As it's a digital download you shouldn't have any problems!
This is really great. I am putting this on my personal xmas list. I really would like to be able to achieve this look for portraits and editorial looks.
Mr. Patrick, I just started watching your video with a friend who purchased it and we have a question or 2. Do you use back button focus? If not you use the middle focusing point? Also, in the beginning you said you use your flash on ttl but when you are first shooting your model you said you had your flashes on manual so you could just control the power. Do you use both modes or just one? Thank you.
I think the confusion regarding TTL lies in the way the PocketWizzard system works. I don't know the technical details, but I understand that even though you put your flash in TTL mode, the PocketWizzard system controls it in such a way as to make it as if the flash is in manual mode. Thus, you control the flash power manually using the PocketWizzard controls even though the flash itself is set to TTL. Joe Brady talks about this in some of his videos on YouTube if you're interested (search for "joe brady pocketwizard"). I don't know if all radio triggers use this approach; I use a Yongnuo YN-622C-TX to manually control the power on my Canon flashes and they are just set to normal manual mode. I don't think it makes any difference in practice.
Hi Charles! Thank you for watching! Regarding focus, I don't use back button focus. I have my D700 set to AF-C with focus tracking set to on, so I essentially use the controls on the back to move the focus point around, Often I'm using the top left and top right focus points when shooting horizontal. As for the TTL issue, Joe is correct. Pocketwizard essentially hijacks the TTL function to communicate the HSS info, when using the AC3 Zone Controller you switch it on camera to manual so that all that is being communicated is the HSS info from the camera and power up or down. You can use the AC3 set to "A" for each channel which would then communicate all TTL info allowing the camera to determine flash output. The reason i don't use it is because the light is always changing and if I move to a brighter background it may guess a flash output that doesn't work with my model. Don't hesitate if you have more questions!
My question is before I click the purchase button, does Dylan also talk about what modifiers to use on a narrower face and a wider face; and how to light a person with a black skin? Thank you very much
Hey Chris! I go over the modifiers I like to use, and differences between bare flash, and using an Octa. I find the octa to be a great modifier for speedlights regardless of the facial characteristics. It allows a little freedom for the model to move, and adjusting the light source can make it harsher or softer depending on what works for your model.
I just finished watching the first two chapters where Dylan did all the shooting. This is EXACTLY the type of headshots I like to shoot myself and he provided loads of tips that will help me and anyone else who wants to take their headshots to the next level. What I liked most about it is that he clearly explained every step in a way that made it easy to understand and follow (including all the why's and how's). Understanding why something is done is probably the most important part. Posing, communication, lighting, camera settings, backgrounds - it's all covered. And he has a pleasant personality and presents the material in a way that's very easy to watch.
And I forgot to mention the most important part of this entire video package. Even with the amazing out of focus backgrounds Dylan shoots, I only heard him say "Bokeh" maybe three times! Man, I'm so sick of people using that word in every other sentence. It gets old fast! Ha! Ha!
Seriously, if you want to advance your headshot photography with a look that's much different than the normal look, you'll want to get this video. I plan to watch it several times to get every last bit of it to sink in and Practice! Practice! Practice! until I can practically do it with my eyes closed (which may be okay for music, but probably not too good for photography).
What is the reason for having the model make a goofy face when using the ColorChecker Passport?
Thanks, Dylan and Fstoppers, for producing such a great video!
Jim, thank you so much for the kind words and I'm really glad you are enjoying it! As for the goofy face during my Color Checker shots, that is just something I like to do, I have a series of about 25 of the best ones on facebook...more for my entertainment than anything else...also helps loosen the model up ;-)
I bought this video and love it! I bought it because I have a job doing headshots for a local dentist office and I want the photos to blow them away. My question for Dylan is, if I am trying to apply these principles indoors (its cold in Connecticut this time of year), what do I need to know? What challenges will I need to anticipate?
Hey Jason, sorry for the late reply! I'm so happy you are enjoying it!, as for working inside, the same principles can certainly be applied. My advice is to throw the lens out of focus and take blurry background shots in the space until you find a spot you like, this will also give you base exposure settings to work with. things like big bright windows, lobby's, etc. You can use standard lights to brighten it up, you may have to bring the ISO up a bit more than normal as well, christmas lights, and other harsh light sources in the background also looks cool. You should join the Facebook group The Cinematic Headshot with Dylan Patrick (if you haven't already, just search for it), there are a handful of examples in there. One guy did a shot in his kitchen with blurry kitchen lights in the background and it looks awesome!
Thanks so much for the tips Dylan. I'll definitely be practicing. I've requested permission to join the group on FB as well.
Hey Dylan! I'm going through your gear guide and I noticed that you use a 36" for your main light. I currently have a Rapid Box 26". Would this be too small of a light source to achieve the soft lighting or should I pick up the larger softbox?
26in is a good place to start but it won't give you as soft of light. If you can I would go bigger
One of the best tutorials I've watched, Thank you for sharing.
Just one question, what focus mode do you use?
Thanks