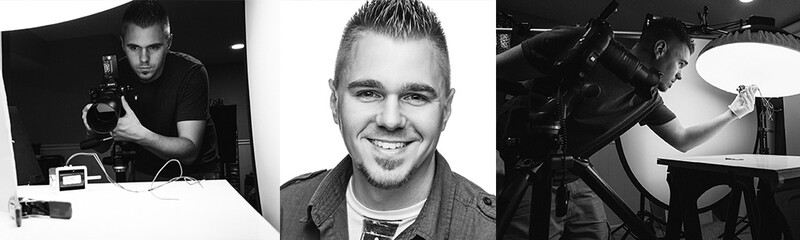
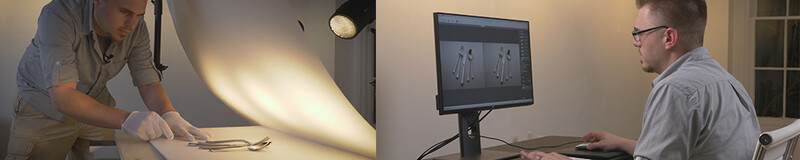
The Hero Shot is a 13 hour video tutorial on product photography taught by Commercial Photographer and Digital Artist Brian Rodgers Jr. This video is a digital download and can be watched immediately after purchasing. The video files in this tutorial are unlocked and can be watching on a computer, phone, tablet, or TV.
The Hero Shot is a 13 hour video tutorial on product photography taught by Commercial Photographer and Digital Artist Brian Rodgers Jr. This video is a digital download and can be watched immediately after purchasing. The video files in this tutorial are unlocked and can be watched on a computer, phone, tablet, or TV.
Who is Brian Rodgers Jr.
Brian Rodgers Jr. got into product photography shortly after leaving a corporate career working on a 3D team. In 2016 Brian became a part-time writer for Fstoppers.com and within just a few months became the highest rated product photographer on the Fstoppers Community. Brian has taught himself the skills needed to produce world-class product photography without the need for a studio or expensive gear.
Where The Tutorial Begins
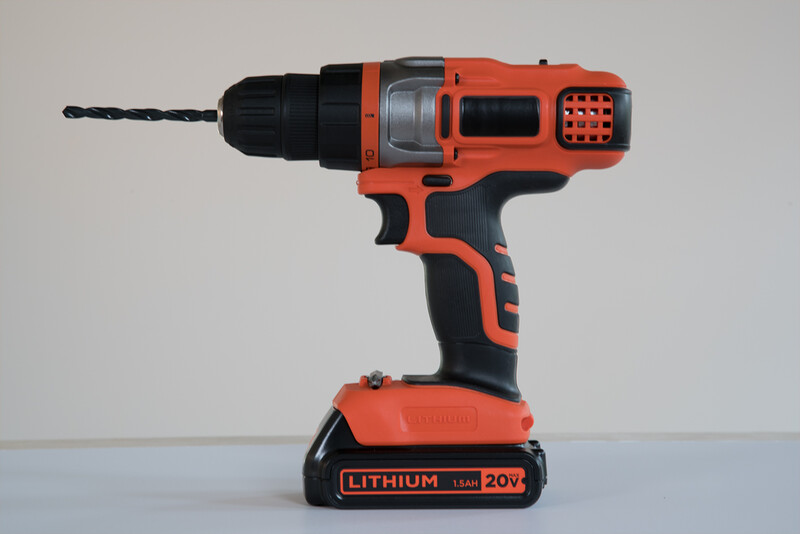
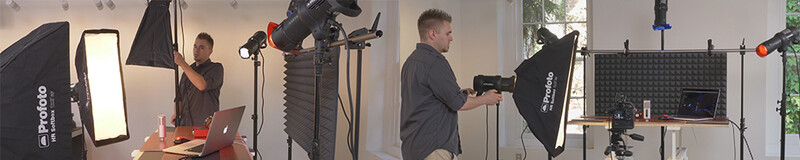
Chances are, you don't have a big studio. Well, neither does Brian. He shoots products for companies all around the country out of his home studio. For the first lesson in this tutorial Brian wanted to prove that capturing an incredible shot doesn't have anything to do with your studio or your gear. Brian uses three inexpensive lights to create a product image of a cordless Drill.
By combining a few different exposures and adding a background in Photoshop, he was able to create this image.
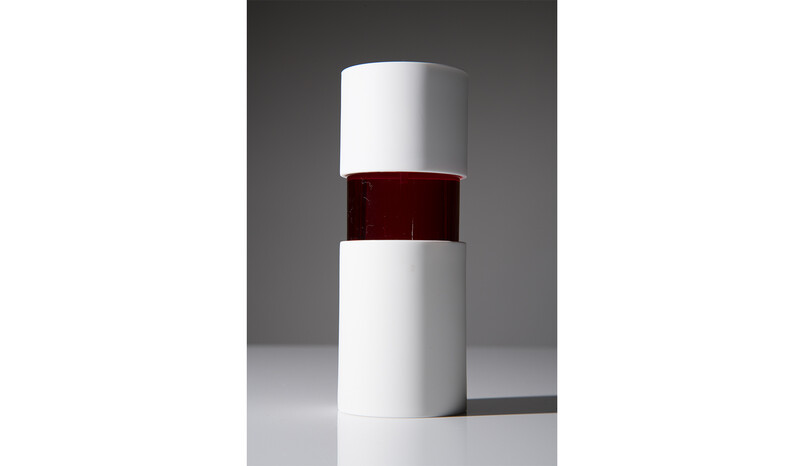
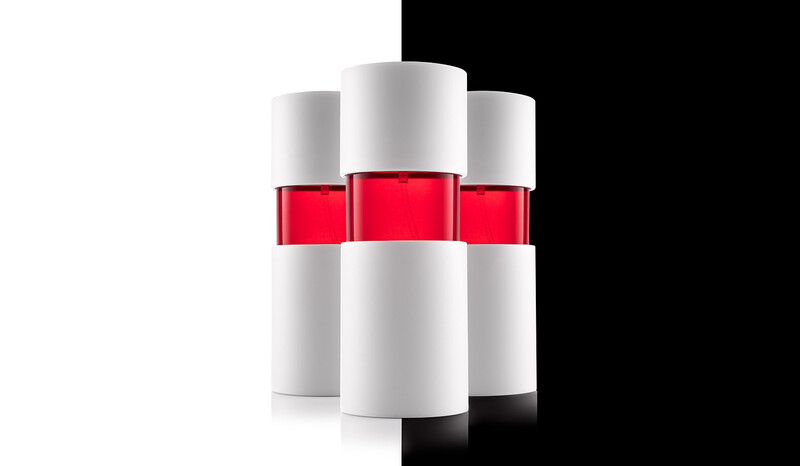
For the next shot, Brian uses another cheap option for lighting; speedlights. By lighting a single perfume bottle and then duplicating it in Photoshop, Brian was once again able to come away with a simple, yet beautifully lit photograph without relying on expensive gear.
All Image Files Are Included
Whether you like it or not, Photoshop is an absolute necessity in the world of product photography. Almost every image of a product you have ever seen in an advertisement has been created with some sort of compositing techniques. For that reason, a large part of this tutorial takes place in Photoshop where Brian teaches the techniques he has mastered to produce professionally edited photos quickly and easily. All of the files that Brian uses to create his shots will also be available to you for following along in Photoshop.
What Gear Does Brian Use
Brian is adamant that the gear you use does not matter and that almost any camera, lens, and lighting system will work. So for the sake of this tutorial, Brian uses a range of different gear to help you master his techniques regardless of what equipment you own yourself.
Brian shoots with a Sony A7RII and a Canon 24-105mm lens but he always tethers his camera to a computer. This allows both Brian, and you the viewer, to view each shot directly through his camera. Every time Brian moves the product or a light, you'll be able to see and understand how the changes affect the overall product shot.
For the lighting in this tutorial, Brian uses a variety of light sources including hot lights, speedlights, and Profoto strobes. The light itself doesn't really matter, but the modifiers are important and throughout this tutorial Brian uses countless store-bought and DIY modifiers to sculpt the perfect light. After watching this tutorial, no matter what your budget is, you'll be able to use the tools you have to replicate Brian's style.
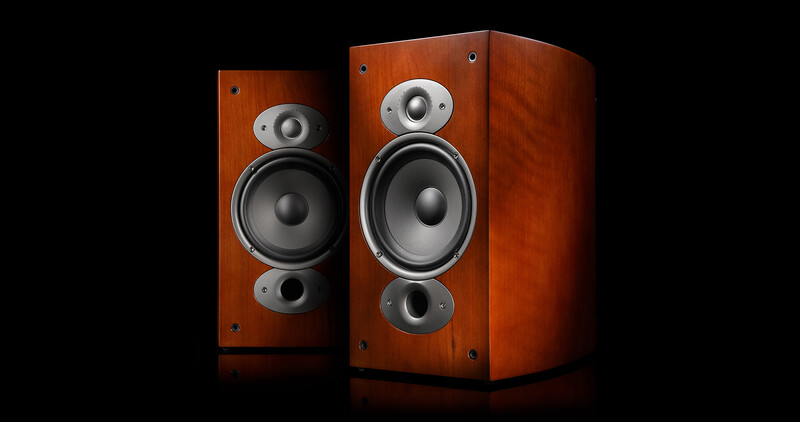
Shooting multiple products
You might think that shooting a pair of speakers would only require a single shot, but Brian shoots all of his products separately. This gives him total control in post-production to change the composition after the shoot is over. If the client ever wants to make a subtle or extreme change in the final product photo, Brian's method makes it extremely easy to give the client exactly what they want.
Making Products Levitate
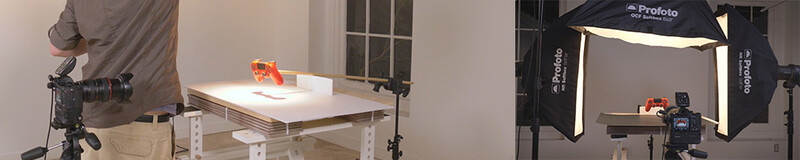
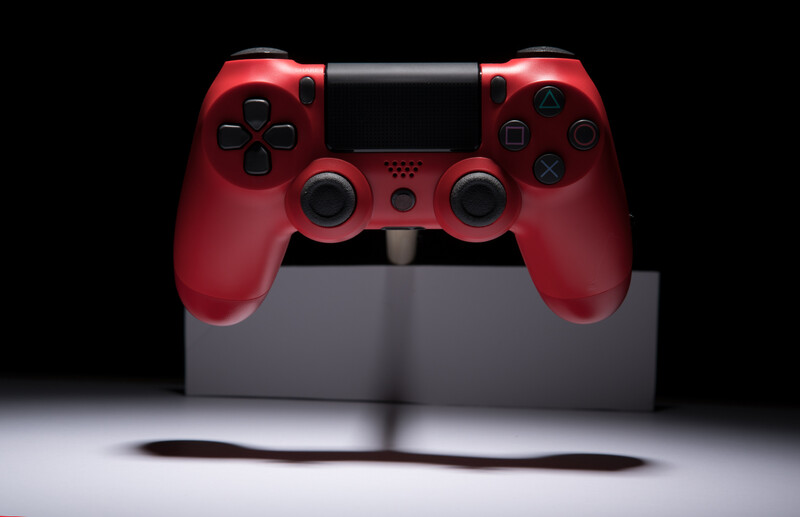
We've all seen images of products levitating but how do they do it? Sure, you could cut it out in Photoshop, but if your product is laying on the ground, you won't be able to light it realistically. Brian uses a dowel rod attached to a video game controller to "float" it above his set. After adding a simple background in Photoshop, he was able to turn a well light image into another incredible advertising style photograph.
Focus Stacking
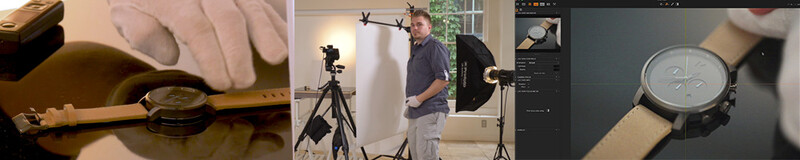
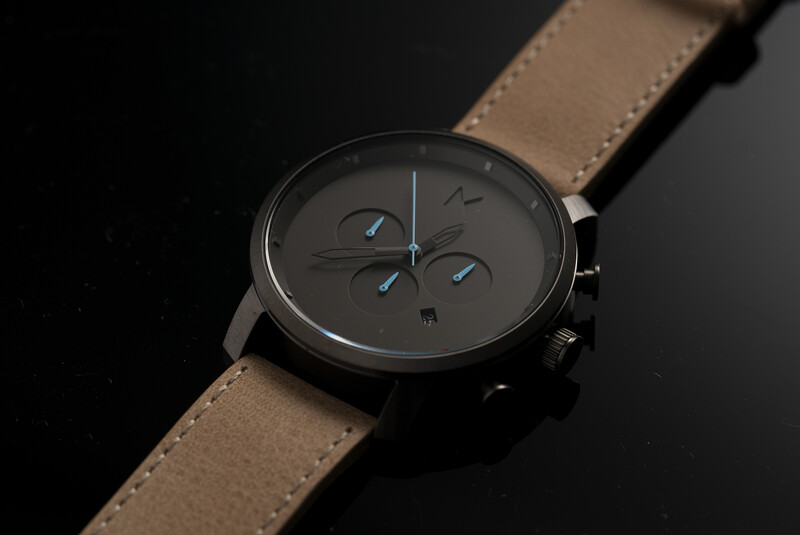
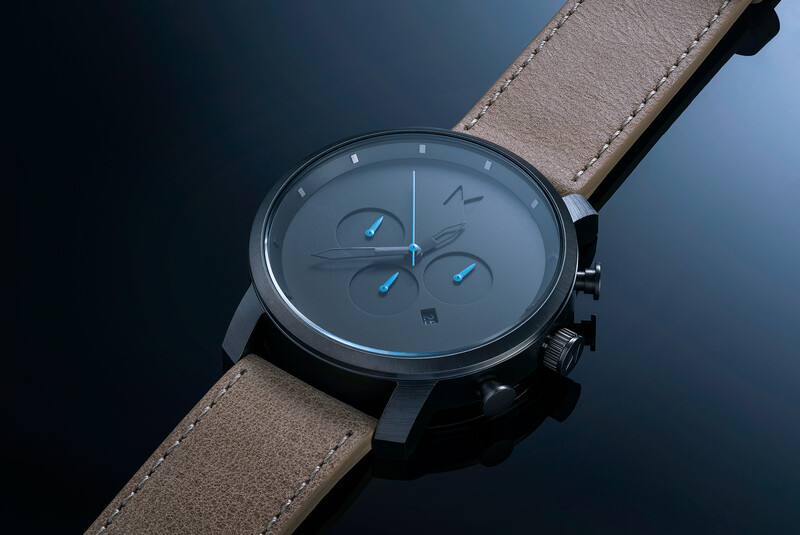
When shooting small products with a macro lens, depth of field may become an issue. For example, when shooting a watch, most brands want every aspect of the watch to be tack sharp. Brian teaches his favorite way to light a watch while also focus stacking the image to make sure the entire watch is as sharp as possible.
Managing reflections
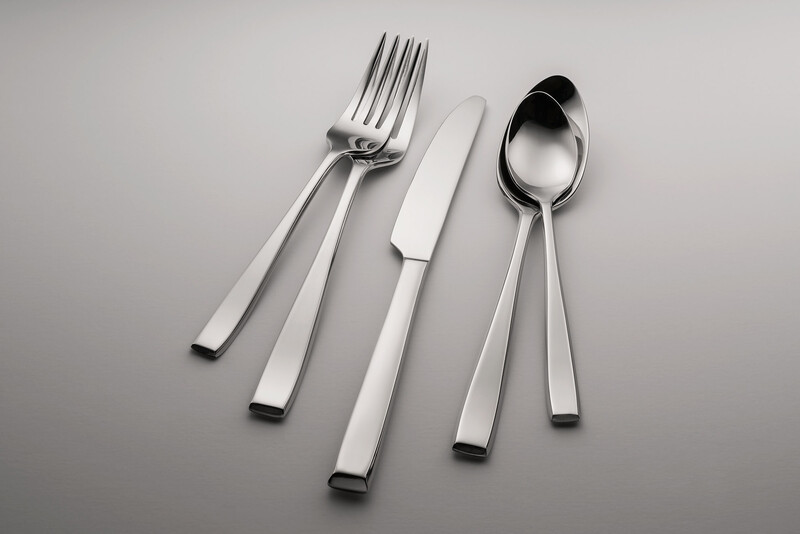
Shooting reflective objects can be the most difficult part of product photography. Brian wanted to film an entire lesson on reflections and decided to shoot a set of cutlery, the most reflective, and oddly shaped products imaginable. Using a few techniques and DIY lighting modifiers, he was able to control the reflections and come away with a clean and elegant final shot.
Creating A Small Set
For the final shot, Brian wanted to take all of the information taught in this tutorial and use it to stage and light a complex set. In the end, he was able to come away with a great looking image straight out of the camera but with a little bit of Photoshop, he was able to perfect it into something portfolio worthy.
This Download Includes:
9 Video Files (25 GB, 1080p 23.98fps h.264 mp4 files)
Over 13 Hours of Content
All High Res Images Included
Brian's Full Story
Intro to Post Production
7 Unique Final Photographs
Brian's Entire Post Production Workflow
Access to Brian's secret The Hero Shot Facebook Group
FREE LESSON
If you want to learn how Brian Rodgers Jr. works and his teaching style, we have uploaded a free stand alone lesson to Youtube. In the video below, Brian teaches you how you can light an entire liquor bottle with just one speedlight and some clever photoshop compositing. This video should give you an idea on how Brian approaches his photography and will give you a better idea of how this entire tutorial is laid out.
We are really interested in this tutorial, is it just possible to know a bit more in detail that what this 13 hours of content include? does it include ALL the workflow for all the 7 photos we see up there, from the beginning to the end?
Correct, I don't go into the business side of photography. However, Monte Isom has a killer Fstoppers tutorial on the business of photography. I highly recommend checking it out. While he's working at the higher end of the market and not specifically in product photography, he interviews all types of businesses in various industries and a lot of the information in the tutorial can be applied to smaller markets as well. Here's the link: https://fstoppers.com/product/making-real-money-business-commercial-pho…
Trying to save up for this one... looks just like the direction I am headed and in a very similar manner as I have been post processing other people's photos for 25 years and just now moving into photographing my own products in studio. Really like the final results that Brian is able to create!
I haven't seen it, but of course! The art, I would think is to imagine what you need to highlight (I think the hardest part of this, BTW) and then taking the *right* images to composite. What I like is that using simple tools he is catching all the spot and highlighting that normally might take many, many hot lights or strobes to achieve. Loot at setups for product photography several years ago (pre-digital). Old Pop Photos or Moderns ran "How To" or behind the scenes segments. Some of them looked like Frankenstein's lab! And then you had to shoot polaroids to know you were getting the balance you wanted. That meant having a camera that even had a polaroid adapter (Hassies and high end Canon, Nikon). View cameras also got a lot of call for this work, especially things like the watches. And then, of course was the curse of color balancing for magazine reproduction! Ahh, the good old days!
Your photos are awesome, really!
Nice composition and ambience, marvellous work on lights and impressive retouching.
I'am a french photographer and I would like to know if you will make soon a training video on architecture and flash painting (like we can see on your website)?
If that is the case I would be interested.
Thanks William! I really appreciate the feedback! I don't have any plans to make an Fstoppers tutorial on architectural photography, but I sure appreciate the interest! Mike Kelley has that pretty well covered already ;) Definitely check out his series, they're great! Thanks!
Hi Justin, in order to use my Canon lenses on the Sony A7r2, I'm using the Metabones Mark IV Adapter - (Canon EF/EF-S Lens to Sony E Mount T Smart Adapter - Fifth Generation). They have a newer version available now. I'm also using the Sony 24-105mm f/4 on my Sony as my main lens at this point as well. Cheers
I watched the free lesson. Does the entire tutorial gloss over the details of post-processing like the free lesson did? I personally expect excruciating detail for a $300 investment.
I'm loving your course so far, and thank you for including your gear list. One thing you use constantly, which I didn't see in the list, though, is your remote. What're you using, and what do you recommend? Thanks!
Hey Adam, sorry if I forgot to put that item on the list. I actually did write an article a while back about the remote that I use. You can check out the article right here on Fstoppers: https://fstoppers.com/capture-one/how-wirelessly-trigger-sony-a7r-ii-wh… . Also, if you're tethering with Capture One, you can also just use the keyboard shortcut Command + K to fire your camera. Personally though, I like having a dedicated radio controlled remote. Cheers!
Awesome work! I noticed that in your "Apple Pie" bottle tutorial that you go heavily into PhotoShop. How detailed are you in the actual full tutorial "The Hero Shot", when it comes to showing the details in PS, i.e. buttons, etc; I'm not very skilled.
Thanks
Len
Hi Len, I think my tutorial has a good mix of both studio and post production. I'd say it's about half an half. If you're not a pro at Photoshop, that's totally fine. I start very basic in the beginning of the tutorial, and get more complex as the tutorial progresses.
Remarkable work, Brian! This article and videos opened my eyes to a whole new world of possibilities. I do have a question about the 13-hour course; would someone of limited knowledge of Photoshop be able to grasp your post-production workflow? I'm efficient in Lightroom but have really just scratched the surface of Photoshop (I've blended multiple images for some nightscape shots). Thanks in advance. - Matt L.
Thanks Matt Linsin
! Just like anything worth doing, Photoshop takes time and practice to become proficient. I start off pretty simple with both Lightroom and Photoshop in the first couple of lessons. Then things get more advanced as the tutorial progresses. If you're at least familiar with Photoshop's interface, I think you'll be fine. One of the best parts of tutorials like these is that you can pause, rewind, fast forward and rewatch as needed. Cheers!
Please disregard my previous question. I just read some of the previous comments and questions that shed light on my question. Thanks again for sharing your knowledge. ML
Hey Matt Linsin
, thanks for the kind words! I put a lot of hard work into this comprehensive tutorial. I tried to make the photoshop lessons as easy to follow along as possible. I start off pretty simple and gradually increase difficulty as the tutorial progresses. So you don't have to be an advanced Photoshop user per se, but obviously being familiar with Photoshop is a plus.
Brian, I'm thinking really serious about doing High-end Product shoots, I looks like a lot of fun with a good imagination, one should be able to make some money from ones craft. I would like to know where to begin on pricing ones shoot, by the hour, image rights?
Hi Leon Kolenda
, there's a lot that goes into pricing your work, way too much to discuss here. Some of these factors include, skill level, the market you live in, the market you serve, demographics, usage, scope of work, logistics etc. I'd first start with an online cost of doing business calculator. Also look into joining the American Society of Media Photographers (ASMP) as they are great resource. And lastly, Monte Isom has a fantastic tutorial on the business of commercial photography right here on the Fstoppers store. I highly recommend checking that out. Regardless of what commercial genre you work in, you're going to learn a lot about the business side of photography in his tutorial. Well worth the investment. Hope that helps, Cheers!
For the reflective part of the tutorial, I wish that Brian would have taught how to take pictures of jewelry with crystals and precious stones on white background. I feel that photographing jewels and diamonds and getting the sparkle and colors right is the hardest to do. This is my problem area. Making the jewels shine and sparkle capture the brilliance and color of them on white background.
Hi, I currently use a DxO Photolab 2 & Affinity combination for post-processing. How big of a problem is that in relation to your tutorials and how adaptable would they be for my apps?
Hey Phillip, the same principles apply. As long as you know DXO and Affinity well enough to perform equivalent tasks, you should be totally fine. I have no doubt that you would learn and apply new skills with this tutorial.
Collecting money for this course for sure!! I have been doing real estate photography for some years now ( yes I bought the Mkelley tutorials, great tutorials as well!!). But at the moment I am building my portfolio for product photography as well. I learned a lot from other courses I found online and they are all great. But by seeing this course I was convinced right away to buy it, after seeing the fantastic free tutorial on youtube. Because (being a photoshop geek myself) I think this is the future, with respect to product photography. The time of `getting everything right in camera` is kinda dying in my opinion....companies these days want so much special effects or simple photoshop manipulation for that matter. Which is more often impossible to do in camera.
Hi Essa Mustapha
, I don't teach how to composite special effects in this tutorial. This tutorial focuses on the fundamentals of lighting and compositing in Photoshop. I start with the basics and then transition into more complex techniques. I put a lot of work into this tutorial and I'm confident that you will learn something you didn't already know.
Hello, I would like to ask if they emphasize the steps in Ps also visibly, so that I can follow this as a non-native speaker also well. I have seen your video and I am thrilled, but I couldn't understand your camera settings very well and also your explanations in Ps.
Hi Sabine Engelhardt
, yes, we also recorded the screen during each of these lessons so you can see exactly what I'm doing in Photoshop and follow along. Cheers
Brian Nicol
Yeah, I sure do. I have Photoshop trick for that. Dust is the bane of my existence. Canned air is great to have on set, but there's always going to be the need for additional cleanup work in post production. I filmed this tutorial back in like late 2017, so I went back to the lesson and double checked. I cover a mass dust removing technique in Lesson 5 - The Watch.
This knowledge is not new..I am retired after running a studio in Soho London for over 34 years, shooting Advertising/Editorial work.
When I started in 1974 as an assistant we were shown all these tricks, but we had NO Photoshop and shot on 5x4 and 10x8 film.
All tricks were done in camera ! and passed down by the older guys.
But for this digital age and for someone starting out this video may be usefull.
Photography earnings today are not on a level with the 60s 70s 80s.
My daily rate in 1980 was £850.+ Film expenses etc. without hunting for jobs.
You were paid for your talent and skills.
To make a good living today, one needs a multitude of skills, but so many people are trying today that buyer's of photography can pick and choose.
I spoke to a young Art Director in London recently and I quote "photographers are like pebbles on the beech,you pick one up and play with it and dump it and get new one later on"
I hope that today's photographers can earn a crust and any training available can only help.


59 Comments
We are really interested in this tutorial, is it just possible to know a bit more in detail that what this 13 hours of content include? does it include ALL the workflow for all the 7 photos we see up there, from the beginning to the end?
Correct
I do not see any mention of information about the "business side" of his product photography. Is there nothing about that?
Correct, I don't go into the business side of photography. However, Monte Isom has a killer Fstoppers tutorial on the business of photography. I highly recommend checking it out. While he's working at the higher end of the market and not specifically in product photography, he interviews all types of businesses in various industries and a lot of the information in the tutorial can be applied to smaller markets as well. Here's the link: https://fstoppers.com/product/making-real-money-business-commercial-pho…
This is awesome!
Any "shitty" product can be put into a good light by a prof/inspired photographer
Trying to save up for this one... looks just like the direction I am headed and in a very similar manner as I have been post processing other people's photos for 25 years and just now moving into photographing my own products in studio. Really like the final results that Brian is able to create!
This looks more like digital retouching than anything.
I haven't seen it, but of course! The art, I would think is to imagine what you need to highlight (I think the hardest part of this, BTW) and then taking the *right* images to composite. What I like is that using simple tools he is catching all the spot and highlighting that normally might take many, many hot lights or strobes to achieve. Loot at setups for product photography several years ago (pre-digital). Old Pop Photos or Moderns ran "How To" or behind the scenes segments. Some of them looked like Frankenstein's lab! And then you had to shoot polaroids to know you were getting the balance you wanted. That meant having a camera that even had a polaroid adapter (Hassies and high end Canon, Nikon). View cameras also got a lot of call for this work, especially things like the watches. And then, of course was the curse of color balancing for magazine reproduction! Ahh, the good old days!
Hi my zipped files from 06-09 are not opening for some reason, how should I proceed to re-downlloading the corse?
Just purchased and am downloading content. Looking forward to getting started!
Hello from France,
Your photos are awesome, really!
Nice composition and ambience, marvellous work on lights and impressive retouching.
I'am a french photographer and I would like to know if you will make soon a training video on architecture and flash painting (like we can see on your website)?
If that is the case I would be interested.
Best regards from france
William
Thanks William! I really appreciate the feedback! I don't have any plans to make an Fstoppers tutorial on architectural photography, but I sure appreciate the interest! Mike Kelley has that pretty well covered already ;) Definitely check out his series, they're great! Thanks!
Looks great!! but what lens adapter does he use?
He gives you a full gear list in the tutorial.
Hi Justin, in order to use my Canon lenses on the Sony A7r2, I'm using the Metabones Mark IV Adapter - (Canon EF/EF-S Lens to Sony E Mount T Smart Adapter - Fifth Generation). They have a newer version available now. I'm also using the Sony 24-105mm f/4 on my Sony as my main lens at this point as well. Cheers
Thanks for that Brian, is the IS 11 USM or the older one?
Hey Deleted User I was using the older version of the Canon 24-105mm
I watched the free lesson. Does the entire tutorial gloss over the details of post-processing like the free lesson did? I personally expect excruciating detail for a $300 investment.
It's pretty damn detailed. By and large, the lessons run 1.5–2 hours, from shoot to final touches in Photoshop.
thank you!
Hey Brian,
I'm loving your course so far, and thank you for including your gear list. One thing you use constantly, which I didn't see in the list, though, is your remote. What're you using, and what do you recommend? Thanks!
Hey Adam, sorry if I forgot to put that item on the list. I actually did write an article a while back about the remote that I use. You can check out the article right here on Fstoppers: https://fstoppers.com/capture-one/how-wirelessly-trigger-sony-a7r-ii-wh… . Also, if you're tethering with Capture One, you can also just use the keyboard shortcut Command + K to fire your camera. Personally though, I like having a dedicated radio controlled remote. Cheers!
Awesome work! I noticed that in your "Apple Pie" bottle tutorial that you go heavily into PhotoShop. How detailed are you in the actual full tutorial "The Hero Shot", when it comes to showing the details in PS, i.e. buttons, etc; I'm not very skilled.
Thanks
Len
Hi Len, I think my tutorial has a good mix of both studio and post production. I'd say it's about half an half. If you're not a pro at Photoshop, that's totally fine. I start very basic in the beginning of the tutorial, and get more complex as the tutorial progresses.
Remarkable work, Brian! This article and videos opened my eyes to a whole new world of possibilities. I do have a question about the 13-hour course; would someone of limited knowledge of Photoshop be able to grasp your post-production workflow? I'm efficient in Lightroom but have really just scratched the surface of Photoshop (I've blended multiple images for some nightscape shots). Thanks in advance. - Matt L.
Thanks Matt Linsin ! Just like anything worth doing, Photoshop takes time and practice to become proficient. I start off pretty simple with both Lightroom and Photoshop in the first couple of lessons. Then things get more advanced as the tutorial progresses. If you're at least familiar with Photoshop's interface, I think you'll be fine. One of the best parts of tutorials like these is that you can pause, rewind, fast forward and rewatch as needed. Cheers!
Please disregard my previous question. I just read some of the previous comments and questions that shed light on my question. Thanks again for sharing your knowledge. ML
Hey Matt Linsin , thanks for the kind words! I put a lot of hard work into this comprehensive tutorial. I tried to make the photoshop lessons as easy to follow along as possible. I start off pretty simple and gradually increase difficulty as the tutorial progresses. So you don't have to be an advanced Photoshop user per se, but obviously being familiar with Photoshop is a plus.
Brian, I'm thinking really serious about doing High-end Product shoots, I looks like a lot of fun with a good imagination, one should be able to make some money from ones craft. I would like to know where to begin on pricing ones shoot, by the hour, image rights?
Hi Leon Kolenda , there's a lot that goes into pricing your work, way too much to discuss here. Some of these factors include, skill level, the market you live in, the market you serve, demographics, usage, scope of work, logistics etc. I'd first start with an online cost of doing business calculator. Also look into joining the American Society of Media Photographers (ASMP) as they are great resource. And lastly, Monte Isom has a fantastic tutorial on the business of commercial photography right here on the Fstoppers store. I highly recommend checking that out. Regardless of what commercial genre you work in, you're going to learn a lot about the business side of photography in his tutorial. Well worth the investment. Hope that helps, Cheers!
Does anyone know if fstoppers store has student discounts? Id love to go through this course over winter break but its a bit beyond my budget.
Hey Matt. Thanks for the question. We don’t have a student discount but we occasionally have sales. Keep an eye out for those.
For the reflective part of the tutorial, I wish that Brian would have taught how to take pictures of jewelry with crystals and precious stones on white background. I feel that photographing jewels and diamonds and getting the sparkle and colors right is the hardest to do. This is my problem area. Making the jewels shine and sparkle capture the brilliance and color of them on white background.
Hello... How in depth are your post production tutorials? That's where I am getting stuck :(
Most of this tutorial is post processing
Hi, I currently use a DxO Photolab 2 & Affinity combination for post-processing. How big of a problem is that in relation to your tutorials and how adaptable would they be for my apps?
Hey Phillip, the same principles apply. As long as you know DXO and Affinity well enough to perform equivalent tasks, you should be totally fine. I have no doubt that you would learn and apply new skills with this tutorial.
Collecting money for this course for sure!! I have been doing real estate photography for some years now ( yes I bought the Mkelley tutorials, great tutorials as well!!). But at the moment I am building my portfolio for product photography as well. I learned a lot from other courses I found online and they are all great. But by seeing this course I was convinced right away to buy it, after seeing the fantastic free tutorial on youtube. Because (being a photoshop geek myself) I think this is the future, with respect to product photography. The time of `getting everything right in camera` is kinda dying in my opinion....companies these days want so much special effects or simple photoshop manipulation for that matter. Which is more often impossible to do in camera.
Hi, Just wondering do you teach how to work with particles, flames, dirt and the advanced compositing
Hi Essa Mustapha , I don't teach how to composite special effects in this tutorial. This tutorial focuses on the fundamentals of lighting and compositing in Photoshop. I start with the basics and then transition into more complex techniques. I put a lot of work into this tutorial and I'm confident that you will learn something you didn't already know.
Hello, I would like to ask if they emphasize the steps in Ps also visibly, so that I can follow this as a non-native speaker also well. I have seen your video and I am thrilled, but I couldn't understand your camera settings very well and also your explanations in Ps.
Hi Sabine Engelhardt , yes, we also recorded the screen during each of these lessons so you can see exactly what I'm doing in Photoshop and follow along. Cheers
Do you cover how to deal with dust other than retouching countless dust specs? thanks, Brian
Brian Nicol Yeah, I sure do. I have Photoshop trick for that. Dust is the bane of my existence. Canned air is great to have on set, but there's always going to be the need for additional cleanup work in post production. I filmed this tutorial back in like late 2017, so I went back to the lesson and double checked. I cover a mass dust removing technique in Lesson 5 - The Watch.
This knowledge is not new..I am retired after running a studio in Soho London for over 34 years, shooting Advertising/Editorial work.
When I started in 1974 as an assistant we were shown all these tricks, but we had NO Photoshop and shot on 5x4 and 10x8 film.
All tricks were done in camera ! and passed down by the older guys.
But for this digital age and for someone starting out this video may be usefull.
Photography earnings today are not on a level with the 60s 70s 80s.
My daily rate in 1980 was £850.+ Film expenses etc. without hunting for jobs.
You were paid for your talent and skills.
To make a good living today, one needs a multitude of skills, but so many people are trying today that buyer's of photography can pick and choose.
I spoke to a young Art Director in London recently and I quote "photographers are like pebbles on the beech,you pick one up and play with it and dump it and get new one later on"
I hope that today's photographers can earn a crust and any training available can only help.
Your photoshop skills are insane. Nice work!
Thanks Travis Johansen , Cheers! 🍻
This is spectacular! I have knowledge in light room and basic knowledge in Photoshop :)
Toby P./ https://www.acelandscapinghobart.com.au
I bought it.
Can I get English subtitles? I am not an English speaking country.