
Free, fast, multi-platform, and easy to use. PhotoRec is the great data recovery software that I ran after one of my card got corrupted. Here is a short review and tutorial.
After the Internet lost its mind over the single memory card slot of the new Nikon Z mirrorless cameras, I may have found a potential antidote against this madness.
Recently, the images stored on the microSD card of my smartphone got corrupted. My computer was able to read the card and open a few pictures but the vast majority of the files were gone. The loss was not critical but I still wanted to recover the thousands pictures and videos saved on the 128 GB card.
After a quick Internet search, I installed a few freewares but most didn't work that great. Some of them were not really free while others were extremely slow during the scanning process (up to three weeks to scan my card). Eventually I tried PhotoRec, and this nice little freeware was able to recover the vast majority of my files in a few hours. I don’t know exactly what was on my card but I was pleased to find all my precious cat pictures after the scan.
PhotoRec is a file data recovery software designed to recover lost files including video, documents, and archives from hard disks, CD-ROMs, and lost pictures from digital camera memory. It can retrieve lost files from FAT, NTFS, exFAT, HFS+, and ext2/ext3/ext4 filesystem. PhotoRec ignores the file system and goes after the underlying data, so it will still work even if the media's file system has been severely damaged or reformatted. PhotoRec is a companion program to TestDisk, an application for recovering lost partitions on a wide variety of file systems and making non-bootable disks bootable again. Both programs are available for download on the developer's website. This software can virtually run on any platforms from the newest Windows 10 to Windows XP, DOS, MacOS X, BSDs, and Linux.
Here Is a Short tutorial
First, connect your memory card or hard drive to your computer via a card slot or USB.
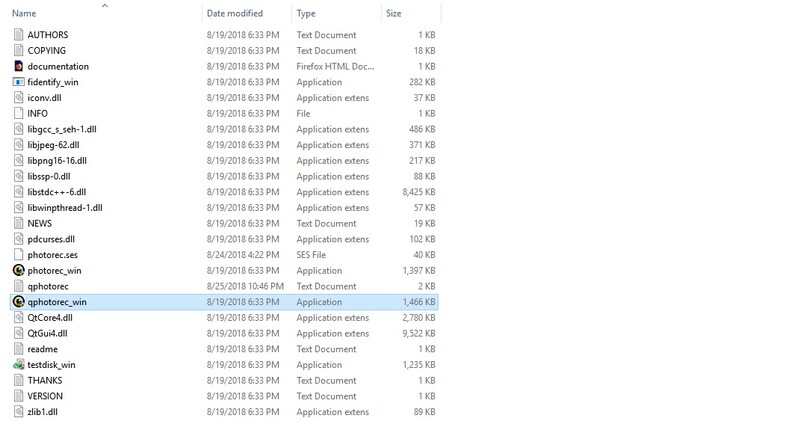
Download PhotoRec and launch the “qphotorec” executable. Another executable will start the software in a DOS window so make sure to launch the right one with the graphical user interface.
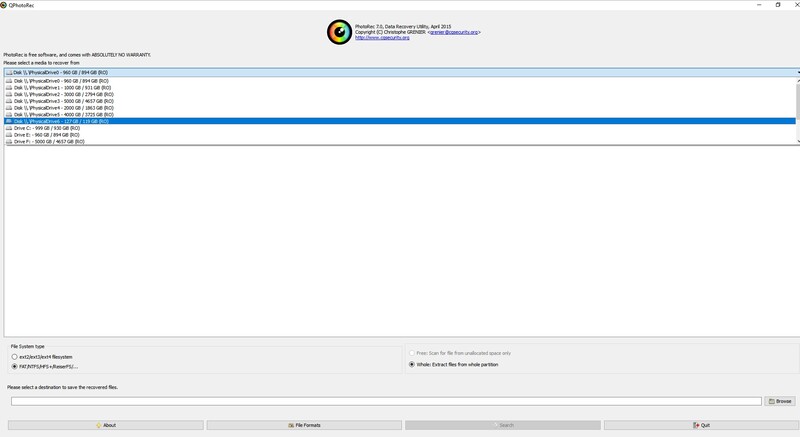
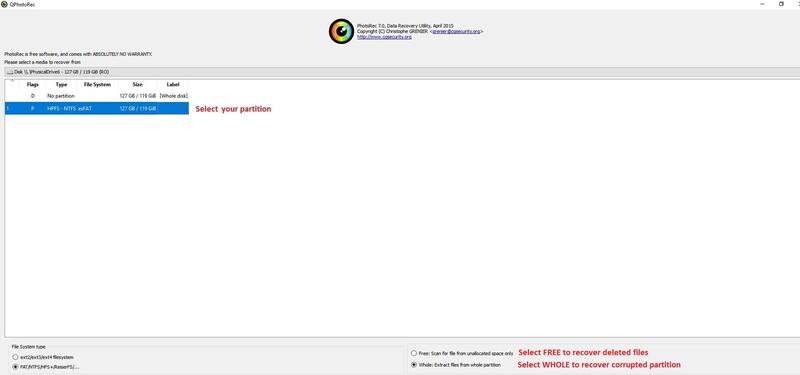
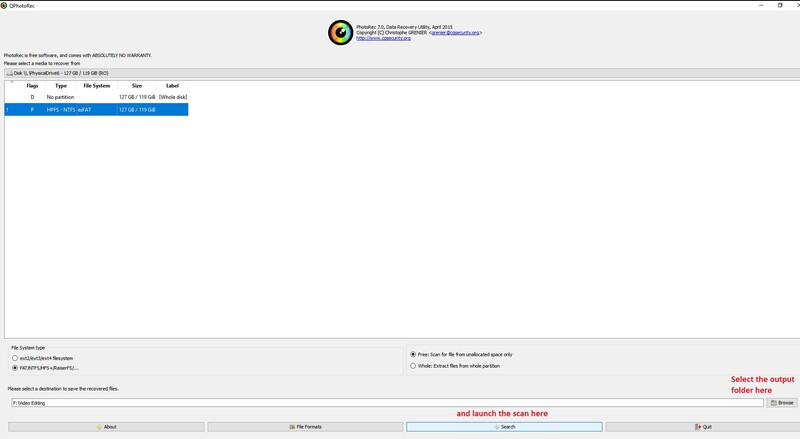
Select your disk location from the top section and pick your partition right below. At the bottom, check “free” or “whole.” If you select free, PhotoRec will simply look for the unallocated files which are the files that have been deleted by the user (images sent to the bin or deleted manually in camera). Keep in mind that deleted file are not erased from the card or disk, they just become “unlisted” but they remain on the media until new files are written over which is why you should never use a card after a mishap because new pictures may be written over the old ones and compromise the recovery. If you experience a media corruption like I did (the card become randomly unreadable or some files are lost for no reasons), select “Whole” and the software will perform a deep scan of the card or disk.
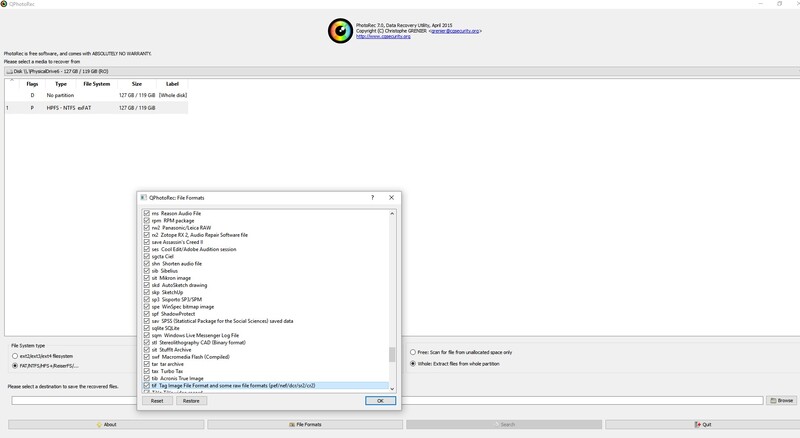
Next, click on the “File formats” button at the bottom to specify which type of file you want to recover. This option allows to reduce the scanning time by excluding some format from the process. Most raw files like Canon .CR2, Nikon .NEF, Pentax .PEF, Fuji .RAF, and Sony .SR2 files are gathered under the single “tif” tag which also includes the .DNG and .TIFF among others. In case of doubt, check all the formats and sort the recovered files manually at the end of the scan.
Finally, select the export folder where the recovered files will be transferred and click “search” to launch the scan. Obviously, the export folder must be located on a different media, don't try to export the rescued files on the corrupted disk or card.
If you like PhotoRec and were able to recover your precious data, consider making a donation to the developer.


10 Comments
At the end there you might want to add that you need to select a folder on another disk drive on your computer and not attempt to save images onto your corrupted memory card. I've seen people do the latter.
I usually find the drive with the most free space, create a folder on it named 'Recovered Images' or something similar.
If you mess up just exit the program and run it again.
A long time ago, before the developers created PhotoRec I had to use TestDisk to recover data, and that program can be a bit much to figure out how to use but it's saved my important files more than once.
Thanks, It seems so obvious to me to export the files on a different media but I've added the remark in the article. I haven't used testdisk much, the DOS interface would probably scare most people.
A must companion to the new Nikon Z cameras :-)
A must companion to the new Nikon Z cameras :-) I was gonna say just that.
I bet many have the same thoughts after the big news of the Z one card fiasco :-) Cheers!
My HD that I stored a lot of my pictures/videos just failed last night. Unfortunate perfect timing I guess. Thanks for the info.
*Also, you said to connect USB. If its connected directly to the mobo via SATA, will this software still work?
On a side note, I'm going to be setting up more than likely a RAID 1. Maybe you can do a write up on that for those that may not even know RAIDs exists.
Sorry to hear that. I said USB because that's how I plugged my card via a card reader but SATA should work (i see all my disks in photorec, USB and SATA). Check the link in the article, there is a wiki with all the tutorials.
Yes, I would recommend RAID 1 (mirror). I have that on my PC as a short term dump before I move my files to long term storage. The procedure is very simple and you can do it in Windows 10 in a few minutes. There are a lot of tutorials on youtube but I'll keep that in mind for a future article.
This is the best recovery software I have ever used . I tried the expensive ones and most them failed
I've tried the program, but it doesn't recover my videos files completely. Just some of the audio. Any help?
Note sure, what “File formats” did you select? I would try to check them all and scan again.