
Westcott just came out with a new optical snoot designed by Lindsay Adler. I recently had the opportunity to work with it in the studio and compare it to a similar optical snoot I used in a recent article so that I could determine if it was worth the upgrade.
In short, an optical snoot is an attachment that goes on the end of a light that focuses the light through a lens and allows you to use different inserts to create crisp light patterns. A few months ago, I wrote this article, where I broke down how optical snoots work and how I used mine to get the shot:
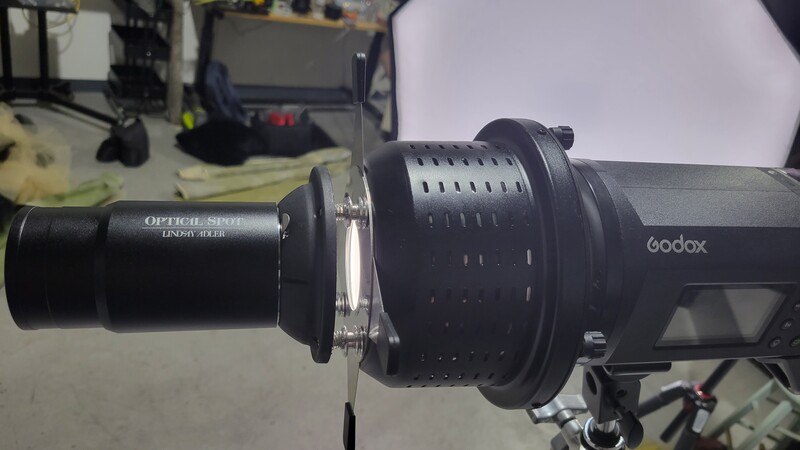
For this image, I used a cheap optical snoot put out by Godox (sometimes sold under the brand name Clar). A few weeks ago, Lindsay Adler and Westcott announced a joint collaboration in coming out with a new optical snoot called the Optical Spot. I recently had the opportunity to visit my friend's studio and spend the day seeing how it works and whether it was, in fact, worth the price increase over my cheap optical snoot. To be completely honest, I went into this with the idea that I would not find any significant differences over the cheap optical snoot that I used, but I was wrong. I spent a lot of time watching videos online and reading about this new device to see if I could find any reason at all to upgrade. Everything I saw about it was geared more towards how it works in general. I already know how optical snoots work. When I buy equipment for my business, I want to know specifically why one thing is better than the other options. So, here are some specific reasons why the Optical Spot is a better option.
I made a 6:30 YouTube here, but let me walk you through in more detail why these three points are important,
The Built-In Flags
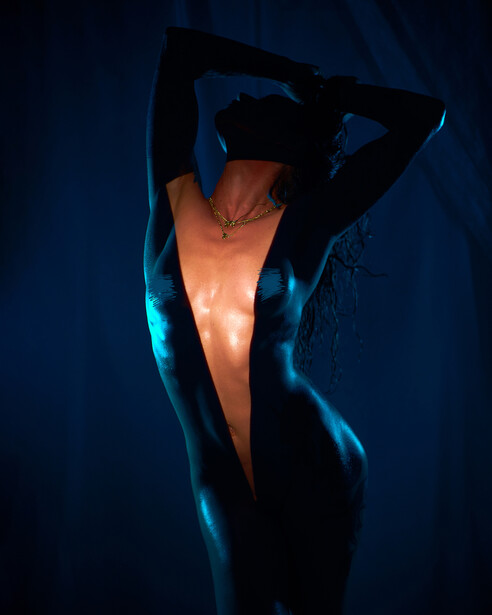
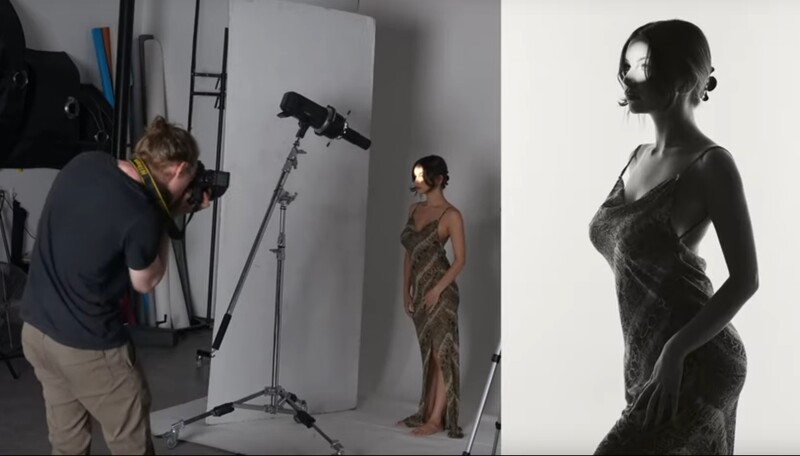
One of the integral parts of using an optical snoot is the ability to create precise patterns that shape the crisp edges of light as it comes out of the lens at the end. There are "gobos" (go-betweens, little discs with patterns carved in them) and there are also flags. The flags are inserted at some point in the body of the optical snoot between the light and the end of the lens to create sharp, blocked-off edges. In the earlier video, I created that image with two flags that came together at an angle to carve out the triangle pattern on the model's torso. In that part of the video, I actually had to put it into fast motion while I spent quite some time getting it just right. When I was creating the actual image that was the source inspiration for the video, the model had to hold extremely still for about a minute in her pose while I maneuvered the removable flag pieces in and out and around the pins that were blocking me from freely rotating the flags.
If you go to this part of the video (starting at 1:22), you can see that it takes me seconds to create multiple shapes with the Lindsay Adler version.
A lot of the creative optical snoot pictures I see online are done with precise placement over the eyes or other parts of the body where the model has to hold a pose and the patterns are then put on the model in a precise way. Being able to do that quickly is a huge bonus.
The Difference in the Gobo System
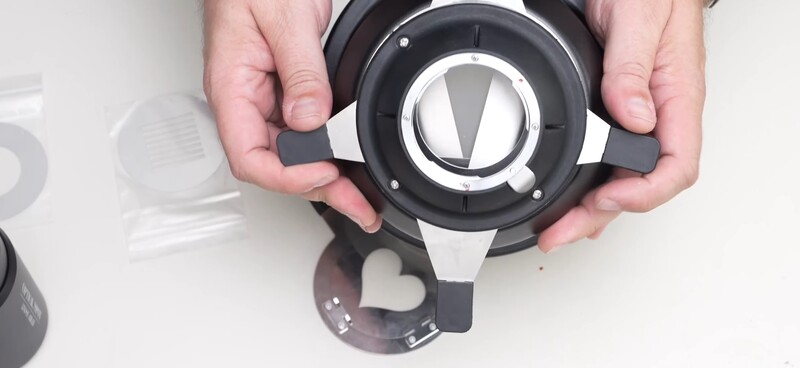
This is another huge convenience factor. Let me start by explaining how the gobo holder works on my other optical snoot.
There is a tray for the gobos with a top piece that you screw down to lock the gobo in place. Then, you insert the gobo holder into the slit in the body of the optical snoot to create the projected pattern of light through the gobo. The problem with that system is that you have to know the angle the gobo will be inserted before you tighten it. There is no top or bottom to the optical snoot. It just attaches to the front of the light. There is one part with a little pull-away tab where the gobo holder slides into place. Depending on how you attach it, that could be on the top or bottom or left or right of the body of the optical snoot. Once it is inserted, if the angle is not right, you have limited range to move it around because of the pins in the body of the optical snoot. So, if it's not at the correct angle, you have to take it out, unscrew it, and try again. Just an interesting side note, but the gobos did not come with my optical snoot. I bought them separately. I did not know that you need a gobo holder as well. After I bought the gobos, I got an e-mail saying, "Customers like you also bought this" and that was the first time I learned that you need a separate piece to hold the gobos in place.
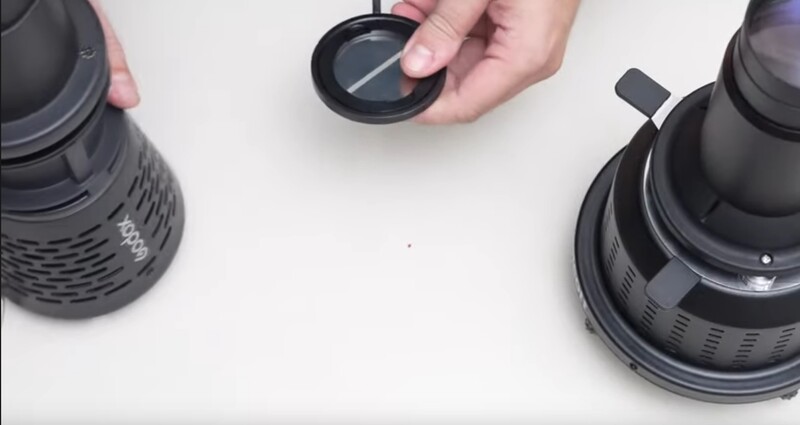
By comparison, here is the Optical Spot gobo holder:

The notable difference is that the gobos slide into place and can easily be repositioned if needed without having to stop and unscrew the two pieces to try to reposition them. The other difference is that you have much more room to move the gobo holder once it is in place. On my Godox optical snoot, you can only rotate it about 90 degrees to try to get the correct position. With the Optical Spot, you have much more range to rotate the gobo holder around. It's not an absolute deal-breaker, but when you are experimenting with creative looks and you have the freedom to change something about 800% faster, it is very convenient.
The Most Important Feature: The Shape of the Body
When I was researching different optical snoots, one of the issues that came up was the limitation on which lights were suitable for each optical snoot. The problem is that with a strobe, the bulb gets hot and needs space around it for the heat to dissipate. When you put an optical snoot over the front of the bulb, you are suffocating it, and the bulb is not allowed to cool, which causes long-term damage to the bulb. With the Godox/Clar system, the base of it where it attaches to the Bowens mount of the light is not wide enough to allow it to fit over a Godox AD600 Pro, even if you wanted to try to ruin your bulbs.
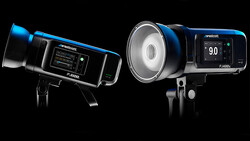
Here is a comparison side by side:
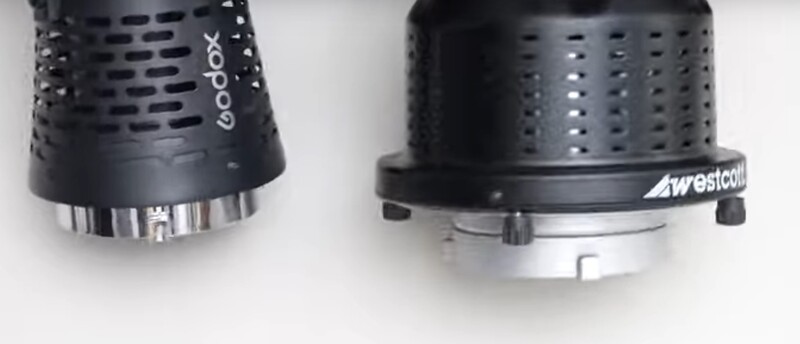
The wide base of the Opitcal Spot allows it to be used on a Godox AD600 Pro. Not only does it fit, but the manual specifically states that it can be used with strobes up to 600 Ws because the wide base allows enough space for the heat to dissipate with strobes as powerful as 600 Ws.
The Bottom Line
If you are looking at getting an optical snoot and you want a high-quality item, then this is a pretty simple choice. If you are looking to get an optical snoot and you are wondering why you would want to pay extra for the Westcott version, consider these issues: do the lights that you have currently work with what you want to get, or do you need to get a new light for several hundred dollars that can accommodate the heat and size restrictions of another optical snoot? Are there kit pieces that you need to take the creative shots that you have in mind? Are you going to be held back during use by the inefficient workflow of trying to use the different accessories to create the images you want during a shoot?
I have a detailed walkthrough of each of these points and some samples of the lighting setups and sample images in the video above. Let me know if you have any questions about either system. You can purchase the Optical Spot here.
Images used with permission of Zachary Lee

Join the Fstoppers community for free
-
Post comments and join in the discussions
-
Browse the site ad-free
-
Share your work and get featured in the community
-
Compete in the photo contests for fun and prizes
9 Comments
$500 is pretty steep for a GOBO.
A gobo is the disc that goes into the optical snoot. If you mean that $500 is pretty steep for an optical snoot kit, then I would agree at least to the extent that it's on the pricier end of the spectrum. That was what led me to want to look into it and compare it to my kit, which was, I believe, probably the cheapest kit out there at about $130. So, when you are looking at equipment for your business, the question you have to ask is whether the equipment is going to make you money versus buying a cheaper version. That is true with $30 tripods vs. $1200 tripods, lenses, godox vs. profoto. So, the question here is whether having this system will help you make a couple hundred dollars more over the course of your career. As a natural sceptic on high-priced items, that is what I came into this article to show. I wanted to highlight the differences that I found that make it helpful and would justify the price to help someone stuck between choosing one over the other.
I see four finger screws in the back. Does that mean it is interchangeable for various brand mounts?
Yes
Currently I use the broncolor siros, how much difference would this be to using the bron optical snoot which is only available for the picolite? This seems on the face of it to be a good option so wouldn't need to change strobe as well (600w limit of this would be enough for my uses).
I'm not familiar with that one. One thing that was important to me was the ability to use it with a variety of lights because you can get different effects from different powered LEDs in particular. So, I would just go with whatever option gets to the most variety of use.
Pico and Mobil use a clamp type mount. There is apparently a Pico/Mobil Adaptor for Pulso Reflectors. So probably you would need that then the Broncolor mount that's made for this optical snoot from Bowen.
Is there any light lost through the westcott?
I'm currently using a godox sa-p projector with godox S30 (30watts)
I also have a godox ML60 (60watts) which I tried mounting the sa-p with the godox sa-17.
I was expecting to have twice the light output with the ML60 over the S30 but was saddened to findout it was a much weaker output from the S30. Maybe due to using the sa-17 adaptor.
That is the kit that I used to make my previous video. Not sure about the light output change though