
The Blackmagic Design ATEM Mini is one of the best and easiest ways to do more than just stream multiple cameras, and at first, it might seem like an expensive gadget for most photographers. But this last year has shown us a lot of businesses can succeed remotely and even after things return to some level of normalcy a few things are probably going to stay that way. The Blackmagic Design ATEM Mini series of devices take all the hardware and software you need to do complete live video productions and puts it into a smaller, affordable (compared to traditional broadcast gear), and simple yet feature-rich device accessible to anyone.
I was first introduced to the ATEM Mini by a wedding photographer friend who started adding streaming to his wedding business during Covid. Even though a lot of people delayed their events, by offering live streaming he was able to adapt and keep his business busy over the last year. He already offered photography and video service so streaming live with the help of two ATEM Mini Pros made going live simple.
Now adding live streaming wouldn't help me with my clients but I was looking for a better way to do online meetings and workshops which after all my live appearances had been postponed or canceled started moving to Zoom. I was struggling with the Canon beta utility that is still pretty buggy, and wanted to go bigger with full workshops and multiple cameras. After seeing how my peer was using it and doing further research on what options were available the ATEM Mini seemed like the perfect tool for the job.
Full disclosure, Blackmagic Design made available to me a demo model for testing. However, the opinions and following review are mine alone, and Blackmagic Design hasn’t had any influence or feedback on my review process or this article. Additionally, after, as a result of reviewing the product, I ended up purchasing one for myself.
How Does It Work?
Black Magic Design has an entire line of expensive hardware switchers for doing live broadcasting for television and production studios under the ATEM name. The ATEM Mini line of products is a more portable version of these switchers with some additional features that make them perfect for someone doing a lot of zoom calls at home up to full production studios who need to stream live on location.
Learning and even utilizing all the advanced features of the ATEM Mini especially each step up the line is a daunting task, one I’m still working my way through. So this won't be a comprehensive review of each device’s full capabilities but rather a look at how I utilized both the Mini and Mini Pro ISO and an overview of what makes the devices special and how they differ from each other.
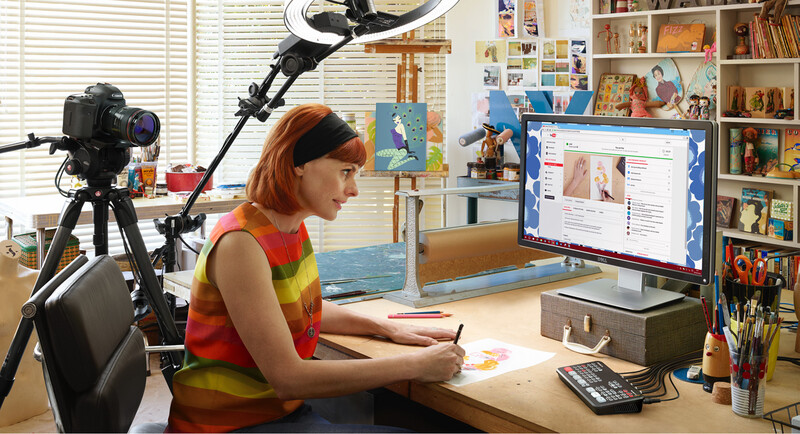
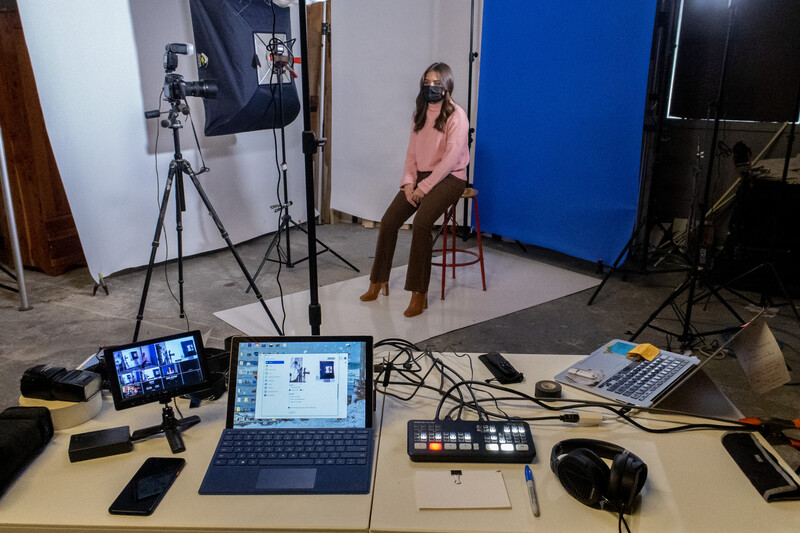
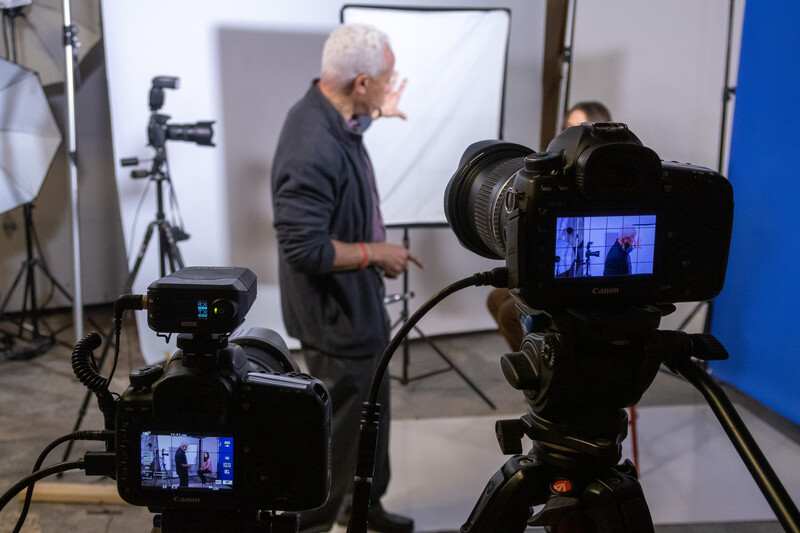
At its basic level, the ATEM Mini is a video switcher that allows you to switch between multiple input sources in this case HDMI and output to your computer as a single video source or in the example of a Zoom call your webcam. For a lot of people, one camera is enough for all their streaming needs, and using free software like the Canon Beta utility or even a device like a Camlink will let you use your DSLR or Mirrorless camera for better video quality. I wanted to be able to do more. During client meetings I wanted to be able to switch between multiple computer desktops more seamlessly so I could play a video then prep a slideshow and switch right to it without having to minimize windows or reshare my desktop. I wanted to be able to have a second camera during lectures or group forums where I could demonstrate something in my hand like camera settings. With multiple cameras, I was even able to do a portfolio review with a potential client where I set up a top-down view of my desk with my physical portfolio spread out. That particular client had never been presented to in that way and it helped set me apart.
I tried using the Canon utility but it's buggy and doesn't do camera audio. You could buy a Camlink or similar device and that solves the audio and gets you HDMI output from your camera to your PC but that costs $115 and only allows for one camera. If all the original ATEM Mini did was allow me to switch between 4 HDMI sources and output as my webcam I think it is worth the $295 for the basic model, but as I learned how to use it I realized it can do so much more both in its hardware and the additional software that comes with it.

ATEM Mini Series
With the release of two new models this year, there are now 5 devices in the ATEM Mini line. This is because, since the release of the original ATEM Mini, Blackmagic Design has paid attention to its users, both in the creative ways they were using the device and in the feature requests they wanted. They have done several firmware and software updates adding more features and each new device has added additional hardware options expanding its functionality to a wider audience not originally targeted by the first device.
- ATEM Mini $295
- ATEM Mini Pro $495
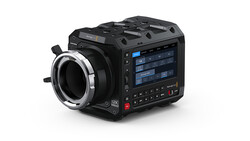
- ATEM Mini Pro ISO $795
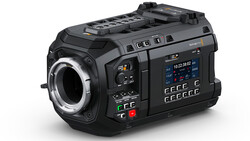
- ATEM Mini Extreme $995
- ATEM Mini Extreme ISO $1,295
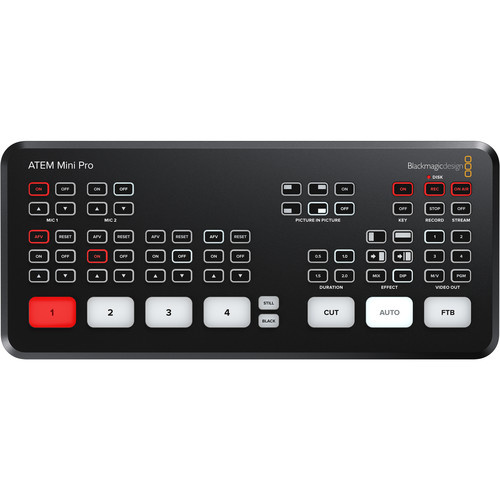
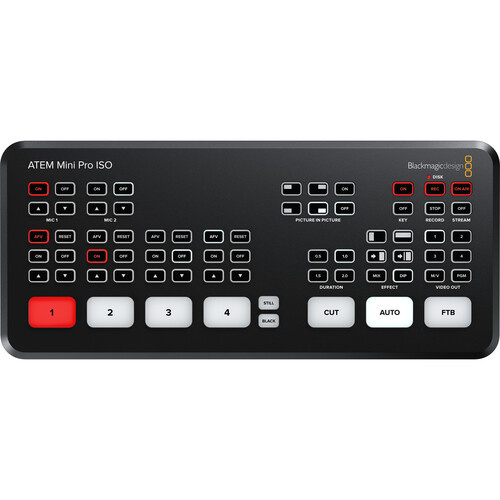
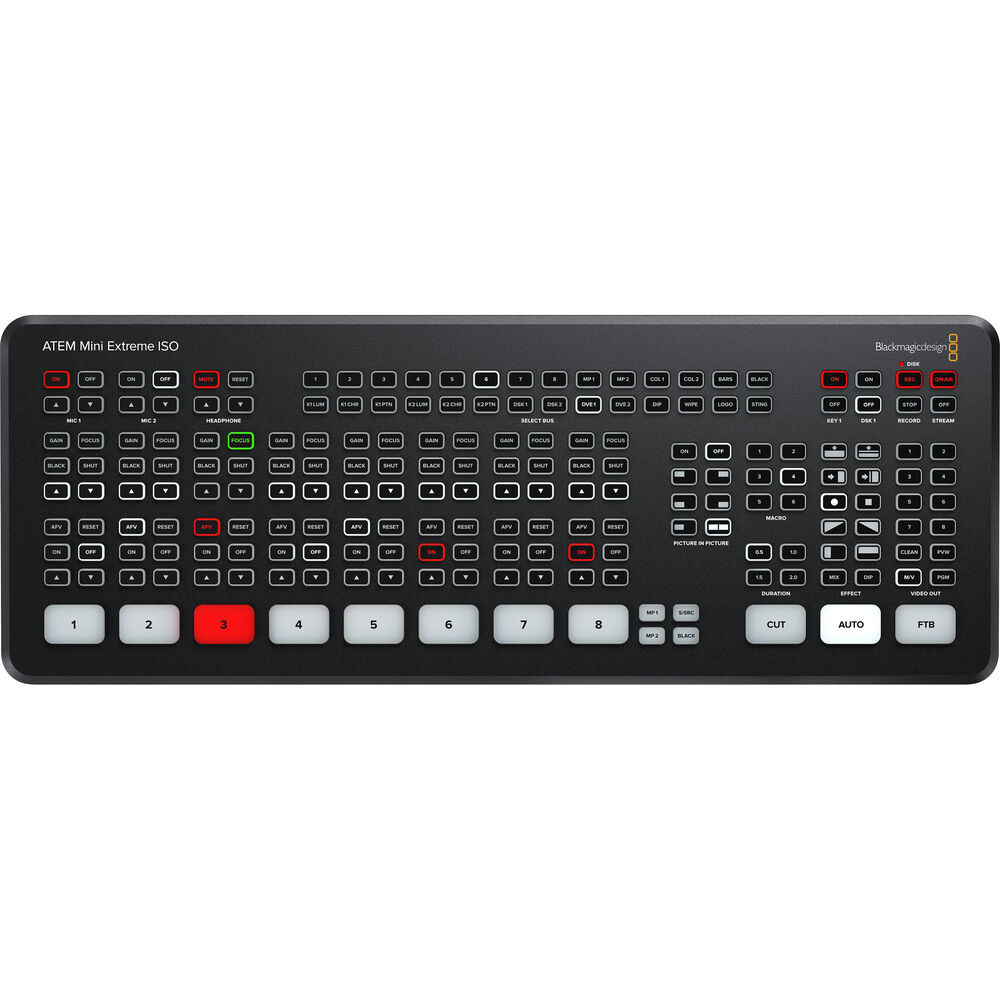
For this review, I will be focusing on the original Mini (which I now own), Pro, and Pro ISO (which I demoed for this article). Both of the Extreme versions expanded the available input ports from 4 on the previous three models to 8 and added a bunch of more advanced broadcasting features. These are both far beyond the average user's needs, myself included, and are better suited for bigger production studios. The Mini, Pro, and Pro ISO all share the same physical body at 9.35" wide, 4" deep, and 1.38" at its tallest point, with the Pro and Pro ISO having additional hardware buttons and software features.


ATEM Mini Features
I think what makes all the ATEM Mini switchers so successful is just how easy they are to set up. I didn't have very much experience with broadcast panels before using it but after just connecting all the cables with no additional software it was up and running. For all its advanced features and capability, its plug-and-play usability is what sets it above the competition.
- 4 Live Stream HDMI inputs
- 2 3.5mm audio inputs and Digital Audio Mixer
- Input/Output up to 1080p60 10-Bit 4:2:2
- HDMI output, USB Type-C output
- Upstream/Downstream Keyers
- A variety of transition options including DVE
- Chroma/Luma Keyers
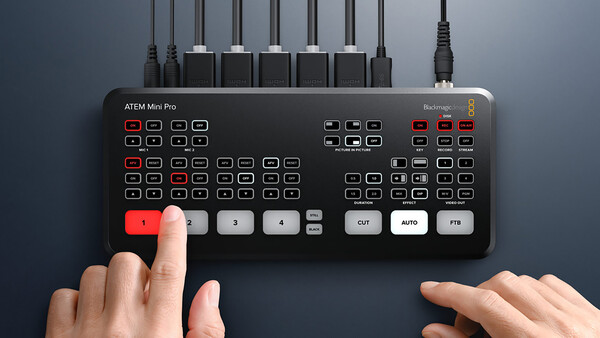
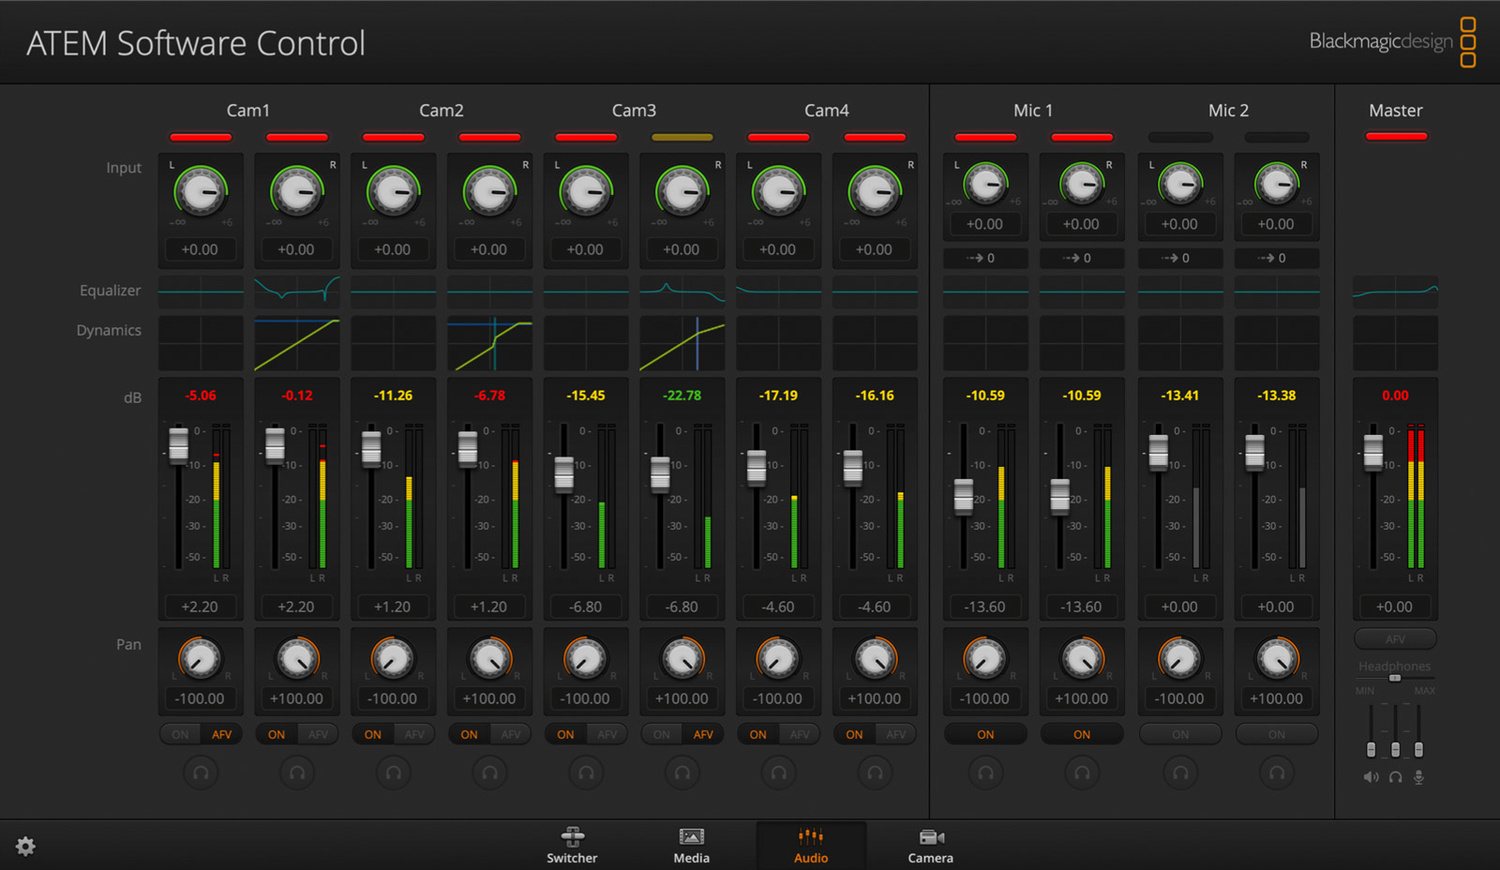
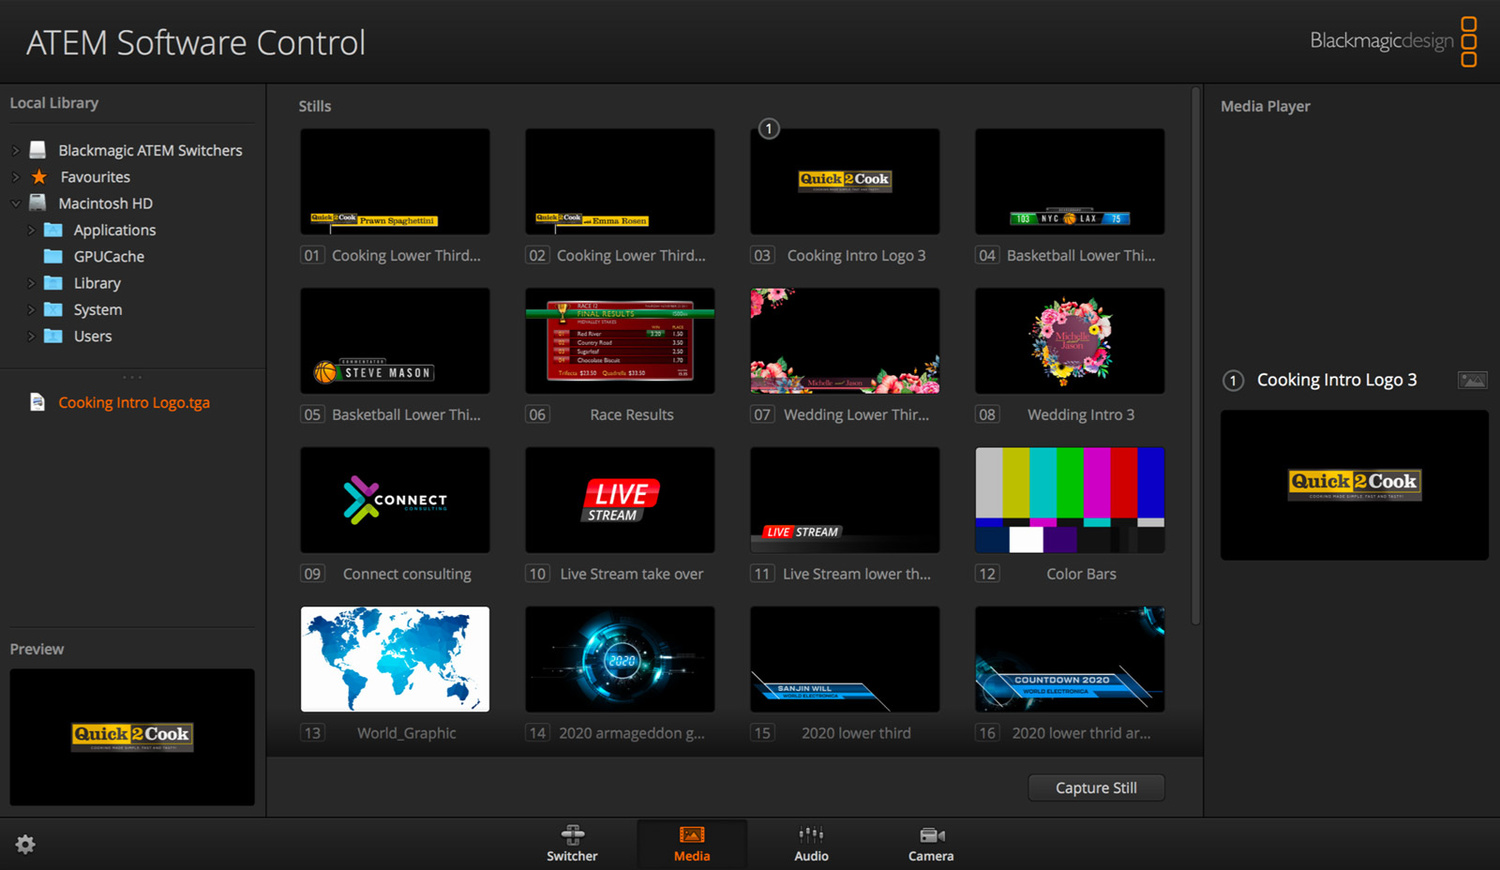
In addition to its 4 HDMI inputs which can piggyback audio from the source, the mini includes 2 dedicated audio ports. On the face of the switcher, there are buttons to turn audio on/off for all 6 inputs as well as the ability to turn each one up or down. For the 4 HDMI inputs, you have the option to individually set them to AFV or Audio-Follows-Video. Each of the 4 HDMI inputs has a large dedicated button that turns red when selected indicating it is currently the live source. It is very easy and quite satisfying to click between all 4 sources. Next to those you have a small button for a black screen and one for a still that can be loaded in the software. I found the still button great for having a picture and my details up before going live to video. While you can upload several stills to the software in advance there is no hardware button to rotate or select them. From a production standpoint, I suppose this makes sense but as a single individual, it would be a nice feature to have even if it was just cycling through them.
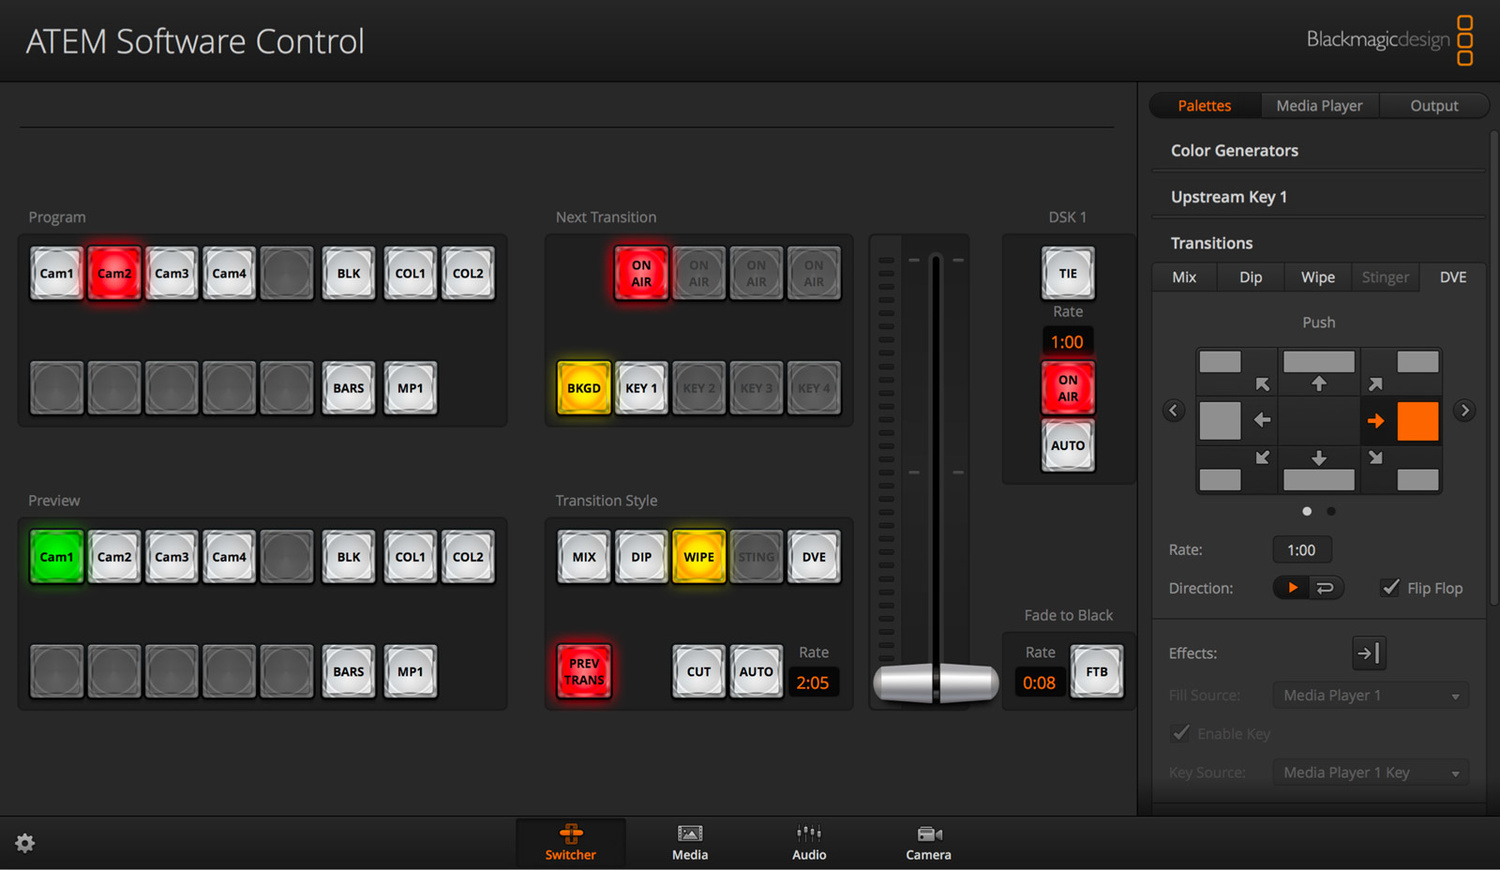
In the software, you can set up the switcher for Program/Preview mode which I found to be my favorite way to use it. Preview mode allows you to click an input to go live(program), indicated by a red light then click a second input setting it to preview indicated by a green light. Using the HDMI output you can see the single preview feed on a second monitor. To switch from the program input to the preview input you then either use the CUT button or the AUTO button. CUT does a simple hard cut from one to the other while AUTO initiates a pre-decided transition from one to the other. There are buttons to set up a variety of transitions and durations. In the first workshop I did with the ATEM Mini I received a lot of positive feedback on the transitions alone.
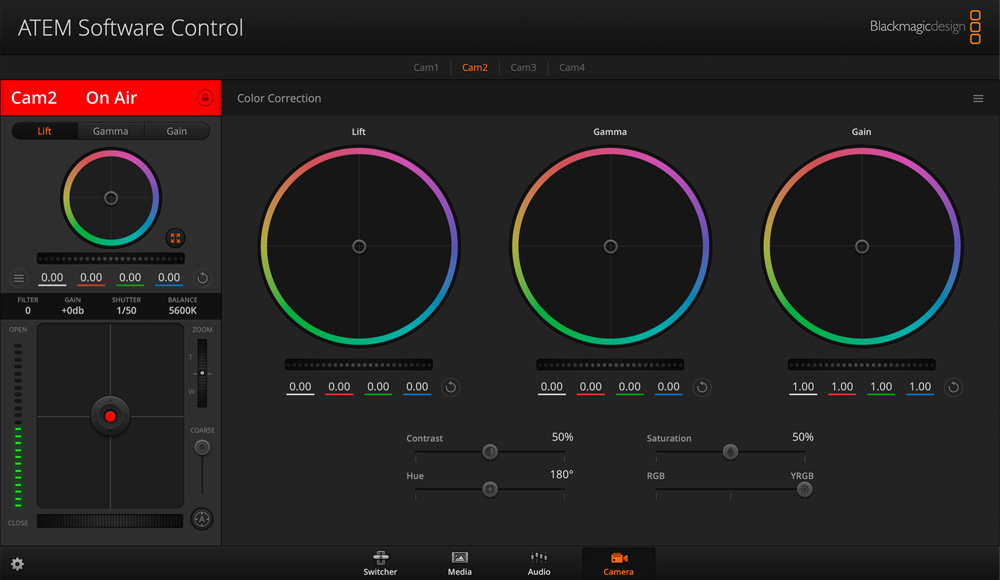
The last buttons I want to mention are for the Picture in Picture and Chroma Key functions. I didn't have a need for the Chroma key feature but I did test it out and it was pretty impressive for doing it live. It also works in conjunction with the PIP feature that turned out to be very useful even if kind of a novelty. You can set up both functions in advance via the software and then enable them using the switcher buttons. I found the PIP useful for talking over examples like tethering live shots or when using overhead camera setup.
ATEM Mini Pro and Pro ISO Features
In addition to everything included in the ATEM Mini version the Pro and ISO versions come with several additional hardware and software features.
- Direct recording to USB flash disks in H.264
- Live Streaming over ethernet
- Multiview monitoring output
- 5G/4G Mobile Data support via USB connected mobile device
- Direct recording of 5 individual H.264 streams(ISO model only)
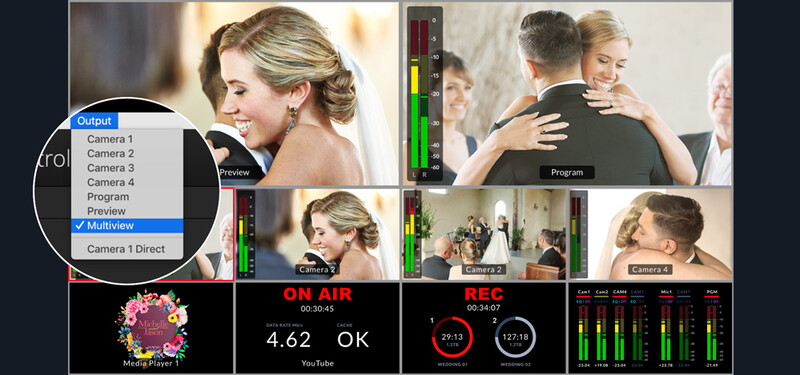
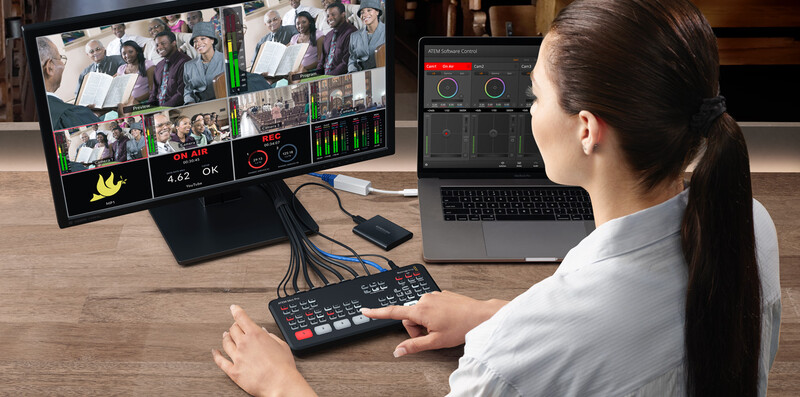
The biggest feature for my needs was the ability to have Multiview monitoring, something I think should have been available on the Mini. Combined with program/preview mode and connected to any monitor the Pro can show you all 4 inputs plus a side by side of the program(live) feed and the preview feed. It is not 100% needed when using it in almost all the setups I used it for but it is just such a great feature to have if you are using multiple cameras. There are some workarounds if you want this feature on just the Mini but they will make your setup more complicated by adding additional software or buying a dedicated preview monitor. Unfortunately, that feature alone does not warrant paying the cost to upgrade from the Mini to the Pro.
Where the Pro really is worth the money is if you need to be able to record your live streams. Again for the average photographer who might use this for client meetings, remote conferencing your crew, or just better zoom calls, recording is probably overkill. If you plan to do lectures and workshops, offer live streaming to your clients etc., it is a necessity. The Pro comes with a dedicated Rec and Stop button that lets you record directly to a USB flash device like a Samsung T5 SSD. It will record the entire Live stream with audio to a single H.264 file. If you are outputting to a monitor with multiview it shows a separate screen to indicate you are recording, the runtime, and your storage usage/availability. This is perfect if you want to upload to a service like YouTube later or give a copy to your clients.
Another new feature of the Pro is Live streaming via ethernet at the push of a button to services like YouTube Live, Facebook Live, or Twitch. Once setup this bypasses the need to connect a PC allowing for a cleaner setup and better quality stream. Just like with recording when monitoring there is an On Air screen that lets you know when you are live as well as runtime and bandwidth. Next to the Rec and Stop buttons you’ll see a matching pair of On Air and Off buttons. I didn't have a chance to test any of the streaming live features as it's not something I really have a need for but I talked to some YouTube friends who said the ATEM Mini Pro has been a game-changer for simplifying and streamlining their desktop setups.
If you have a need to edit the footage after streaming you might want to upgrade to the Pro ISO. The ISO version of both the Mini Pro and Mini Extreme step up the recording capabilities by allowing you to record each input source individually as well as the Program (Live) feed. That's five recordings and audio recorded to your SSD for later post-production.
User Experience
As I’ve mentioned I have used these devices in several different ways. As a simple camera and audio connector for everyday zoom calls to more complicated workshop setups with three cameras, two lavalier mics, and a live tethered camera connected to a laptop running Lightroom. In every situation, I had no issues broadcasting, and other than needing a ton of cables to set up was intuitive and simple. While there are a ton of more advanced and customizable broadcasting features built into the software that comes with all of these devices to do just about everything I mentioned in this review all you have to do is plug it in.
The first workshop I did only days after receiving the demo model was for another Boston photographer who had asked me to help him up his production value during his streams. I watched a couple of videos and did a test run and was able to produce a great workshop for him. It really is that easy of a device to use. Could the workshop have been streamed with just a single camera without the ATEM Mini Pro ISO, of course, but with it I was able to put on such a better experience for his audience. It allowed me to set up live tethering to Lightroom, so people could see the images as he was taking them.
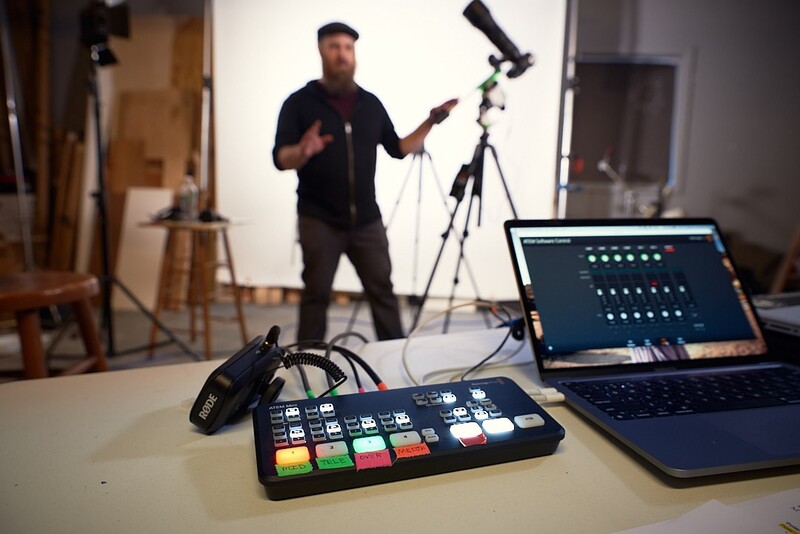
For one of my own workshops, I used a very similar setup just with the ATEM Mini. I was able to have a wide shot of me talking, a second camera setup for tight detail shots on my astrophotography rigs, and a third camera setup as an overhead rig so I could demo the Astro apps I use on my cell phone. I connected two wireless Lav mics one for me and another for my assistant producing the show so he could help with questions etc. The whole setup ran so well that it really took a lot of the stress off my shoulders and I could concentrate on the workshop itself.
What I Liked
- The size and design
- The customer support and updates
- Variety of features and customizability
- Plug and play design
What Could Be Improved
- 4K video (though for most it's probably not needed)
- Multiview on the original Mini
- A way to switch stills on the actual device
After using the demo model I picked one up for myself even though I could just rent one for workshops, I enjoyed using it for all my video calls. I hate doing video conferencing and video or audio issues on both ends can be so frustrating. At $295 I solved all my audio and video problems, can easily use my Canon cameras and wireless Lav mic, and have set up a graphic on the bottom of my video feed that says my name and website. I always get complimented on my video quality and the transitions between video and my desktop content. I realize not everyone needs a switcher for their conferencing calls but I think a lot of people can benefit from incorporating one into their business especially as we transition out of the pandemic. Hopefully, I’ve given you some ideas on how you can use one for your own needs.
I’m looking forward to trying to do some more advanced features. I want to try streaming with wireless HDMI transmitters and get some handheld camera work involved. I’d also like to experiment with cell phone connectivity and try a workshop on location or stream live on an assignment. As I mentioned in the beginning there are considerably more features packed into the software options bundled with the device for controlling Blackmagic Design cameras, audio mixing, and more. But this review is already too long and I hope this covers the overall main features most people will be looking at first. I think there are a lot of great possibilities for photographers to utilize any of the ATEM Mini series devices but what ideas do you have that I might not have thought of?


Join the Fstoppers community for free
-
Post comments and join in the discussions
-
Browse the site ad-free
-
Share your work and get featured in the community
-
Compete in the photo contests for fun and prizes
2 Comments
I have had my Mini for a bit over a month and have used it with a Nikon 850, 500, and Z6II. I added the Rode GOII wireless mics and have had the same experience as you. Later this month I am doing a three-camera live-stream on Zoom for a veterans group. Since the Mini does not have the multi-view for preview, I added my Atomos NinjaV as a preview monitor so I can see the selected camera before sending it live.
Regarding the 4K recording, I have an ATEM Mini Extreme ISO. If you use BMD Cameras, it will shoot BMD RAW 4K or 6K, depending on model, in camera. It uses the same file names as the recorded package, changing to the extension for BRAW.
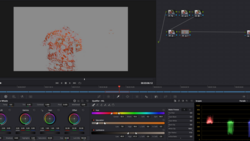
Literally, all you need to do is take the whole Resolve project that’s created, add the BRAW files to the media folder, and when you open the project in Resolve, it uses the 4K/6K files automatically.
You can’t live stream 4K/6K, but you can certainly fix that in post.