Color management in photography and videography extends well beyond display calibration – it includes color control from beginning to end, from capture to final output. In this article, we’ll explore a new tool that helps you ensure that your image capture is well controlled and that your capture device delivers vibrant accurate color – whether you’re using, for example, one camera on set, different cameras in different lighting conditions, or multiple cameras on set at the same time.
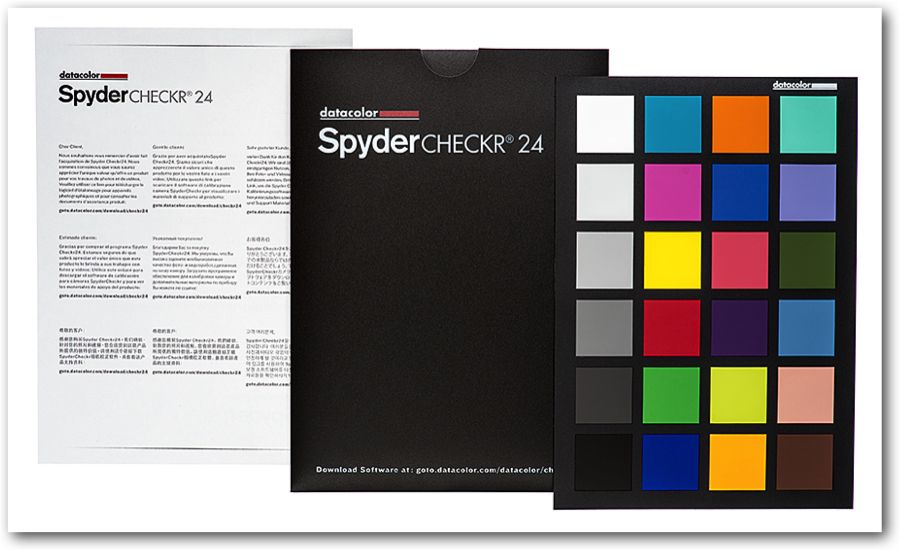
The Datacolor SpyderCHECKR 24 is Datacolor’s latest offering in color management tools for still photographers, videographers, cinematographers, digital imaging technicians, colorists, and more. It consists of a thin, durable chart with 24 spectrally-engineered color patches, a large gray calibration panel, and easy-to-use software – making post-production quicker by giving you consistent, accurate color from your capture devices.
SpyderCHECKR 24 helps you to easily capture consistent color from camera to camera, and from session to session, and apply these results easily in your workflow with software such as Adobe Photoshop, Lightroom, Hasselblad Phocus, and video editors like Davinci Resolve 11.
The SpyderCHECKR software analyzes an image of the target captured with a particular camera and lens combination, and compares it to the known values for each color patch. It uses this analysis to create a calibration that will adjust the values for Hue, Saturation and Luminance in a supported editing application.
Some examples of effective use of the SpyderCHECKR 24:
- Color reference chart for commercial photography and fine art reproduction
- Custom, in-camera white balance for individual or multiple still or video cameras on-set
- Color calibration for still and video cameras
Workflow for Still Photography
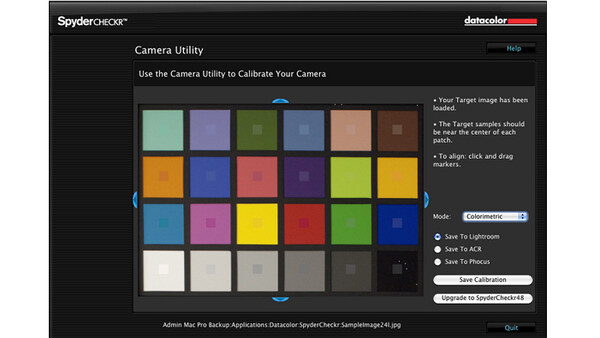
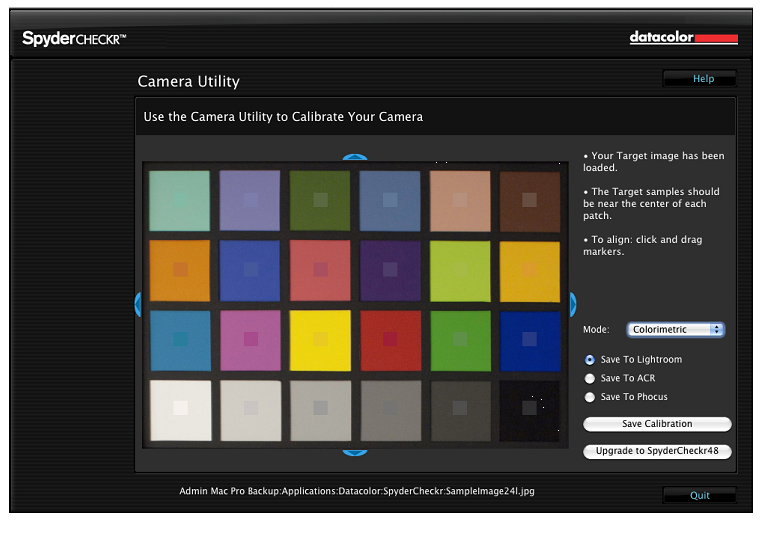
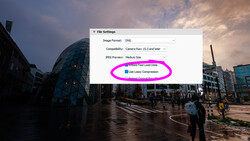
Camera calibration workflow is simple: photograph the color face of the SpyderCHECKR 24, import the image into a supported image editor for basic adjustments, open the image in the SpyderCHECKR software, and export the HSL preset. You can apply this preset during image import or editing.
- Capture the target: The SpyderCHECKR 24 should be evenly lit, no hot spots or shadows. Capture an image, preferably in RAW format.
- Open the image file in Lightroom, ACR, or Phocus, as with any other image (RAW is preferred). Crop to inside the black border of the chart, with no background showing beyond the target. Use the rotate function of the crop tool to straighten the target image.
- Adjust the image: Use the 20% gray patch to gray balance/white balance the image. Use the exposure adjustment tool to set the RGB value of the white patch to approximately 230. Use the Blacks or Shadow adjustment to set the black patch to average RGB value of 10.
- Save the result as a high-bit TIFF file (if you are using a RAW source file).
- Open the new file in the SpyderCHECKR software. Align and straighten.
- Save your calibration to your pre-selected application, like ACR or Lightroom.
- Apply the preset: Relaunch Lightroom, ACR, or Phocus and select an image shot with the same camera/lens combination.
See the SpyderCHECKR 24 web page for details on still and video camera color calibration workflow. Information contained there is expanded beyond the scope of this article.
In-Camera White Balance
Activate the in-camera white balance function on your still or video camera. Using the flip side of the SpyderCHECKR chart, which is a gray target, try to fill the frame through the viewfinder or viewing screen, and set the white balance for the camera. This simple two-step process can be used to harmonize color between cameras used in the same lighting condition. If you change lighting (for example, from indoors to outdoors) just repeat the process.
Video
SpyderCHECKR produces color correction presets for a number of applications, including Lightroom, ACR, and Phocus. It can be used directly in Davinci Resolve 11. These presets are typically applied to still images processed in these applications.
Lightroom and Photoshop can now catalog, clip, and even make basic adjustments to your video. You can use SpyderCHECKR Presets to correct color for your video cameras. This applies to adjusting video capture from different types of cameras, such as GoPro cameras and DSLRs, or different types of DSLRs, to normalize and match their color as closely as possible.
It is possible to apply an existing SpyderCHECKR preset from a still image shot with your camera to a video shot with the same camera. However, since that preset was most likely shot in RAW, and certainly as a still image, its best to start from scratch and shoot the SpyderCHECKR target in a video clip to capture the actual video workflow for color correction.
The SpyderCHECKR 24 is a versatile color management tool, useful to advanced amateurs and professionals alike. Watch an instructional video here.
You can find more information on the SpyderCHECKR 24 and other Datacolor technology on the Datacolor Spyder website.
* * *
David Saffir is a commercial and fine art photographer and printmaker, located in Southern California. His is a well-known speaker and instructor at workshops and conferences across the US.

Join the Fstoppers community for free
-
Post comments and join in the discussions
-
Browse the site ad-free
-
Share your work and get featured in the community
-
Compete in the photo contests for fun and prizes
11 Comments
So this is their version of the X-Rite ColorChecker Passport?
Kind of - it's a budget version for amateur/enthusiast photogs. Half the price, half the number of patches, a bit flimsy.
The Passport equivalent is the $139 SpyderCheckr, with 48 patches and replaceable charts (with fade monitoring). Overkill for someone that just wants to get consistent WB and colors.
http://spyder.datacolor.com/portfolio-view/spydercheckr/
I'm still working out a good naming convention for my Colorchecker Passport profiles.
So far I have Camera_Lens_Filter_Light-shootname.
For example: "5D2_70-200_ND64_Strobe-Smith"
Since the Xrite ColorCheckr isn't compatible with Pentax 645z DNG files, I wonder wether this one will do the trick...
Well since your already in shooting DNG files, all you need to do is manual make your own profile. Download the free app from Adobe, the Adobe DNG Profile Editor. (I convert my Canon RAW to DNG, but your lucky your Pentax uses the DNG Format so you can skip a step of converting form RAW to DNG).
Then for a quick run down of the app watch this: http://youtu.be/CzjcqX-eiXo
For more in depth watch this: http://youtu.be/IrEtS3BnNkU
(theres more online, a lot of people in Pentax Forums discuss using the Profile editor for their DNG files).
I wish there's a solution to have some sort of color profiling for Capture One
Why not modify the ICC profiles based on a colorchart and save them as an import preset.
http://help.phaseone.com/en/CO8/Editing-photos/Working-with-colors/Colo…
"6. Save your calibration to your pre-selected application, like ACR or Lightroom."
Is this implying that the Datacolor app will make an app specific preset, such as for LR, so a program like LR sees it as a native adjustment preset?
That would be useful for a controlled environment like studio work, less useful in the wild.
So to have my profile created i need:
1. Crop to inside the black border of the chart, with no background showing beyond the target.
2. Use the rotate function of the crop tool to straighten the target image.
3. Use the 20% gray patch to gray balance/white balance the image.
4. Use the exposure adjustment tool to set the RGB value of the white patch to approximately 230.
5. Use the Blacks or Shadow adjustment to set the black patch to average RGB value of 10.
6. Save the result as a high-bit TIFF file (if you are using a RAW source file).
7. Open the new file in the SpyderCHECKR software.
8. Align and straighten. Again?!
9. Save your calibration to your pre-selected application, like ACR or Lightroom.
Compare with qpcard please:
1. Open the reference image in QPcalibration.
2. Save the profile!
That's it! http://www.qpcard.com/en_b2c/qpcalibration-instructions/
You just open raw file and save new profile. No croping, no straighten are needed.
Note: I'm just happy user of QPCard and i don't represent the QPcard company!