A little over a year ago I had the opportunity to do my very first celebrity photo shoot with Grammy Award-winner Fatman Scoop at my studio in New Jersey. He had posted on Instagram that he was looking for photographers and videographers to collaborate with. Thinking I had nothing to lose I submitted a brief email expressing my interest and directing him to my website to review my work and to reply back if he liked my work. To my surprise, I received a response a couple of days later asking to schedule a date to shoot!
It was on that day that I saw the power of social media platforms like Instagram to connect you with business opportunities that may otherwise be out of reach, but that's a topic for another day.
Around the time of our first shoot I was starting up my new tutorial series for Adorama TV titled "The Breakdown." As I jotted down ideas for the next few month's worth of episodes I tentatively penciled in "celebrity shoot with Scoop," hoping that I could convince him to come back to the studio and allow me to film the process of shooting portraits with him. With both of our schedules being extremely busy and time passing by, the chances of setting up this shoot were becoming increasingly dim. On a whim I decided to message him and gage his temperature on appearing in a tutorial with me, to which he immediately replied he would. The rest, as they say, is history. With some of the background behind the shoot out of the way, let's delve into the setup for this particular photoshoot.
The Gear
Anytime you are shooting celebrities you have to understand that time is of the essence. I wanted to choose a setup and the right gear that would allow me to work quickly and get the best lighting regardless of how he moved or posed. I decided to use my new Sony a99 II and paired it with the Tamron 85mm f/1.8 lens. If you follow my work at all you probably already know I'm a big fan of shooting portraits with 85mm lenses, and this time was no different. While I own a number of different camera bodies, I decided to use the a99 II due to its speed and high resolution, though I believe the finished results would have been the same using my other camera, the Sony a7R II (which shares the same 42.4-megapixel sensor).
For my lighting I decided to use my trusty Profoto D1 1,000 W/s strobe. I often tell people that the key to becoming a professional photographer is the ability to deliver consistent results shoot after shoot, and this light gives me the best combination of power and consistency that I could find. For my light shaper I reverted to my trusty five-foot octodome. Pairing these two items together gives me the ability to throw soft light onto my subject while allowing the light to wrap around him and light my backdrop. Speaking of backdrops, I was fortunate to get my hands on a new canvas product line from my friends over at Savage. I used their largest size so that he had the liberty to extend his arms out and not have to worry about losing appendages off the sides of the backdrop. It also gave it a very classy look which is what I had envisioned for this shoot. I feathered the light slightly to help light him with the softest light possible and was quite happy with the results.
Camera Settings
My recipe for studio lighting is typically the same for every shoot. After selecting my lighting I dial in my settings to negate the ambient light in the room. For this shoot my aperture needed to be at an aperture of f/13, 1/160 shutter, and ISO 100. These settings without the strobes turned on created a completely dark, underexposed image. With that as my baseline I bring in my light knowing that its the only light affecting the overall exposure. This gives me the flexibility to move it around and shape it as I see fit.
Communication
The key to a successful portrait shoot is communication. This happens not only before the actual shoot, but all throughout. In the video you'll hear me constantly saying "nice," "very good," etc. My goal is to transfer positive vibes and keep him out of his own head so he can comfortably and confidently move from one pose to the next. I oftentimes will say silly things, as I did in this video, all with the goal to keep my subject feeling good about the process. I believe this is the key recipe, above all else, that helps me to get great expressions out of my subjects time in and time out. If your photoshoots are so quiet you can hear a pin drop, I can almost guarantee that your photos will suffer (unless of course you're photographing an inanimate object).
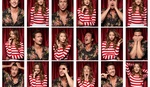
With that all being said check out the final, retouched images from the shoot below. I completed these using Photoshop CC and my favorite creative suite, Alien Skin Exposure X2. With just one click I was able to select the look I wanted (which happened to be one of the Kodachrome presets) to give me a polished final result.
As an added bonus, Fatman Scoop joined in on one of my Facebook Live streams to answer questions about life, business, marketing, and more. I do these Live streams every other week on my Facebook page, and often solicit questions and topics to discuss on the show. Be sure to check it out as I would love for everyone to chime in for future episodes.


Awesome video, enjoyed watching it.
Thanks for checking it out!
Loved the video. Awesome client!
Thank you! Glad you enjoyed it.
I would've like seeing the photos that Fatman took in the out-takes.
I may end up posting them up on my blog. They were pretty terrible ;)
Great work!