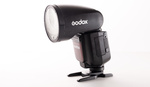
![[Review] The Clever, Durable, And Simple Honl Lighting System Is A Must For Any Small-Flash User](https://cdn.fstoppers.com/styles/large-16-9/s3/wp-content/uploads/2012/05/Honl-review-strobe-flash_jpg.webp)
If you’re a regular user of small flashes, you know how overwhelming it can be when it comes time to purchase modifiers for your lights. One of the more popular systems is David Honl’s line of accessories, based around his Speed Strap concept. I’ve reviewed and tested every piece in the line, and I’ve got all the info you could possibly want.
David Honl has shot for some of the biggest names in the biz – National Geographic, Newsweek, Time, People, and countless others. He was often sent to far-flung, hard-to-access places, such as rural Kazakhstan, Afghanistan, and Iraq, which meant that he had to travel light and be ready to move on a moment’s notice to get to the action and get the shot. Being far from a studio or lacking access fully-loaded Pelican cases with seven foot parabolic umbrellas and Profoto systems, he had to improvise, often making light modifiers out of cardboard, paper and whatever other random bits he could piece together on his speedlites. Over many years and countless trips, David refined his lighting modifiers to become more robust, easier to use, and easier to pack.
After years of making and refining his own modifiers, David had a strong foundation from which to work when he decided to pursue the manufacturing of his lighting modifiers. They’d need to be light, durable, easy to use, easy to pack, all while producing good light. Enter the Honl Photo system: Softboxes, grids, snoots, flags, gobos, gels, you name it. All made with the needs of the traveling, small-flash photographer in mind.
Over the past three months, I’ve used David Honl’s line of speedlight accessories day in and day out, putting them through the ringer to put together a comprehensive review. While I’m an architectural and interiors photographer by trade, I was sure to mix things up to give as detailed of a review as I could.
The entire premise of the Honl Photo system is based around the speedstrap, a rather genius device with soft, fuzzy Velcro on one side and grippy rubber on the other, which is wrapped around the head of a speedlight.

From there, different modifiers can be quickly attached, and the robust Velcro makes sure that they stay put. Something that will be appreciated is the fact that you don’t need to stick any glue or sticky substances to your light to affix the Velcro. I can’t tell you how many hours I’ve spent picking dried glue off of my speedlites. The other neat feature is that there is enough real estate on the Velcro to allow you to stack modifiers: for example, I often use a gel with a grid on the same light, or a gel with a snoot or flag.
So without further adieu, let’s get to work.
Honl Speed Grids
Without a doubt, the one modifier in this system that I use more than any other is the Speed Grid. Coming in both 1/4th inch and 1/8th inch varieties, I’ve used them in at least one image at every single shoot since I’ve owned them. The idea behind a grid is to create a narrow beam of light with a unique falloff pattern, which can be aimed with much more precise control than a bare speedlight. The Speed Grids use a honeycomb-esque material to narrow the beam of light, and it’s the size of each ‘hole’ in the honeycomb material that determines the 1/4th or 1/8th inch designation. The 1/4 inch grids will produce a decently narrow beam of light, but if you want to have pinpoint control over your light, you’ll want the 1/8th grid. I use these mostly for spot accents for architectural images and for rim lights in portraits. Check out the images at the end of the article for examples of how I use the grids. I find that light enhanced with a grid gives a much more interesting look than that of a bare speedlight. You’ll see that they produce a tight beam of light with a nice, even falloff, which is a result of the honeycomb material. This is in contrast to a snoot, which is a modifier that creates a tight beam of light with a more abrupt falloff.

These are some tough little suckers. I’m by no means easy on my gear: it all goes in one giant case, gets thrown in the back of my pickup truck, and is oft neglected (I know, the rough lifestyle of an architectural photographer!). I would have no concerns whatsoever about using these in harsh outdoor environments: all solid plastic, with thick, heavy duty Velcro all over.
Similar to the grids are the snoots. Another modifier used for creating a tight beam of light, snoots are made of a tough, flexible fabric. Unlike the grids, they do not have the honeycomb material inside. The lack of this honeycomb material is responsible for a narrow beam of light with a more abrupt falloff than that of the grid. Another feature of a snoot is that the inside is able to be lined with gold, silver, or white reflective material – very useful for warming up or changing the quality and/or color of light. I’ll oftentimes use the gold-lined snoot to warm up a portrait or add a golden quality of light in a specific area. Like the grids, they are made extremely well, and I’d have no qualms with taking them ‘off-roading,’ so to say. They’re made for serious use and after three months I haven’t seen any fraying, they look as good as new. While they don’t see as much use as my grids, I do find the gold and silver lined snoots nice tools to have in the bag, as they take up little to no space and can double as gobos if needed.


I won’t lie – I love these badboys. I’ve got the 8-inch and 16-inch version, and like the grids, they get used on every shoot of mine. They give the amazing quality of light of a softbox, but they fold up so easily and are so simple to use (as anyone who has used a softbox knows, they can be an absolute nightmare when it comes to using them with speedlights). The quality of light is fabulous, too.

Both of the softboxes are designed in relatively the same way: they’re like giant cones with diffusion material strategically placed within them to soften the light and provide a nice, even spread. The 16-inch version will obviously give a softer light (due to the larger size) but at the expense of ease of use and portability. It’s pretty big when compared to the rest of the Honl modifiers. The 8-inch version, however, is so easy to fold flat, toss into a backpack, and forget it’s even there. I love it for this reason alone. I’ve been unable to find any other modifier that is so easy to pack, and gives such a great quality of light.

Like the rest of the Honl stuff, build quality is top notch, with solid Velcro and durable materials throughout. No fraying or tearing after constant use. I did have one gripe with the larger Traveller, however. Due to the weight, and size, it tends to be a bit finicky with positioning. If you are the type to get it set and leave it, it won’t be a problem, but if you’re constantly moving lights, it may tend to loosen and sag a bit. It uses a clever cord system to keep itself upright, but if you are adjusting the lights and stands, it will tend to loosen, and thus, sag. Just something to be aware of if you’re the type who's always touching their lights.
Honl Gel Filter Kits
A few months ago I reviewed the Rogue Gel Filter Kits and found them to be a great value for the money. I was eager to see how the Honl system would stack up. Both of them are great systems, but they work in different ways. The Rogue kits use a rubber-band like attachment that is pretty secure and reliable. The Honl kit uses Velcro and like the rogue kit, comes in a a multitude of different colors, both for theatrics and color correction. The one thing that I liked more about the Honl Kit was the fact that the gels were a bit bigger, and were able to cover some more real estate on the flash head, ensuring an even coverage, and thus, no light leaking. You can also cut them down to size, if necessary. Other than that – they’re the usual gels, they turn your light into pretty colors. My recommendation? You can’t really go wrong with either. I like how the Honl system is compatible with all the rest of their modifiers. Honl also sells a roll-up bag for convenient storage, which I think is a pretty cool way to easily organize and identify your gels.

Honl Gobos, Bounce Cards and Flags
An often-overlooked, but necessary piece of kit for anyone using off camera lighting, the gobos, flags and bounce cards affix to the flash head via the speedstrap, and are built of a rigid but flexible material. These can be used to either bounce light in a certain direction or to control spill from a light, for example, to prevent it from going into the lens and causing flare when a light is positioned as a rim light behind a model aimed towards the camera. I personally get a lot of use out of these, as one of my favorite lenses is the Canon 17mm TS/E, which is very prone to flare due to the bulbous front element, especially around the edges. Since I often work in tight, confined areas, my lights get awfully close to the edge of the frame, and these little babies are invaluable for preventing flare. They’re also useful when you’re looking to bounce light, but the walls aren’t white – which can cause some ugly color casts and loss of power, which is definitely a common problem when shooting interiors.

Before I get to the conclusion, I’d like to show some photos which illustrate the capabilities of the Honl system. I’ll explain the light setup for each one so you can get a feel for how the Honl system has fit into my shooting style.
For this first shot, I used a 1/4" Speed Grid on a single flash to illuminate the shrubbery and grass around the home. The controlled hard light gives an otherwise unattainable depth to the gardening and foreground. Lights were placed behind trees, as seen on the right hand side of the image, for rim light, as well. I also used the Honl Gel Filter kit to add a half CTO to flash pops which were aimed at certain areas of the house and then later layered in to add an inviting glow to the home.

For the kitchen shot below, I used a Honl snoot with a gold reflective lining to add a warm glow to the oven and backsplash area. The sync speed and aperture effectively killed any light coming from the weak oven hood lights (note how little light is emitted by the fixture in the ceiling), and the added warmth from the snoot gives the image a more believable and inviting quality. You can see that my aim with the snoot wasn't perfect, but I feel that it works all the same. I also bounced a light off the floor for fill and placed a light in the recessed dog food area under the counter to complete the shot.

In the following image, there's a lot going on, and I'll walk you through all the modifiers used. First, I set my camera's white balance to tungsten, and matched my flash with a color correction gel (a full CTO) to keep all of the colors consistent throughout. On top of the CTO gel, I used the 8" Traveller Softbox to illuminate certain areas of interest, for example, the daybeds and the back of the couch, as well as the table and chair legs. I then took off the Traveller Softbox and fitted a 1/8th inch grid to the flash, being sure to leave the gel on, and did some light painting on the planters on the deck to add depth and dimension to an otherwise dark area. These were then composited later in photoshop. Without the modifiers, the added light would have been the wrong color temperature compared to the interior tungsten lighting, the interior would lose its soft, inviting quality, and the light would have been spilling all over the deck when I went to illuminate the planters.

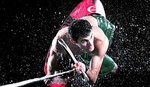
I'll be the first to tell you that I'm not much of a portrait shooter. I spend 99% of my time shooting subjects that don't talk to me, so it's always a little funny when I get together with a model to try and make some pictures happen. For the following image, I used a 16" Traveller Softbox for the model with a Vivitar 285 as key (yep, all the Honl modifiers fit on the fat Vivitar flash heads) and a bare speedlight to illuminate the background. This light looks pretty damn good to me - and with under $200 worth of modifiers. The funny part is that we shot this on a Hasselblad with a Phase One P45 back. One of the cheapest flashes and modifiers, and one incredibly expensive camera. Looks pretty good, doesn't it?

Lastly, another image from the studio. The setup for this was an 8" Traveller Softbox and a Speed Snoot as a hair/rim light. Again, I find the light very impressive for a modifier that can fold up and be tossed in my bag without a second thought for the space that it will take up.

Conclusion
David Honl has created a comprehensive lighting system for photographers who are on the go and need portable, rugged, and most of all, effective modifiers. After using the system extensively, what can I recommend? First off, I think that the Honl Speed Grid system is simply the most effective light modifier that one can buy for a speedlight. I absolutely love mine to bits, and you’d have to pry them from my cold dead hands to get me to give them up. Like I said, I use them on every shoot. They’re indispensable to me, both the 1/4" and 1/8" models. Another favorite of mine is the 8” Traveller softbox. For it’s size and portability it can’t be beat – you can move it right in close to a model for gorgeous soft light, and due to the size, it’s easily moveable, transportable, and quick to set up. The gels are also great – as I mentioned, my favorite feature is the ability to stack them with other modifiers in the system. While there is no incredible feature or gold dust sprinkled on them, they integrate flawlessly and do their job well. The durability and ruggedness of the whole system is impressive, and you can tell that they've been designed to last a long time. I've been shown some cheap Chinese and off-brand copies (especially of the grids and snoots), and while I can't comment on their their build quality, I can say that I've never had an issue with any of my Honl products falling apart. They're the original, and they're rock solid. (And just 24 hours ago, David Hobby of Strobist posted a picture of a Honl Speed Grid being run over by a car with no ill effects).
If you're interested in seeing more technical images of the different qualities of light that each modifier produces, you can check out David Honl's site: There are many comparisons between grid sizes, snoots, and so on, as well as a gallery of images that David has made while using these products in the field with the lighting setup explained in the caption.
Prices range from $9.95 to $149.95, so there is a place in every photographer's budget for these modifiers. You can pick them up at B+H Photo Video or one of many local retailers which carry the Honl Photo system.


Cool review of these amazing products. And incredible examples of your work. My, God, the first image of the home's exterior, is superb. Like David Tejada says, "Small strobes; Big results!"
Thank you for this information. Once again we can keep learning and take better images.
Great, comprehensive review Mike!
- Joe Gunawan
www.fotosiamo.com
SLRLounge.com Editor
Thanks, Joe! :)
Love the Honl products, but when talking about accessories for small flashes, don't forget about the Lumiquest LTP 15" softbox, I use it a lot and wouldn't go out to take strobist portraits on location without it.
Here's the first picture I took using that collapsible softbox: http://flic.kr/p/azWWHJ
A bit of WD40 usually takes the glue residue off pretty quickly if you put it on an old cloth. Got some of the Honl kit but the gels could do with a variety of +Greens rather than just full. Good stuff though.
Nice tip - I never knew!
Great review, and awesome shots!
their gel kit is sick, but too expensive i think....10 bucks for a speed strap for each flash, plus $20 for like 5 gels in the kit...per flash...so $30 per flash, and i have 6...that adds up quick...rather spend $40 on this
http://www.bhphotovideo.com/c/product/292682-REG/LEE_Filters_LOCP_Quick_...
and then do my own velcro fastening system...but i'm wicked cheap...hahah
Honl makes great stuff. We have a handful of those modifiers in our studio.
Hmmm. I wonder if it'll fit on my Sunpak 522.
I love David's stuff and use it all the time but there's a small "gotcha" most review sites fail to discover and report on. On my SB900 flashes, the speedstrap has to be placed carefully as to avoid blocking the flash's filter detector (the dark window underneath the head). Blocking that window results in unreliable flash operation especially when used with PW TT5 as I found out while trying to set up for this shot (first one in the post)
http://studiosolaris.com/blog/archives/688
Moving the strap back just under the filter detector solved the problem ...
Just my two cents.
Bogdan
www.studiosolaris.com/blog
Interesting point! I don't use Nikon, only Canon speedlights, and I didn't get to do any testing with Nikon flashes. So this will be helpful info. Thanks!
This is why I stop by Fstoppers
Do you have any tips on getting the Traveller 16 not to sag. I got one of those and it just won't keep it's shape. It just sags no matter what I try.