
Perfect travel or street photography is a delicate concoction of the right place and the right time mixed with a superb eye for the extraordinary. William J Palank is one of those individuals who managed to brew that concoction with a supernatural elegance. While traversing the globe, his weapon of choice these days is the Leica M9, a digital rangefinder that produces an uncannily beautiful image. To help us celebrate Mirrorless Month, Palank describes what about the Lecia M9 allows him to shoot at his best.
Why the M9? Let's go back in time for a moment. Palank first started out with the Epson RD-1, the first Digital Rangefinder. Along the way he collected a few Leica M-Mount lenses, so as time went by it was a natural progression to get a Leica M8 when it became available, thereby upgrading from a 6 megapixel (remember when that was huge?) to a 10.3 megapixel camera, which was great even with inherent problems such as having to use IR cut filters.
Because his images are undeniably pretty fantastic, Leica bought several of his shots taken from his travels through India and Burma to advertise first the M8 and then the M9. Palank was later invited to the M9 launch in New York in September of 2009. After viewing the large printed images from Cuba with incredible tonal gradations he saw produced with the M9, he knew he had to have one. But in addition to the quality of the images, the size of the M9 really made the difference for him.

Palank is lucky enough to own an Epson 7900 with the Image Print Large Format RIP, so that he can print his images big: up to 22 inches on the short side (he likes to leave a minimum of an inch border). The micro contrast that the Leica lenses produce are nothing short of phenomenal.
"Another thing I love about Leica is that it truly is a family. it wasn’t that long ago that it was very close to going bankrupt. The northern California Rep, Tom Brichta and I have become good friends. In fact we teach many of the Leica North America Akademie Courses together. Unfortunately, he and I won’t be involved in one together until the beginning of next year for a Leica M Monochrom Class." That class is already close to being sold-out.


So what is it like shooting on location with the M9? In short, it makes all the difference.
"Traveling through third world countries, I have noticed a complete difference in the way my subjects react to a small Leica with 50mm Summilux lens, as opposed to a large Canon with f/2.8 L 70-200. The M9 is a compact, simple-to-use camera. It really gets down to the bare bones. When looking through the viewfinder I see the world completely differently. Seeing the frame-lines while keeping my left eye open allows me to see the subject entering and leaving the frame. Since I never use Continuous mode on the camera, it slows me down. I’m more cognizant as to what is in front of me before pushing the shutter. When traveling I typically choose two camera bodies - one as back-up - and three lenses. Comparing the size of a Canon two body kit with two to three Zoom Telephotos to my Leica kit with M8 as back-up and three primes, well... let’s just say it is night and day."
For travel photography, you can imagine how a massive camera can be somewhat intimidadting to the local population. You're not exactly hidden when you whip out a giant telephoto lens on a modern DSLR.
"When in the field away from my base camp and wearing cargo pants, I can hang the camera with lens around my neck and place an extra lens in one pocket "ghetto style" (bubble wrap and a rubber band) and place an extra SD card, battery and lens wipe in another. I constantly see DSLR shooters in the field with huge a camera around their neck and a large heavy backpack. To me that would limit my mobility and prevent me from getting the shot. I just make the lens already on the camera work."
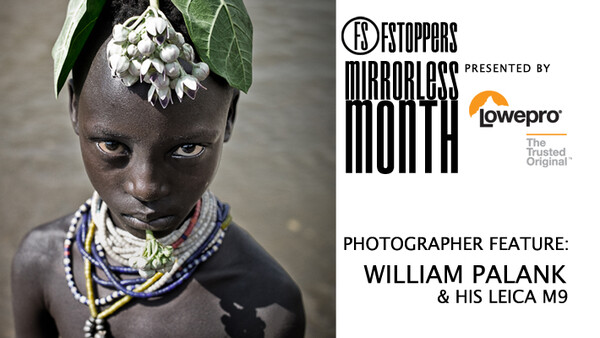
To really explain how using a mirrorless not only works for what he does, but makes what he does possible, let's examine one of his images as well as the backstory to its creation. It's called "Boy with Blood."

Palank was at a Suri Tribe cow Blood Letting, a ceremony practiced by local tribes in Ethiopia, Africa. The blood from the cow or bull veins are used as a food source when the land is dry and the cows are not producing milk. When they started it was pre-dawn and Palank was standing in a shadowy area. He was set up with a Broncolor A2r Pack with Mobilite Strobe and his trusty M9 and a Leica 50mm Summilux lens.
"I watched this small child guzzle close to a liter of frothing blood and just as he was done, the sun broke over my shoulder casting this amazing light over his face. First thing I thought was this would be best with my 35mm lens to catch a little more of the environment."
That would be great, if the moment was going to last a few minutes. Needless to say, it was barely going to last a few seconds. With no time, first Palank took a few steps back (the oldest form of manual focus).
"The Suri tribesman who I had trained to hold the strobe in just the right angle and who didn’t speak a lick of English kept trying to jam the strobe with 5 foot Octa in the kids face. "No need!" I kept saying, and finally I turned the strobe in the opposite direction so he would get the idea. I then had to kneel in a hot steaming pile of bull crap, regain my composure, smile and get the shot."
The image then went on to win this years PDN World in Focus Travel Portrait Category, a contest with over 15,000 submissions.
So what was the point of that story? The point is that you have to adapt immediately to your situation. Palank says that luck often has it that just when something unfolds in front of your eyes you’ll wish you had that other camera or that lens or that light modifier. Just make the seconds count with what you have otherwise that event will disappear and you have nothing to show for it.
"Ideally when entering a village or new location I try to get to know the people and will often just hand my camera to my guide. I’ll sit down and ask them about their family or tell them about mine. I’ll try to get them to laugh. If you accidentally trip and fall, for example, roll around and make a monkey out of yourself. Don’t take things too seriously."


After the image has been captured and Palank has the time to make his final adjustments, he has a workflow he likes to stick to. While on the road, he typically travels with at MacBook Pro loaded with Adobe Lightroom, Photoshop and the Suite of Nik Plugins. These days, he most often finds himself using Color-Efex 4 and Silver Efex Pro 2. He also uses a portable Wacom tablet (awesome retouching devices; we love them!).
"The first tip I will give is that if you plan on using a Nik Filter that has a Structure Slider, don’t use the Clarity Slider in Lightroom or ACR. The Structure slider is smarter as it analyzes each individual image and the fact that you can use control points to make it very localized."
Palank tends to use the Nik filter and paint in the effect with a Wacom tablet in localized areas except for SEP2. "I’m just not a fan of colorized Black and Whites." Once you save the image it goes immediatelly back to Lightroom as a TIFF.
"What a lot of people don’t seem to realize it that all the sliders in the Develop Module are all zeroed out again so that you can even add back a little Clarity at this stage, or even better yet, brush it in with the Adjustment Brush. I’m a vignette fan which goes against a lot of Leica thinking and I typically add it in Lightroom as Post-Crop Vignetting, Highlight Priority with a little bit of Feather."


For those of you who haven't tried out Nik yet, William has the hookup. You can grab any of the Nik software for 15% off if you use the code WPALANK and buy from their official store online.
For more of William Palank's work, head on over to his website.
Special thanks to William Palank for taking the time to speak with me, and Adobe for bringing us together.


26 Comments
I don't understand why anyone would pay $7,000 for that camera. Those photos look alright, but nothing a $700 camera couldn't do.
Have you tried one?
Big reason to buy a Leica is the fact that it's a totally different camera in feel, depth, and (personally) contrast. I've used a Leica once, and I wish I could buy them (but I would use the film ones not the m9 personally). I suggest check one out and renting it, you'll be blown away (if used correctly).
you comment says enough to know you have never shot with an M9 or a Leica with M lenses for a matter of fact... go back to your $700 camera!
You make that sound like not being ripped off is a bad thing.
I don't understand it either, nor do I understand that people are getting hostile when it comes to Leica. For this amount of money you could buy a 1Dx or a D4. Even two 5D MIII or two D800. And let's be honest, you really can take nice photographs with the cameras mentioned.
However, there seems to be something about range finder cameras and I can understand that they are less intimidating when it comes to street photography. But if somebody would give me a Leica for free I would sell it in a heart beat without even shooting with it.
To pull from Palank's quote in this article: “Traveling through third world countries, I have noticed a complete difference in the way my subjects react to a small Leica with 50mm Summilux lens, as opposed to a large Canon with f/2.8 L 70-200."
Not to diminish the photographer's excellent work, nor his good taste in photographic equipment, but some people might make the case that the lack of subject intimidation of the small Leica body and lens would arguably be offset by the presence of that Broncolor pack and head. Just saying...
I agree Kurt the small size of the camera can certainly make some people feel more comfortable.
Kurt, agreed. out of the above images we decided on for the article, only the first one was taken with the Light Set-up. I forgot to mention to Jaron, the Image took First-Place recently (out of 10,000 submissions, me thinks0 and won me an "Around the world Trip". But then again, I had sat with the woman for about 45 minutes before the lights came out.
In many cases they think it is crazy cool and start laughing when the strobe pops and get used to it quickly.
a great camera with a bad photographer is like a helium capsle without a Baumgartner. i mean...look at the editing above. it dont look pro. Sorry! for example...way too much "clearity" in the photo with the asian girl.
yeah, George, I know a lot about bad photographers and their work, one need just do a search:
https://twitter.com/i/#!/georgeSif88/media/slideshow?url=http%3A%2F%2Fy…
I work with real light. if you're going to paint the light in, gotta get the shadows right. ;)
first of all...that pic was shooted 2010. (2008 i started with photography)
my photoshop skills that time were like these of an amateur.
so back then i didnt really know how to paint light :) but i was able to bring the dust from the ground to the air.
real light...! just editing colours and contrast.
Then have the b*lls to post a link to your current work.
Your like a lot of people that criticize on the Leica Forums. they like to dish it out and have no links to their work. You're no better.
Let's see it Georgie, probably rubish like that image. how many camera companies are buying your work Georgie?? Hmmm... a list of tears would be in order as well. (Chances are you don't know what that is either). ;)
http://georgesif.tumblr.com/
i'm in the second year of studying photography. i don't have clients yet.
but what i got is sense of objective criticism.
when i'm criticize i don't criticize Leica i criticize the photo. you know... i'm one of these guys who don't believe everything.
and i am also one of these guys who are able to sharpen a photo without a f***ing halo. so simple. when i'm seeing halos and too much "clearity"...i just can not accept the Leica logo on that pic.
oh and Billy...its just ridiculous that fact that everybody can see the brushes you used in Photoshop!! In the first "photograph" with the black girl.
When you look close enough you can see the path from brushes he used! Come on people it cant be! Thats a big fail...a serious fail for Leica! ...its just sad.
hahahahah
Don't worry about it, William. Students - like teenagers - always like to think they know more than the rest of the world. Hell, in this case, more than PDN jurors, in fact.
i cannot believe someone get featured that way with such bad photographes
I hate it when children fight. though at least we weren't treated to the phrase "I can tell by the pixels"
m
I shoot my black and white images on T-Max film with Leicas, Hasselblads and plastic cameras and my commercial and editorial work with digital gear.
http://www.ManuelloPaganelli.com
And when traveling overseas and to 3rd world nations I prefer my Leicas too for its quietness and small sizes. That said, a great photographer will create wonderful images with any Leica camera as well as a $25 Holga or Diana plastic cameras. Is up to you what you want to work and travel with or what you can afford. You can also be a mediocre photographer yet able to raise to the top if you know photoshop well. The true talent comes when you are able to see the raw footage or work done with analog film without the aid of any photoshop or filters that can turn so-so images into a work of art. But make not mistake, photoshop is here to stay and there is nothing wrong in using it to your advantage. By the wonderful work in here I can see that William J Palank can create great images not only with the Leica M9 but also with a camera worth $200 or $30... even if photoshop or filters are no use at all. You can't buy talent... you are born with it. BTW WIlliam P you dont need to defend your work. It stands on its own and they speak very well for you. Folks one thing I learned long ago is to let my work speak for me.George S. " i mean...look at the editing above. it dont look pro. Sorry!" Who made you a photo critic or photo editor to make comments like this one? I had worked with lots of top pro photo editors and some do like that look. What works for you doesn't work for everybody else. Be careful when you voice your opinion online or tell someone that their work isn't professional at all. Manuello PaganelliLos Angeles California USA
I'm reading this article nine months after the fact. I bought my first Leica about 3 months ago. It's a very difficult camera for me to use, yet the most rewarding. By the way, the photo of the young Asian woman is a touch out of focus, and it is PERFECT! It's not a picture of a woman, it's a photo of the essence of joy.
September 2013 and came across this article. Lovely images by William, tone, composition, editorial substance all there for me. I looked a George's images also and have to say not particularly good IMHO. I don't own a Leica or lust for one but appreciate what photographers like William do with them. Liam, Ireland
Came here four years after, but the thread is still very interesting and actual. I've enjoyed every picture and I've clicked every single link to explore more. I'm on my way to buy (who knows if will really happen) a 10 years old M8 and I've been looking for some sample photos straight out of the camera to see what the camera can do in real life ;) I like PP, don't get me wrong (I'm a big fan of vignetting too), but i like also a great JPG directly from the camera, because sometimes I love to use big DSLRs as point and shot camera ;) Crazy I know ;) Here's a link (if anybody cares) http://poglejsi.wixsite.com/something to some of my pics.
But to get to the point... after weeks of searching I'm still not sure what can an M8 deliver. Yes I found many photos but were converted RAW files... straight out of the camera... yeah right... so I'm still searching ;)
Good light to everybody!
I'm happy to see a particularly subject.