In this article I will be giving some insight behind the creation of my latest video, “Green Heron: A Cinematic Portrait,” which includes dealing with gear limitations, working with music and sound effects, and forming wildlife footage into a story.
Gear Limitations
First, I’m not exactly equipped at the moment as a videographer. However, I do acknowledge I am far better off than many people when they are first interested in making movies simply because I’ve already dug in as a bird stills photographer. Diving into this whole video thing head first and soaking up all the information I can, I’ve read some really disgusting opinions on various online forums about how no one should even bother being out there if they don’t have the proper gear. Unbelievable. On the other hand, I’ve also been catching up on the Master Wildlife Filmmaking podcast and each distinguished professional guest has shared the same sentiment that you start making movies with whatever you have and to not go nuts thinking about the gear. Encouraging.
I have an old tripod that is probably being crushed under the weight of the video head alone. The video head is overloaded and unable to counterbalance the weight of the camera and lens. I also have essentially no audio equipment. Yet, instead of sitting on my hands, I decided to give it a go and play to my strengths. I know what good images of birds look like. I know bird behaviors and what would be interesting to focus on. And if anything, I knew I could at least get my lens pointed at something and lock it off there to film.

Whenever I’d have a green heron in front of me, I’d start off with static shots of the bird doing its thing. If time was available, I would try other things like switching file formats from 4K video to higher frame rate 1080p recording for slow motion. After I got the basics shot, with a patient bird I could move into more ambitious techniques such as panning the camera around with it. Usually this would create a lot of visible shake in the footage with my puny support system, but I knew some of it could be smoothened out in editing. As time went on and I knew I had enough good looking locked off shots, that really allowed me the freedom to make more compelling imagery.
Working With Sound Effects and Music
Without clean audio to work with, I made my own. Using the sound effects library at Epidemic Sound, I found some fitting foley and learned to layer it up and mess around with the equalizer to make it fit to the best of my abilities. Before editing the Green Heron video, I practiced this technique in a previous video shown below along with some Instagram posts.
It was my original intention with the Green Heron video to have added sound effects throughout, but that plan changed after I made a rough cut with only the ambient sound in the beginning. Watching and listening to the cut many times over, I enjoyed it too much to want to keep prodding away at the sound design. There was also the possibility that working above my skill level would be too noticeable and distracting, so pacing myself in this regard was maybe for the best.
Next was dealing with the music. Working with video footage set to music, it’s a challenging act to balance the time limit, the song’s pacing and structure, the story being told, and the pile of clips that could be assembled in infinite ways. For this I was much more prepared having edited a number of popular bikes videos back in the day. It really helps to have most if not all of your clips ready to go for this step rather than starting off an edit and filming more as you go. Seeing the “big picture” with all available options somehow always seems to work itself out once you get going. It will become apparent which clips would work best with the delicate musical buildups or lulls, and which are your grandiose energetic finishers.
Forming a Wildlife Story
As it turned out, just because I had some cool footage didn’t mean that it could fit in with the rest of the video. From a photographer’s perspective it’s much different than nailing a great still image that would stand on its own almost anywhere it’s seen. With wildlife filmmaking, most shots will live or die in editing based on how it can relate with the surrounding video. Some green heron clips that I thought looked pretty great are sitting on the cutting room floor right now due to not flowing with the rest of the story I was trying to share. It’s tough, but necessary.
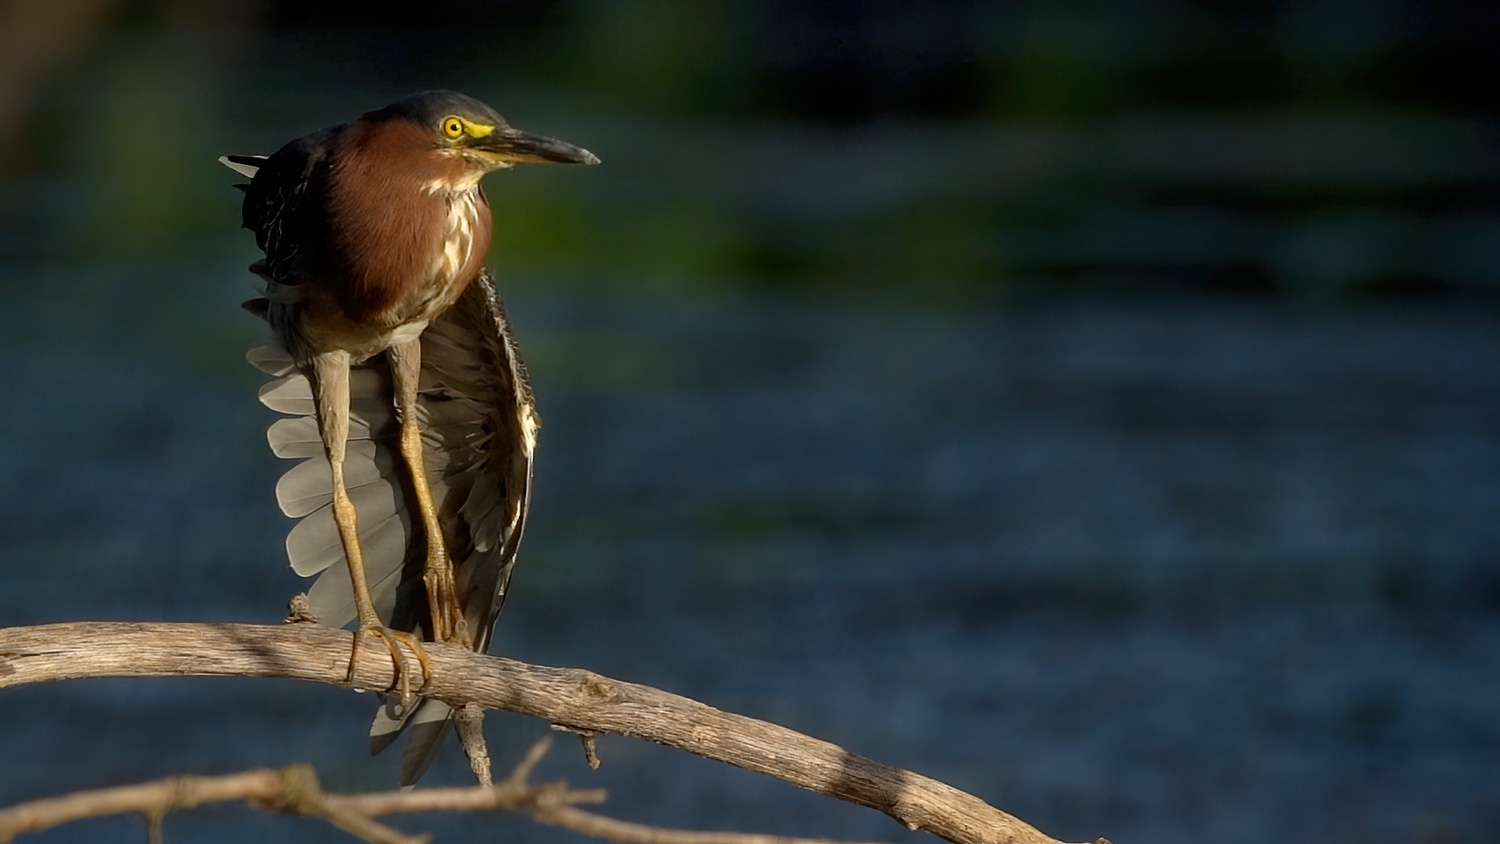
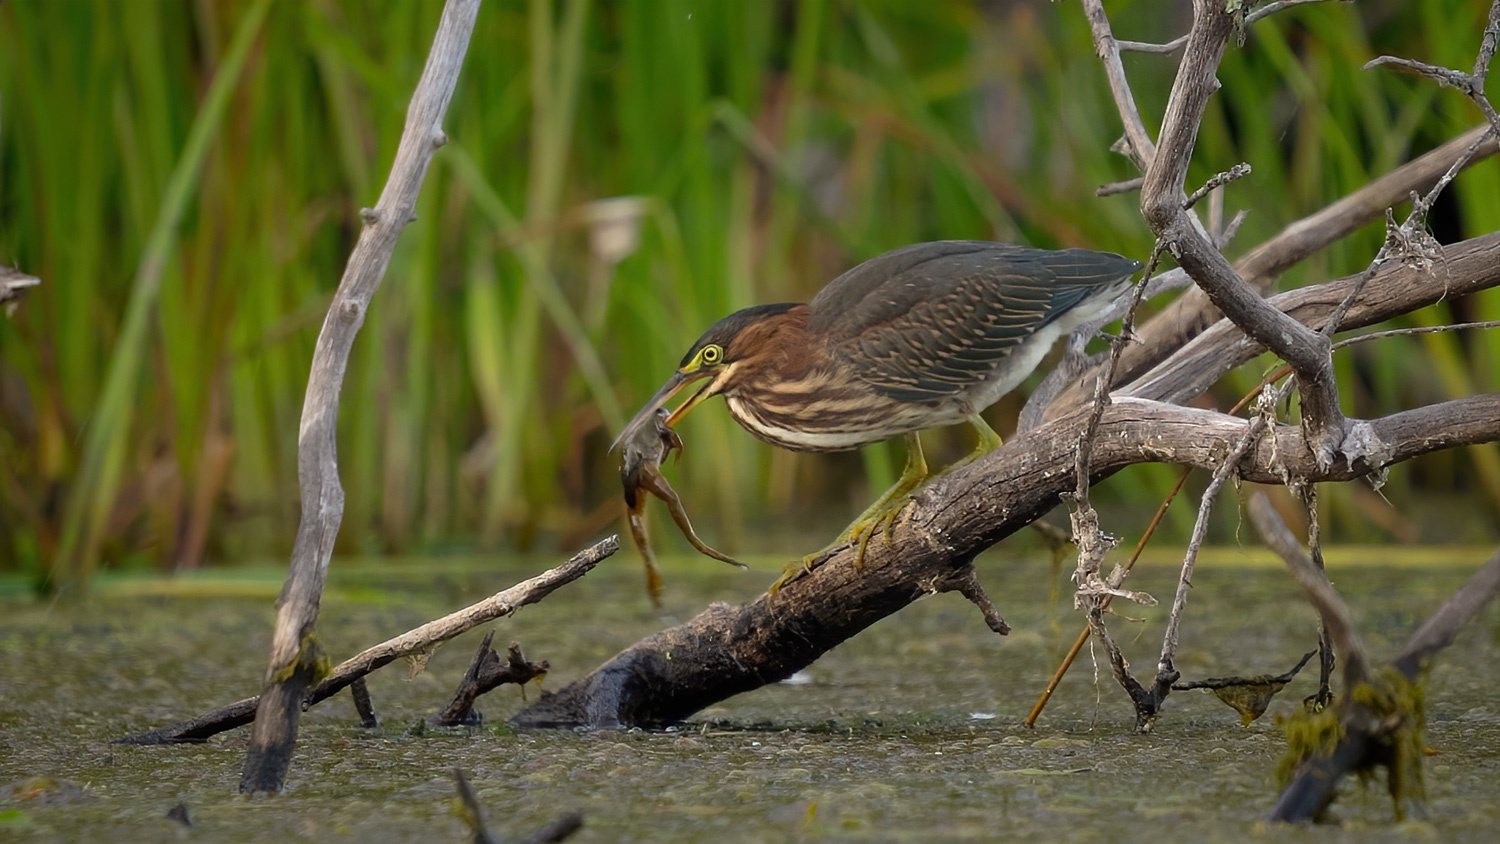
For my Green Heron video, I chose to work my story in three parts. In the introduction, I had some really cool footage of white-tailed deer at the pond that end with them walking past our first glimpse of the main character perched on a log. My thinking was that this would be an intriguing way to establish context with the green heron’s habitat and size with a little bit of build up mixed in. For the next part, I would show their elegance as well as their quirkiness and try to have the video exude their personality that makes them loved by birdwatchers in the first place. Then finally, it’s a classic predator-prey climax to show off their fierce intensity.
For your own wildlife videos, it will likely follow a similar path as many stories like mine do. Lead in with some way to establish the habitat that your animal lives in. Move in to giving the audience some compelling character shots to form a connection. After that add some type of action that acts as the payoff for the building momentum.
In conclusion, if you want to create a cinematic wildlife video don’t be afraid to try things out and tinker with what you already have going for you. Having watched back all my clips individually as I was in the filming process, I’m still kind of shocked how well it all worked out in the end for the final edit. Now, I’m currently filming for my next project and hopefully many more to come.


I enjoyed both your article and the heron movie. The improvement over the deer video was obvious. Your camera movement and skill seemed improved as well. Educational info. but can you tell us what video editing software you used? I like your approach to simplicity. Thanks.
I enjoyed the video (and the heron). The introduction with the deer gave context and drama. Did you use your Sony setup to achieve the accurate focus on the bird's eyes/head?
You did a good job! look just amazing! By the way, the green gull is very similar to a little bittern. this bird is also from the heron family, the smallest heron. Only her color is more variegated. I really like how you managed to convey the character of the bird in this video, the musical accompaniment also deserves special attention. It fits perfectly with what is happening in the frame. especially when the green gull is hunting. immediately visible. that you put a lot of effort into this work, and in the end it paid off. It's very difficult to choose the soundtrack so well and choose the perfect shots for work, shoot it all, edit it. For me, editing is generally something very difficult, only recently came across this site: fastreel.com there are all the necessary tools to work and what is nice - it's free. no need to install anything, the tools are as easy to use as possible. This is a nice bonus considering how much time you spend shooting, choosing a location, etc. Moreover, shooting wild animals is more difficult than working with people, since we cannot agree with the animals about how we want to see them in the frame. you need to study their behavior in order to understand them better and be more able to take good pictures. Again, when it comes to static images, this is a little easier. And video filming is generally a very complicated process. I really like that you were able to solve a technical problem in your work. that they told about all the difficulties. Because the finished video lasts 4 and a half minutes and many do not even imagine how much time and effort it took. And in general, how many more frames were lost. because they didn't fit into the concept of the video. It's great that you told everyone about this. I really liked your video. Thanks for this job!