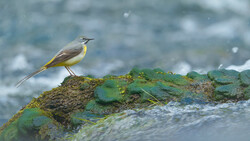
With fast action and rapidly changing backdrops, getting the correct exposure can be a real challenge in bird photography. With the right techniques and a bit of practice, however, you can ensure consistently correct exposures, and this fantastic video tutorial will show you everything you need to know.
Coming to you from Jan Wegener, this excellent video tutorial will show you how to get a proper exposure every time in bird photography. If you have not used it before, auto ISO is one of the most useful functions on modern cameras (and is great for a lot more than bird photography). Auto ISO allows you to set your desired shutter speed and aperture and lets the camera set the ISO according to the lighting conditions, which is quite useful if you are tracking a bird moving through light and shadow more quickly than you can change your settings. This is particularly useful for bird work, as you will often have a set shutter speed for freezing the action and will often use your lens' widest aperture. I like to dial in a bit of negative exposure compensation to protect the highlights just to be safe. Check out the video above for the full rundown from Wegener.

Join the Fstoppers community for free
-
Post comments and join in the discussions
-
Browse the site ad-free
-
Share your work and get featured in the community
-
Compete in the photo contests for fun and prizes
No comments yet