

Fall is here! The leaves around you have hopefully taken on some great colors, but you might not be getting the draw dropping pictures you want. Fortunately, there’s 5 easy tricks you can try and they all work with your phone.
Use Your Sunglasses
If you’ve got a mirrorless or DSLR camera, you can use a polarizing filter on your lens to really bring out the colors in the sky and foliage. On a phone, you can actually use a pair of polarized sunglasses for the same effect! Just make sure to bring your phone’s lens as close as possible to minimize reflections and glare.
Now, if your sunglasses lenses are tinted, you might end up with some strange color effects, but it can still be a fun technique to try out. Depending on how your glasses are polarized, you might even be able to see the effect in real time, by rotating your glasses parallel to your camera lens.
Use Exposure Compensation
Your phone’s camera tries to guess at what the right exposure should be. This combination of settings that determines how bright your picture is can be controlled a number of different ways. If you’re just getting started, you can try using exposure compensation to adjust the image to be brighter or darker.
If you’re photographing some dark red leaves against a dark brown tree trunk, your camera may be adjusting to make the exposure too bright. This can wash out your colors, leaving things looking gray and lifeless. Instead try adjusting your exposure compensation. On an iPhone, tap the screen on your and drag up or down to increase or decrease the brightness of your exposure. For Android, look for the EV slider in your app’s settings.
You can also use your exposure compensation setting for creative effect. Want to get a bright and airy portrait? Just brighten up the exposure and consider reducing your contrast via a photo editing app. You can also turn a shot darker, moodier, or even silhouette your subject by decreasing your exposure.
Learning to control the exposure can help you prevent over or under-exposing your images, both of which can leave your colors looking lifeless. Fortunately, it should be quick to pick up as the phone’s screen gives you an instant preview — just adjust the exposure until it looks right to you.
Editing Apps
On the topic of editing apps, give Snapseed a try! This free app developed by Google offers a versatile range of tools for editing, as well as a number of easy to use presets.
While you can make use of presets, I enjoy putting a custom, deliberate touch on my work. To get started, try the tune image tool or adjust the tone curve. You can try adding saturation to increase the vibrancy of the colors.
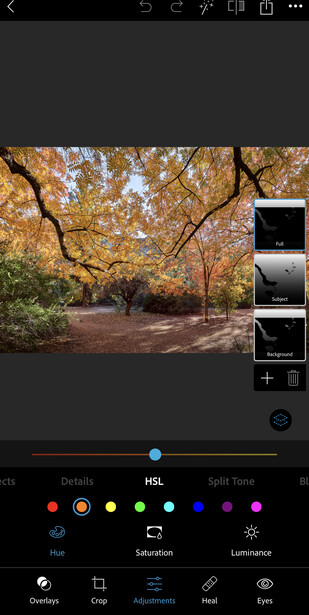
If you’re looking to take your phone-based editing to the next level, consider downloading Adobe Photoshop Express. This app comes from the makers of the best professional photo editing tool and offers a ton of powerful editing tools.
One of the best is the support for HSL adjustments. HSL, referring to hue, saturation, and luminance, allows you to adjust the individual colors in your photo to be a different hue, like making reds more orangish. It also lets you make targeted adjustments to the saturation and brightness, like making a washed out sky more blue.
While the predefined looks aren’t great, as they are really heavy handed, Photoshop Express gives you a lot of editing power, right on your phone. Regardless of which app you chose, making deliberate edits to your photos can open up a lot of new possibilities in photography.
Camera Apps
With all the imaging advancements made by Google and Apple when it comes to the stock camera apps, it might seem unnecessary to seek out an alternative. If you just want to get good photos quickly, or use the smart processing built in, stick to the default app.
If you’re looking for more creative control, however, a camera app can be a nice addition. Since phone cameras have far fewer effective lens and shutter controls, don’t prioritize manual controls. Instead, consider an app that expands the possibilities by adding support for long exposures. Slow Shutter Cam is a popular option.
Another feature to look for is raw support. Raw files can give you more latitude when editing, with the downside of requiring editing to look their best. With a raw file, you can ramp up the saturation further than with a regular JPEG, before you start to get ugly artifacts. I like Halide for this, as it adds a number of other interesting manual controls. Combined with raw support, this can be a great way to learn the fundamentals of photography that’ll transfer to a mirrorless or DSLR camera.
Whether you get into shooting and editing raw files, or just want to make use of some innovative features and controls, consider adding a camera app!
Use Different Focal Lengths
The different lenses on modern smartphone cameras give you more options for composition. While this won’t directly improve your colors, more creative arrangements of the elements in the scene can improve the contrast. Think orange leaves against a blue sky or use the telephoto option to focus in on the yellow leaves and white birch trunks.
Whichever lens you choose, watch out for flare. Flare can be caused by the light bouncing around in your camera’s lens at a weird angle. It might look like oddly colored blobs appearing in dark areas, or just manifest itself as a loss of contrast and quality in some areas. I’ve found that my phone’s camera is particularly susceptible when dirty, so if you’ve got some pocket lint and fingerprints across the lens, give it a quick wipe with a clean, soft cloth.
If the flare is caused by having the sun just inside or outside of your frame, but you don’t want to change the composition, try shading the lens with your hand. Check the screen and use your hand like you’re trying to shade your eyes. Just watch that your hand hasn’t encroached into the frame — if you’re comfortable with Photoshop, you could shoot a frame with and without your hand to blend, but it might just be easier to move your hand out of the way. Whatever the cause or solution, getting rid of unwanted flare can help your photos look their best.


Join the Fstoppers community for free
-
Post comments and join in the discussions
-
Browse the site ad-free
-
Share your work and get featured in the community
-
Compete in the photo contests for fun and prizes
2 Comments
"Now, if your sunglasses lenses are tinted, you might end up with some strange color effects."
I've never heard of clear sunglasses, so I'm assuming they are all tinted. But it may not be an issue -- my experience is that most mobile phones' AWB will mostly negate that. In lieu of sunglasses it may be just as easy to hold a polarizer in front of the lens for the same effect.
There's a significant difference between the color cast from a grey lens and something like Oakley's Prizm line. The phone's AWB won't be able to correct for purple-hued skies. As for just using a regular polarizer, that's obviously preferable, but probably not something many phone photographers have sitting around.