
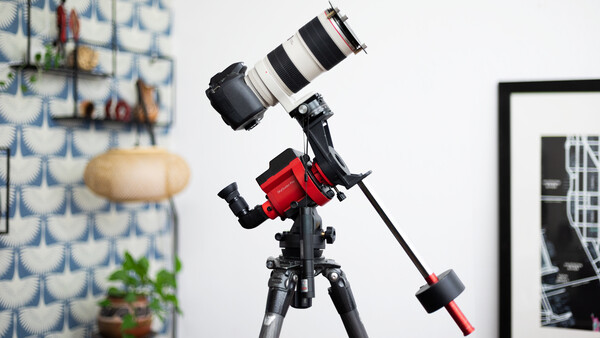
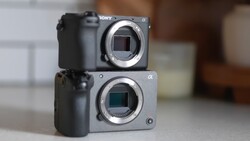
So, you’ve gone out and bought an iOptron SkyGuider Pro. You’ve assembled it, read the instructions, maybe even watched a YouTube video on how to use it, and you’ve got the basics down. But you find yourself wondering if it could be better. Yes, it can be heaps better.
I have been using the SkyGuider Pro for several years now, and it's a great little star-tracking mount, but I ran into a few pain points which I thought could be improved upon.
I want to preface this guide by stating first that you don’t need anything extra to take quality astrophotos with this mount. But in my experience, items that can make the practice of doing something easier are worth consideration. I am more likely to continue to do something if I enjoy it, and all of the items on this list will make the acquisition of images much easier and more enjoyable. I have spent the last couple of years buying and testing various products. and I have found five items that vastly improve the usability of the mount. Remember that these items are optional, and with any luck, you might already have a few kicking around from other projects.
Panning Base With Arca Swiss Clamp
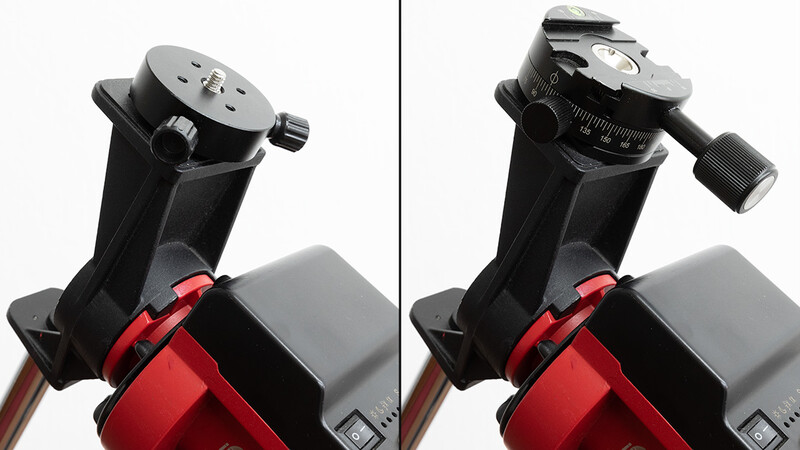
The first revelation I had was that the panning (declination) adapter that comes standard on the top axis of the SkyGuider is pretty terrible to use. The tightening screws kept getting in the way, and it’s not a fluid rotation, which causes the whole setup to jump unexpectedly while rotating around this axis. It just leaves a lot to be desired. So, replacing the standard mounting base with a panning base was essential to alleviate any errors caused while rotating the camera on this axis. As a bonus, the Arca-swiss clamp makes balancing, setup, and teardown a breeze. I searched for "panning base" and bought mine on eBay for $30.
Right-Angle Viewfinder With Polar Scope Adapter

I’m getting older (which is hard for me to admit), and I hated having to get down on one knee to properly polar align the mount. With the camera and everything mounted on top, this was made even more difficult. So, I found a right-angle eyepiece that could be attached to the polar scope. Now, polar aligning is much easier, and I can see all the demarcation lines in the polar scope. The 2.5x zoom on the eyepiece allows for even better fine-tuning. I found the set on Amazon for $70.
Counterweight Extension Bar
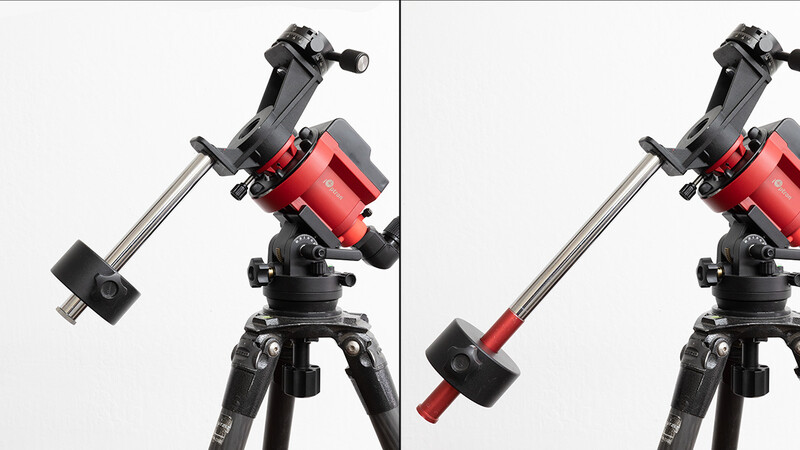
I found out pretty quickly that the lens and camera combo I chose to use for astrophotography was pretty heavy and was nearly impossible to balance correctly with the standard equipment provided. Thankfully, Williams Optics makes an extension bar that allows you to drop the counterweight farther away to allow for more precise (and easier) balancing with heavier loads. This item allows me to use a full frame DSLR with a 100-400mm lens with no balancing issues. Williams Optics sells this for around $30.
Green Laser Pointer

I found that I could increase the speed of my setup and polar aligning by using a laser pointer. It can be tricky finding Polaris in the polar scope without assistance. So, after many frustrating nights trying to eyeball Polaris in the polar scope, I just bought a laser green pointer and shined it through the polar eyepiece. This way, the green laser points at whatever the polar scope sees, so it makes the initial setup much faster. Any green laser will do, you can find them on Amazon for around $20.
*WARNING: Do not use laser pointers while planes or helicopters are flying nearby.
Bahtinov Mask
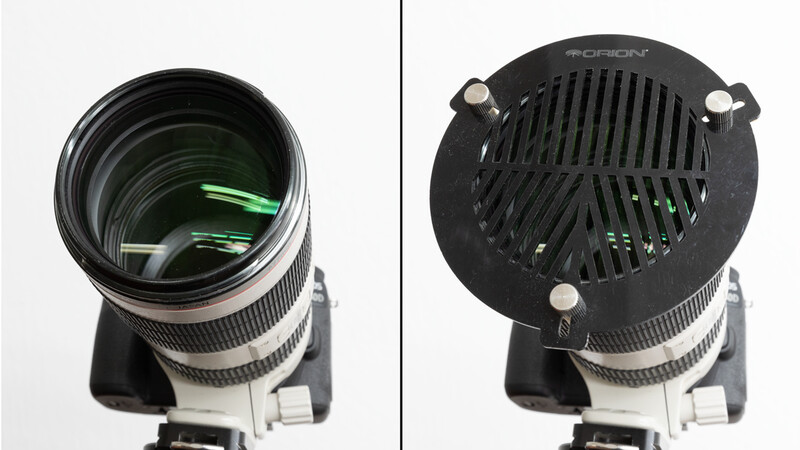
Lastly, if you are struggling to find perfect focus or believe that there’s always room for improvement, then you will want a Bahtinov mask for your lens/scope. There is no cheaper, clearer way to establish the perfect focus that I’m aware of. Just grab one that fits the outer diameter of your lens, slap it in front of everything, and adjust the focus until you see all the diffraction spikes intersecting. You can buy them here.

Join the Fstoppers community for free
-
Post comments and join in the discussions
-
Browse the site ad-free
-
Share your work and get featured in the community
-
Compete in the photo contests for fun and prizes
8 Comments
Just a couple of caveats here:
A) The Arca pan head is a great idea, I did the same, but be careful with Arca mounting bars with large scopes. They tend to bind with a larger, heavier rig and makes balancing in DEC difficult, and you can find yourself loosening it up too far and your rig can fall out. I had a scope and camera slide out of my hands and into the ground once. Lots of fun. I wound up putting a Vixen clamp on a stubby Arca mount that goes on the Arca pan head and I use a Vixen bar to mount the gear. Much better.
B) Do NOT use the counterweight extension bar. The weight will be too far from the center of gravity, and the imbalance will be affecting your tracking. Just look at your image that you posted here and you can see how far it is from the CG compared to the camera and lens that will be mounted on top. Use a second counterweight instead and bring the weights closer. Adding a second counterweight does not affect total load capacity. Ideally you want the weights and camera to be at the same offset, but even when you can't, you want those weights up closer. It will improve your tracking, whether you use autoguiding or not. Reversing the DEC bracket so the long end has the counterweights will allow you better balancing by keeping the camera rig closer to the CG, and also have the rig right-side up when using the polar scope.
You can see an example of what I mean below. I used an additional Arca mount to raise the pan head so the adjustment screws don't hit the Dec bracket locking screw in the rear when rotating. Those Arca knobs in the front in this shot are tightened down with pliers so they are not accidentally loosened in the dark. Only the Vixen clamp set screw and the pan head rotational set screw (in the rear of this shot) are adjustable.
Nice! Thanks for the reply! I cant believe I've never heard of the moment of inertia argument for more weights closer to the center of mass. Thanks for sharing!
Agree with Spy Black. And I would only add... Don't forget to read the SGP Bible at https://www.cloudynights.com/topic/610488-skyguider-pro-fun-topic-info-… 🤣
- A Polemaster in the center can also be a good addition for an even more portable setup (I hate also to use the polar scope)
- I tried the pan head trick and gave up after trying 3 pan heads because they were still moving a little bit even when locked and it was hard to tighten them on the bracket so that they do not unscrew. I have more confidence in the WO Dec enhanced with a clamp and some lubrication.
I found the W.O, DEC adapter to have even more stiction and binding than the standard iOptron DEC adapter. That's why I went with the combination Arca pan head and W.O. Vixen bracket. The Arca rotation is silky smooth. If I feel I need to tighten the rotation set screw tighter, I use a mini Channellock I picked up at Home Depot for around $5-10.
Can anyone tell me which size bahtinov filter I need for a Canon 400mm f/5.6? Planning solar eclipse.
According to the specifications, the lens hood's outside diameter is 90mm, or 3.5", so you can look for a mask that covers this diameter. You can also find many 3D models on thingiverse.com that you could have 3D printed by a friend. That would probably end up cheaper than purchasing a brand Bahtinov mask.
However... it will not do for a solar eclipse. The Bahtinov mask is used to focus on a bright star. The diameter of the sun will not produce the nice diffraction spikes you would need to focus. Even on bright planets such as Jupiter or Saturn, it will not produce a nice result at 400mm. The source of light must be just a point, not a disk. The tighter, the better. It can also not be used during daytime. So, it is great tool for nighttime photography but won't do for the solar eclipse, I'm afraid.
What size screw is used to mount the panning base to the weight bracket? Is it best to go from base to bracket using a flat headed screw?
Hey Matt,
The screw came in the box with the skyguider pro. its a 3/8 inch screw with a length of about an inch if I had to guess