We've posted about commercial photographer Eric Doggett on here before. You may recall his popular post about how he put together his family's Back to the Future Christmas card. He goes out of his way to create some of the most creative holiday cards I've ever seen. Eric uses a creative arsenal including set-building, 3D modeling, Photoshop, photography, and graphic design to create unique one-off pieces for his clients. Read below to learn how he used ALL of these tools to create a fantastic Star Wars Christmas card.
Eric Doggett tells Fstoppers his story:

Every year I have a ton of fun creating Christmas cards for clients. A few years ago, I shared here some behind-the-scenes details on our family’s Back to the Future card. This year, we decided to go Star Wars! It was an idea I thought of in 2013 (at the end of each year I create a calendar event for November 1st of the next year, listing several ideas I thought might be cool for the next Christmas card. I recommend you try that as well to keep track of great ideas).
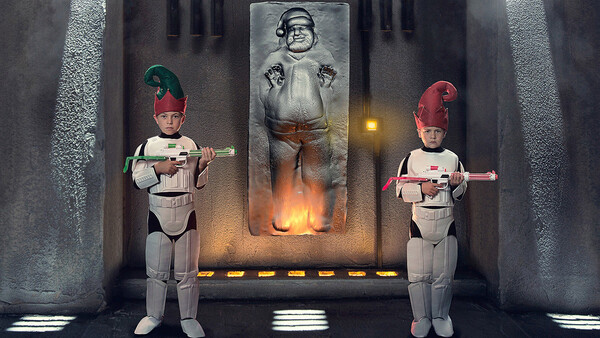
The idea was to recreate a scene from Jabba’s palace, with Han Solo frozen in carbonite. However in our version, Solo would be replaced with Santa, and he would be guarded by my two boys dressed as Imperial Elves.
When I thought about how to create this image, one of my early thoughts was to build it all in 3d using Cinema 4D. But I was a little out of practice with C4D to get that done in any reasonable amount of time. So, I decided to build a miniature set, photograph it, and then composite the kids into it. Santa would be created in 3D though.
Building a Set
To do this, I started with balsa wood. It’s cheap and it’s easy to cut (especially when it’s thin). You can find all sorts of shapes and sizes at Michael’s or Hobby Lobby. I didn’t have any plans/reference materials other than photos I found online, so I kind of eyeballed the dimensions that I wanted.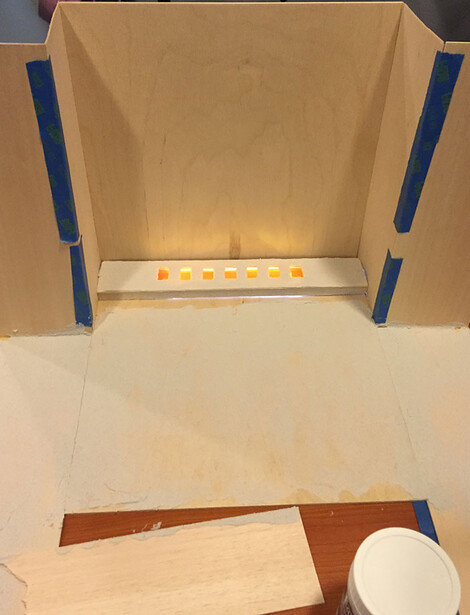
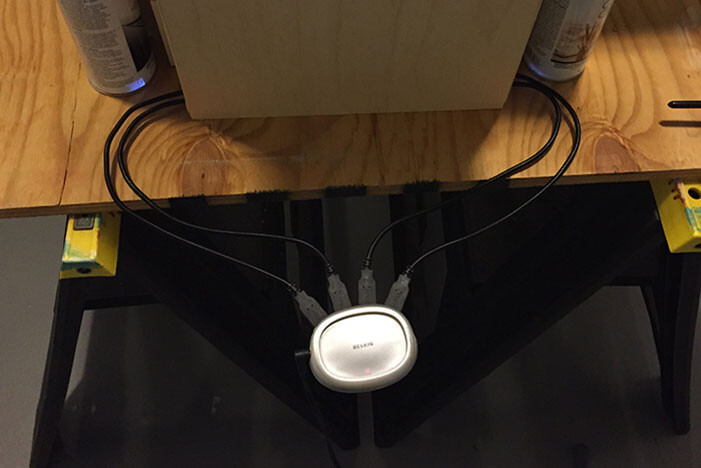
In the shot above you can see the set under construction. I used blue painters tape to hold pieces together while I tested out the shapes. You can also see some rudimentary lighting on the back platform. To create this, I used some USB LED lights, plugged into an old USB hub. The lights snaked around from the back into the platform, and I gelled the open slits orange.
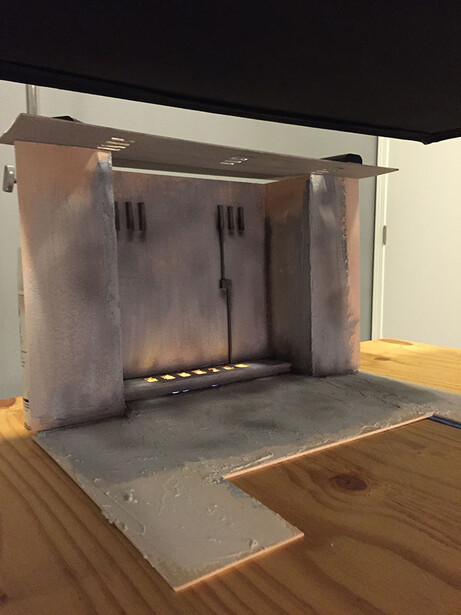
To create the cement texture, I used Ceramic Stucco by Liquitex. It comes in a tub and applies like a thick paste. It can give a nice concrete look to something this size. Just be sure to use an old brush that you won’t need afterwards to apply it, because as soon as it starts to dry it’s difficult to clean out of a brush. I also used a large flat piece of balsa wood as a type of trowel to even out overlapped areas.

To paint the room, I first put down a grey base coat of Liquitex Basics paint. Once the grey was done, I went over different areas with an air brush, painting a dark shading grey to simulate a worn look. I also painted the individual pipe pieces and glued them on with Elmer’s wood glue.
At this point, things were looking pretty good, but I noticed that as the paint and cement dried, it started to curl the wood slightly. Looking back I’m not really surprised, as I’m sure the wood was soaking up moisture and was having a hard time keeping its shape. I used some clamps and extra pieces of wood to help keep the shapes. It’s a tradeoff between using wood that is thicker and wouldn’t have this problem vs. using wood that’s simple, thin, and easy to cut. I went with the latter :)
Lighting
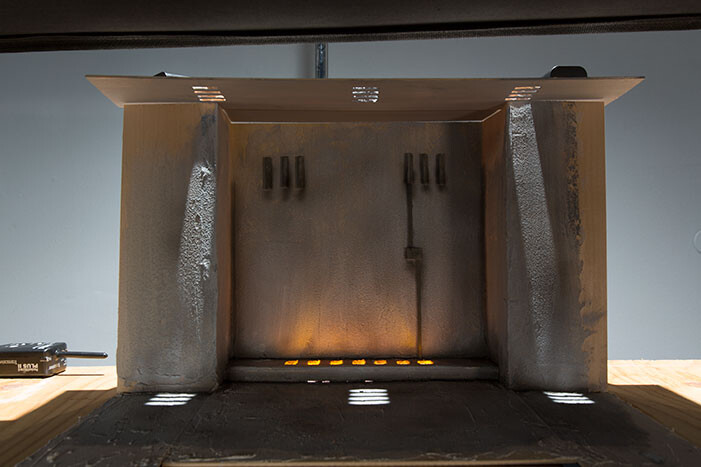
At this point with the set built, it’s time to light it. When you look at the movie, there’s a generic fill to the scene, and there’s also light coming from open vents in the ceiling. I wanted that look, so I created a ceiling piece with slits in it. While it’s easy to light through those slits from above, to sell it well the light needed to rake down the walls to the floor. So, I subtely adjusted the ceiling inch by inch until the light hit both walls somewhat evenly. Here’s a shot of the set: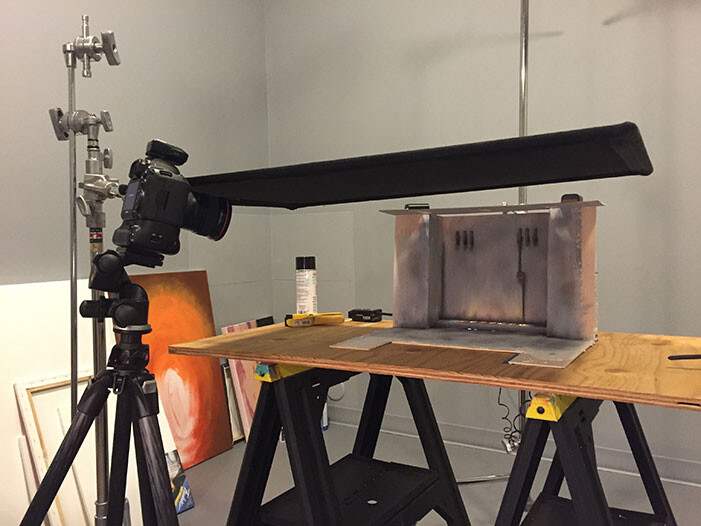
And here’s a lighting diagram:
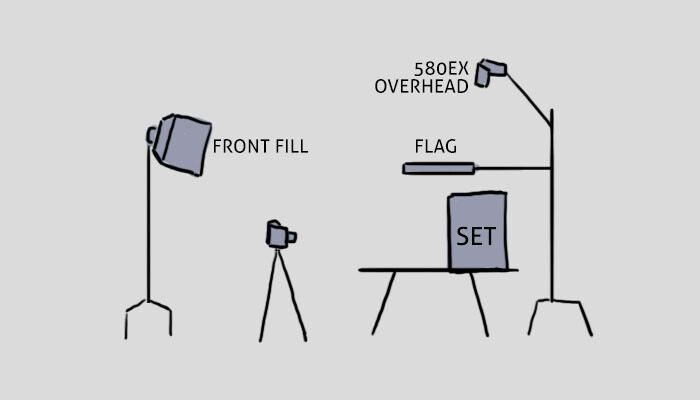
The black flag across the top controls spill from the 580 flash above so that it only lights through the ceiling slits.
I went through a couple different compositional options. At first I thought that an off-axis shot would work, but ultimately I decided to shoot head-on, as this gave a nice symmetry to the look:
To get a nice balance between the flashes and the orange glow of the platform, I put the camera on a tripod and set it for a long exposure to allow the platform light to ‘burn in’. The exposure ended up being 3.2 seconds at f/10 with an ISO of 100. I photographed it at 35mm.
Rendering Santa
To create Santa’s frozen body, I first thought I would create it completely in ZBrush and then render it in C4D. However while searching the web I found a 3D model of Han Solo in carbonite that I was able to use as a basis for Santa. Using Cinema’s sculpting tools, I pulled and pushed parts of the body to give him more of a ‘jolly’ appearance.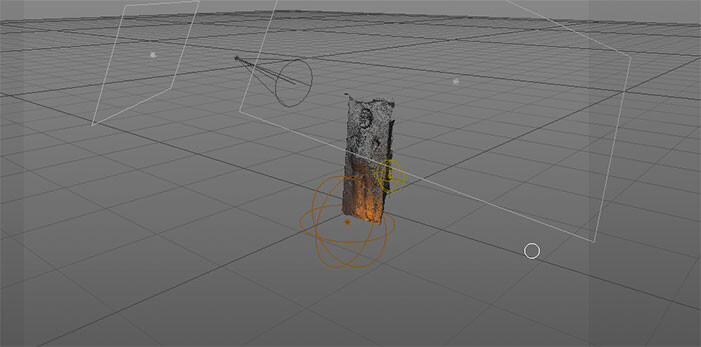

What I like most is that there are still hints of Han Solo in the face.
I gave him a basic metal texture and then lit him in Cinema to match the scene. Lastly I created a camera with similar settings to my real-world camera: 50mm, F/10.
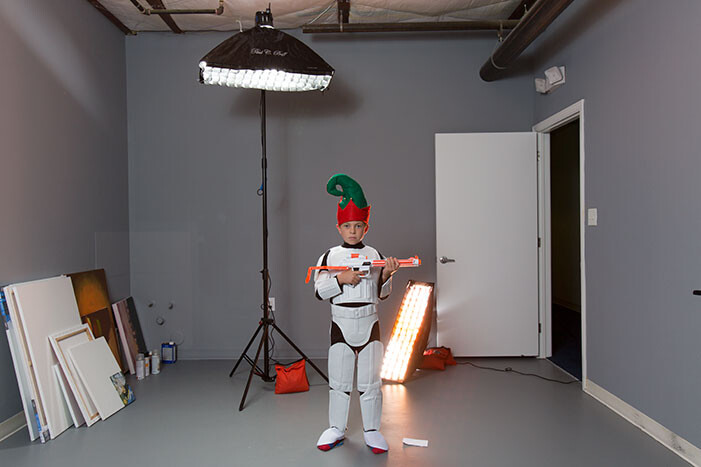
Photographing the Subjects
To photograph my boys, I created a simple lighting setup with a main light camera-left, an overhead light to simulate the ceiling slit light in the room, and a floor light, gelled orange, to simulate the glow from the platform behind them. I photographed one kid and then flipped the orange light to the other side for the other kid.When shooting for a composite, the biggest problem you will run into is where the feet touch the ground in the composited image. This can either make or break your image. If you aren’t shooting close to the same height, lens, and angle, the feet won’t look like they are standing in the scene correctly. Normally when I shoot these types of images I will take measurements, or add in visual ‘landmarks’ to help me line up everything later. However in this case it wasn’t that much of a problem as the costume they were wearing had ‘pretend feet’ (sort of a cover for their shoes underneath.) They didn’t look that real, so all I had to do was keep the camera level in both shots, and it worked.
Retouching
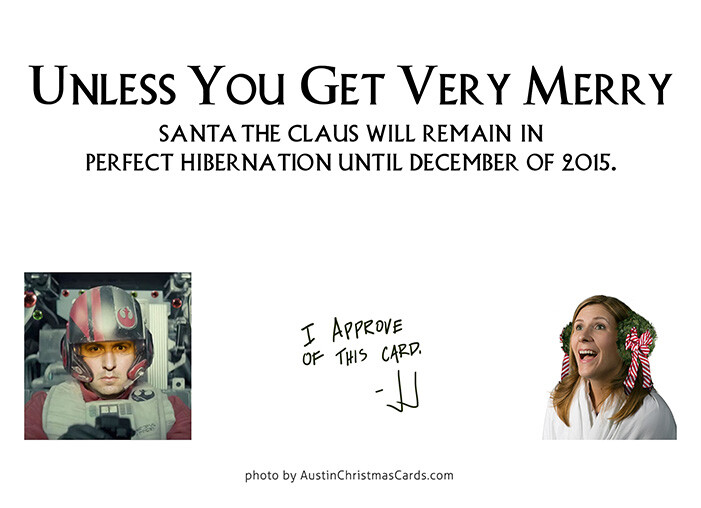
With everything photographed, I headed into Photoshop to do the composite. I did some clean up work for the walls and platform lights (balsa wood can chip a little, and those chips will show up at this scale). I extended the pipes at the top and added a light to the box on the wall. I also added some smoke using some smoke brushes (I think I found those on DeviantArt).One of my clients came up with the tagline for the back. I added myself into a scene from the new trailer, and I photographed my wife as a funny Princess Leia. I also added a little bit of ‘approval’ from J.J. Abrams (and if anyone out there can get his thoughts on this card, I’d love to hear them :) ).
Looking back, I can’t think of much I would do different. At about 18 inches tall, the set was a good size and didn’t need to be any bigger or smaller. I still think I got it done quicker than doing it all in Cinema 4D.
It’s been well-received among our family and friends (especially the Star Wars junkies). I don’t know what we’ll do next year, but it will be hard to top this!
If you’d like to see more of my work, check out my holiday card portfolio at austinchristmascards.com. This year’s work is starting to show up there, as well as voting soon for the upcoming Refrigerator Award. This is an annual contest where I award a trophy to the client who’s card gets the most votes. I’m excited to see who wins for 2014.

You can also find my commercial work at doggettstudios.com. Thanks!!
Eric
Make sure to check out his work:


2 Comments
Awesome job as usual Eric!! Glad to have gotten one in the mail this year!
Ok, that's just awesome! How do I get on that Christmas card list? :)