
I pride myself on bringing ideas to life using minimal equipment and whilst working on low budgets. I’m also in the process of setting up my second photography-related business, so I don’t currently have a ton of expendable income to splash on new gear. However, I recently invested in a cheap set of portable lights I found on eBay for a little over $200. Here I showcase a casual menswear editorial I shot using the lights and an inexpensive kit lens, as well as outline what you get for your money, how exactly I used the lights, and how you, too, can shoot professional images without breaking the bank.
Making a New Investment
Historically, I’ve always been a fan of soft light. Starting out as a newbie, I was shooting outdoors - mostly because I love the effect of natural light, but also due to a lack of access to photographic equipment and studios. Even when I started shooting indoors, I favored continuous light, using these (also inexpensive) set of 15-build, 2850W lights. But seven years into taking photos, I’ve been wanting to experiment more than ever. I’ve always been an advocate of learning through doing, so I started scouring the web for new equipment to try shooting with. Around the same time, I also noticed a change in the types of images I was enjoying looking at from other photographers: for the first time, many of the photos I was landing on had clearly been shot with some kind of flash or strobe lighting, and I decided it was time to give it a go myself. Concerned that flash really wouldn’t gel with my style of shooting, I was initially reluctant to spend.
I’ve never been much of a fan of studio images, although over the last few years I’ve been shooting a lot more at indoor locations. It’s stemmed mostly from being hired for important client or celebrity shoots, which often have a large team and a strict timeframe and, as such, can’t afford to be rescheduled due to bad weather.
Favoring soft light to replicate that of the natural light I was used to, I’ve always used the aforementioned set of continuous lights for indoor/low light shoots. What I liked about that set was that it meant I could continue snapping without any reload time – they were continuously lighting my subject. Another bonus was that I’ve always felt they were less intrusive on sensitive eyes; sure, they’re bright, but after a few minutes the eyes adjust accordingly and, again, I could keep snapping rapidly without worrying about blinding my subject.
Value for money
Pleased with the performance of the continuous lights (also from eBay), I decided to take another look there and see what was on offer in the way of strobes. Scrolling through the results, there were a variety of options, and I was certainly conscious that you get what you pay for. I didn’t want to splash out, but I didn’t want to buy twice, either. How cheap is too cheap?
Some of the offers were significantly lower in price than the set I eventually purchased, and many included a number of accessories such as backdrops with accompanying stands. I went for the middle ground and bought a set for £188 – around $230 with today’s currency rates.
The set included the following equipment:
3 x P-300 Lamps with UK power cable
3 x 190cm Heavy Weight Light Stand
1 x White shoot through Umbrellas
1 x Silver Reflective Umbrella
1 x Barn doors set with gels and honeycomb
2 x 50cm x 70cm Softbox with metal rods and nibs
1 x 4Ch Trigger set
1 x Kit bag
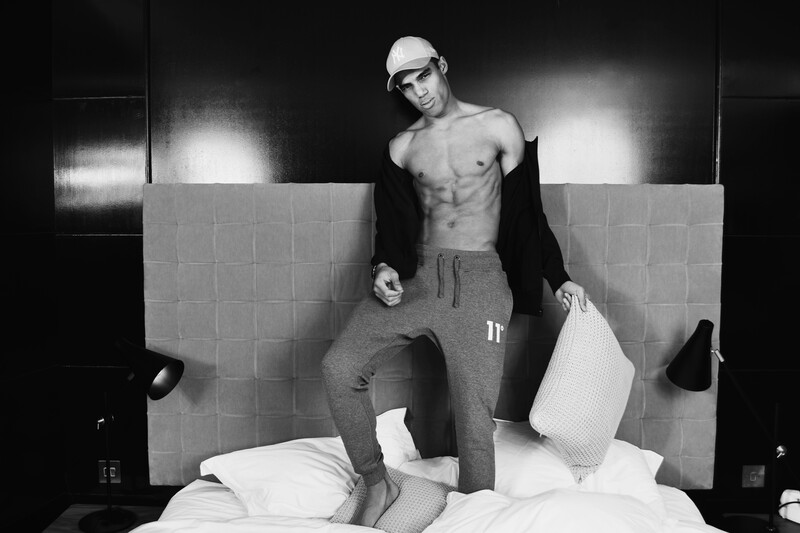
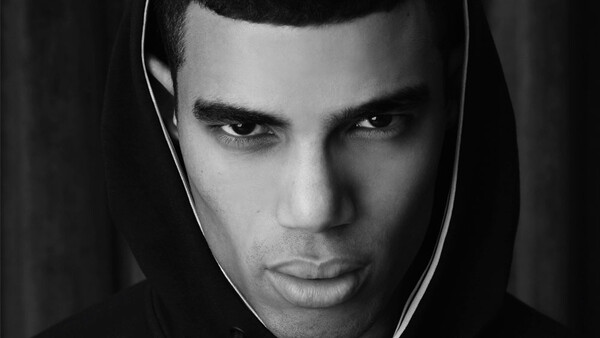
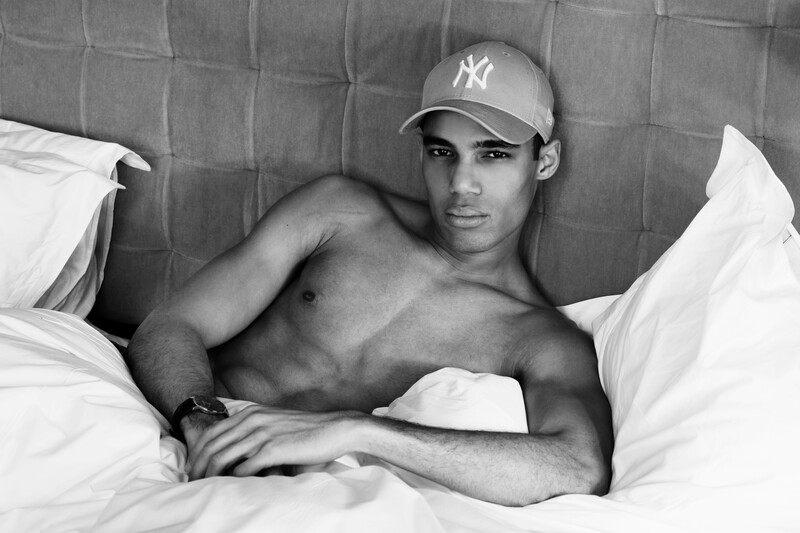
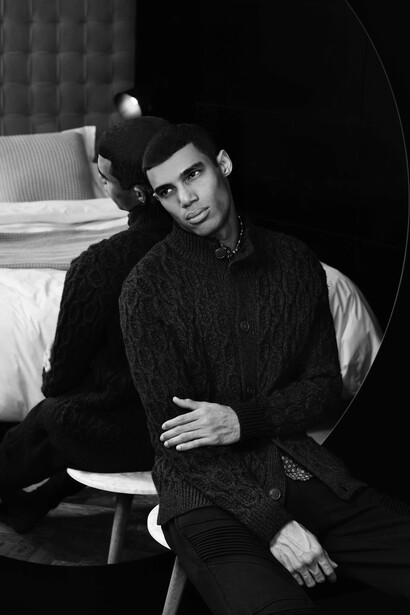
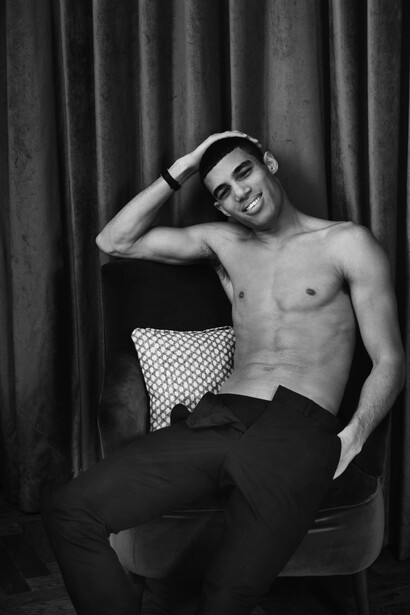
For the images featured within this article, I used two of the three P-300 lamps; one with the white umbrella, the other the silver. I tested the lights out earlier in the week (my living room has never looked better) and found that using two lights was more than enough to adequately light a large area – and certainly enough to light one male model, as per my subject on the day. The set takes no more than five minutes to set up, with simple controls that make for easy adjustments to get your preferred light setting right. Even with my lack of strobe knowledge, I was able to set it up without issue.
One lamp was enough to adequately light my subjects face and, depending on where it was positioned, could evenly spread the light, or created a half-shadow effect - perfect if you're looking to create something a little more dramatic. The above image was taken with the 18-55mm kit lens, using two lamps to evenly spread the light out across a larger area.
Keeping Your Options Open
What I particularly liked about using these lights was the versatility it allowed me in lens choice. For years, I have heaped praise on the 50mm - and I still do, it’s fantastic. For portrait work – my speciality – it ticks many boxes. It’s played a large role in molding what I feel is my signature style, but at the same time I couldn’t help but think a lot of my images were beginning to look the same. So in many ways, part of the motivation behind purchasing these lights was because I was looking for a change in my shooting style. I’m working at a level now where I need to be confident shooting a multitude of different lighting set-ups; there’s no excuse to shy away from the unknown. I’d become set in my ways; I was using the same lens and lighting style for everything I worked on.
These strobes are significantly stronger than my set of continuous lights. It meant, for the first time in a long time, I had more options than just using my 50mm, which is of course notorious for performing great in low light. In continuing with my usage of inexpensive equipment, I decided to shoot with the very basic kit lens of 18-55mm – the very one that came with my very first DSLR, a Nikon D60 back in 2009. Brighter lights meant being able to use this zoom lens, which of course doesn’t have as great a versatility with its f-stop options as a prime lens like the 50mm.
The 18-55mm is a lens I imagine many will scoff at, and admittedly not one I use all that often but, to me, the results still match that of a lens several times its value.
In Conclusion
There’s a lot of snobbery within the photography community. It’s easy to feel embarrassed about the kit you’re using, intimidated by what someone else is using, and possible to think the ideas in your head simply can’t come to fruition with the inexpensive equipment you have access to. But that doesn’t have to be the case. There’s so much more to it, and hopefully these images help to prove that. Would I love to one day own state-of-the-art equipment that costs 10 times the price of these strobes? Sure. But using equipment that doesn’t cost a fortune is a great chance to hone your skills – which will prove significantly more valuable than any equipment in the long run.
See more of my personal work here, Mason’s portfolio here, and the full editorial on the magazine’s website here.
This article is not a sponsored piece, nor was I paid or compensated by eBay or any of the sellers.


Join the Fstoppers community for free
-
Post comments and join in the discussions
-
Browse the site ad-free
-
Share your work and get featured in the community
-
Compete in the photo contests for fun and prizes
7 Comments
A lot of times, fellow photographers underestimate kit lens (18-55 versions mostly), and go straight to f/2.8 version without even trying to use the kit lens, and spending cash for a more expensive piece of glass even if they don't have any advantage from it. Modern kit lenses are pretty sharp, and if you stop down aperture, you get almost the same photo like you would with a $500 or more expensive lens.
It depends on what you want out of the lens. Studio portraits aren't really very technically complex as far as lens choice goes.
Several decades ago, I bought a 4WD truck. Not knowing anything about them I bought a book on the subject. It said, 'a 2WD truck can go 95% of the places you'd ever take a 4WD truck.' I found that to be the case then and, perhaps aside from the percentages, it's the case for photography gear now. If I had a kit lens, I'd still take photos but I'd rather have the best glass I can afford...for the 5% :-)
Love it! I love articles/examples like this. If you can get great stuff with less-than-stellar kit I think it encourages photographers who don't have the better gear yet + reinforce that whole thing about gear not being as important as the idea/eye/light + certainly you could do as good-if-not-better with better gear.
Great article!
Thanks very much!
Good article. Im a fan of picking up gear as other photographers trade up on eBay. My first set of studio lights were a 3 x500ws kit with stands, softboxes etc in a roller bag for a good price after the owner went onto B1s. I can't complain with them they're faultless and more than I need.
I agree with how this article supports the idea that you don't need expensive kit to accomplish an image. However, I think this is only half the message, which is; use the right tool for the job! Many, many magazine covers were shot with 35mm format film before digital became the dominant format, which means you don't need a 50mp image to accomplish this. In terms of lighting, Raphael (the painter...) had a door in his roof, and positioned his subjects so that that light was ideal for what he was trying to accomplish. So, I think the message should be, if you're just starting out, use what you have to the best of your ability. But, as you grow in your skill, learn what something better can bring you, and make decisions about what camera, lighting, etc. you use based on what you are trying to accomplish, and what output you need to deliver.