For those of you who don't know who Pratik Naik is, you're missing out on an extremely talented and witty retoucher with immense talent. Known by many as Solstice Retouch, his work is seen around the world in many a marketing campaign and commercial work. A little over a year ago now, Pratik started his youtube channel, under the name 'Solstice Retouch' and has posted a variety of different video types ranging from time-lapse videos of his retouching of work, some gear reviews and thoughts, and additionally some downright comical videos. Just recently though he posted a video of his review of the demo of 3D LUT Creator.
In Pratik's video, he talks about the power of 3D LUT Creator, saying 'it shifts colors in a way that's not possible in photoshop.' Anyone that's tried to do any drastic shifts of color across a scene will immediately go to curves, or selective color, or anything of that nature, and especially if you're trying to isolate a specific color range, like reds or yellows, then the way you have to do it is either via very selective and tedious masking, or via the selective color adjustment layer. For anyone that's used these techniques, it takes a great level of skill, dedication, and in most cases patience to really be able to achieve a result that is satisfying. Frequently though, you're subjected to banding, odd edges, and other unfortunate side effects that lend themselves to the destruction of some images.
It should be noted at this point that this video is NOT a tutorial on coloring in photographs, but more a demonstration of the efficiency and power of the program.
Simplicity
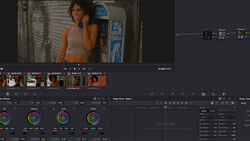
Now many a photographer have had an image, and have done all their retouching, and come to the end and thought, "I really like that, but it would be better if that thingymabob, (official scientific term) was a slightly different hue or intensity." On screen right you can actually see the photo that Pratik is demonstrating on, which is shot by none other than the amazingly talented Bella Kotak, and on the left, a large color space with a spider web mesh over it. As Pratik hovers his cursor over various sections of the photo, you can see a marker popping up on a junction in the spider web representing that specific targeted color in the photo. Clicking on that point and dragging it will obviously change the color, but what you don't expect is how smoothly and beautifully it does it. Due to the structure of the mesh, when you move a point, it effects all the surrounding points, but proportionally and unless you push the limits too far, the color shift is smooth.
A Visual Program for the Visual Minded
As the video goes on to explain, for many programs, you almost have to have a scientific mind to operate some of their more complex and beneficial functions, however, as Pratik points out, this program simplifies that, and narrows it down to clicking on the color or colors that you want to modify and moving them until they meet the vision or look that you're wanting to attain. That fact alone coupled with all the additional features that are provided to allow you to modify the colors, all of which are manipulated through visual means, all results in an easy to use and purely artistic program that allows for beautiful coloring of photos. Check out the video and what Pratik has to say, is this a program that you would be interested in using?


Join the Fstoppers community for free
-
Post comments and join in the discussions
-
Browse the site ad-free
-
Share your work and get featured in the community
-
Compete in the photo contests for fun and prizes
12 Comments
That looks cool!
Been using LUTs for a long time, got a few I inherited from video production to use in Photoshop and creating a LUT adjustment layer is a great way to get a distinct and easily reproducible 'look' quickly without a lot of the processing overheads. The main problem is the lack of being being able to preview the changes before application so you can end up wasting a lot of time guessing if it's going to work or not.
Working mostly in video, it's kind of funny to see someone gaga over this way of manipulating colors
Because Adobe couldn't be arsed with something useful for photography anymore. Guess you haven't seen or noticed that Photoshop is for creating websites and editing short video clips these days. /s
Gawd forbid hiring one missing dev to reach 12,500* to task with creating 3D LUTs or re-imagining color manipulation on this scale within PS.
* According to Wiki: Employees = 12,499 Q2 2015 - I wonder if they need to keep that number below 12,500... or superstitiously worse 13,000 for some reason(?)
Haha I hear ya there. It's baffled me for a while now why Adobe hasn't done more crossover-esque things like this considering they have both photo and video apps. So often I find myself saying "I wish I could edit this photo the way I color a video" and opposite, but it's probably a hell of a lot more complicated than I imagine
The things you can do with LUT adjustments are amazing. Can't wait to try this
Woohoo, thank you Ryan! So glad you liked it!!
This is an interesting program. I am going to have to try this. Thanks for sharing!
I recently bought this program and paid for the pro version and have not received a confirmation email. I was however asked to enter my macbook pro computer ID to then get an activation code. Is this normal and is anyone else having trouble? I hope I haven't been scammed. Any thought Ryan?
I'm not affiliated with the company so I really couldn't answer this but I would suggest you reaching out to the company for help.
Try emailing their support to get your login details, the software is tied to your computer ID, you need to enter this for them to generate a keyed version of the software for you to download.
When you download and run the program it will display the computer ID for you to enter to get your activation key. It took me a while and some trial and error to figure that out.